Learn by Playing
Armored Stars includes gameplay mechanics that may be tricky for newcomers. These tutorial scenarios will help ease players into the fundamentals, introducing new rules and concepts one step at a time. The game is modular in complexity, so feel free to pause at the marked sections if you'd prefer to skip advanced rules like orbits and momentum for now.
--- --- --- --- --- --- ---
Scenario 1: Patrol Route
Simplified Movement and Combat
The Sol League Navy has no tolerance for smugglers and pirates during wartime. Patrol ships near the asteroid fields of Sol have orders to shoot-on-sight any ships that ignore hails or refuse inspections. Recover whatever cargo can be salvaged and return to New Anchorage Naval Station for further orders...
Setup: In this scenario, one or more players will take on the role of a smuggler piloting a single corvette-class ship. The remaining players will attempt to intercept the smuggler before they reach the opposite corner of the map.
To play this scenario, you will need the following minimum requirements:
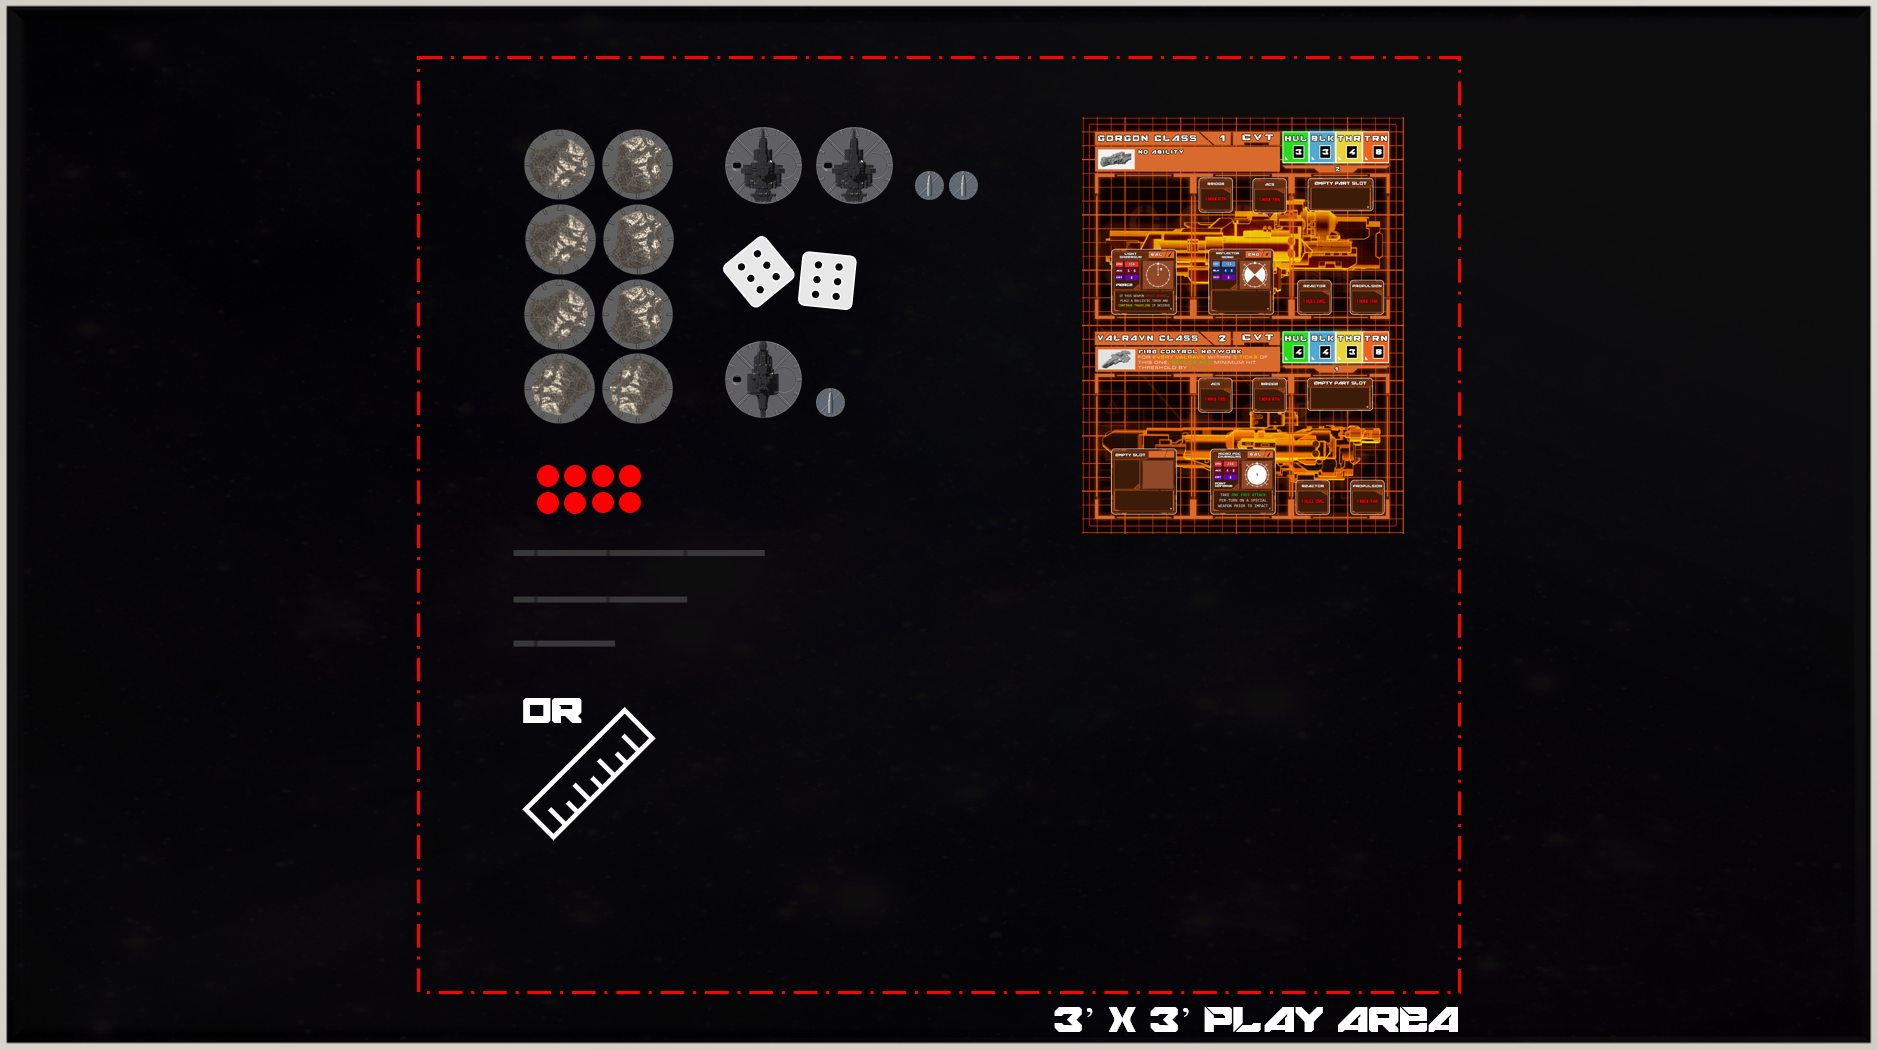
- 8 Asteroids (MAP_MDL_asteroid.stl)
- 8 Asteroid Baseplates (MAP_BP_asteroid.stl)
- 2 Six Sided Dice (MISC_d6.stl) or custom
- 8 Hull Tokens (MISC_TKN_hull.stl)
- 4 Border Markers (MAP_MDL_border.stl)
- 1", 2", 3", and 4" Rulers (MISC_tickruler_x.stl)
- 1 Ruler or Tape Measure instead
- 1 Ship Card per Player (SHP_CARD_SL_CVT)
- One sheet will have both Corvettes if you want to mix it up and go "off script"
- Player 1 (Smuggler)
- 1 Ship per player
- 1 Corvette Model (SHP_MDL_gorgon.stl)
- 1 Corvette Baseplate (SHP_BP_CVT.stl)
- Player 2 (Patrollers)
- 2 Ships per player
- 2 Corvette Models (SHP_MDL_valravn.stl)
- 2 Corvette Baseplates (SHP_BP_CVT.stl)
[MDL - Model BP - Baseplate TKN - Token SHP - Ship CVT - Corvette Class SL - Sol League Navy]
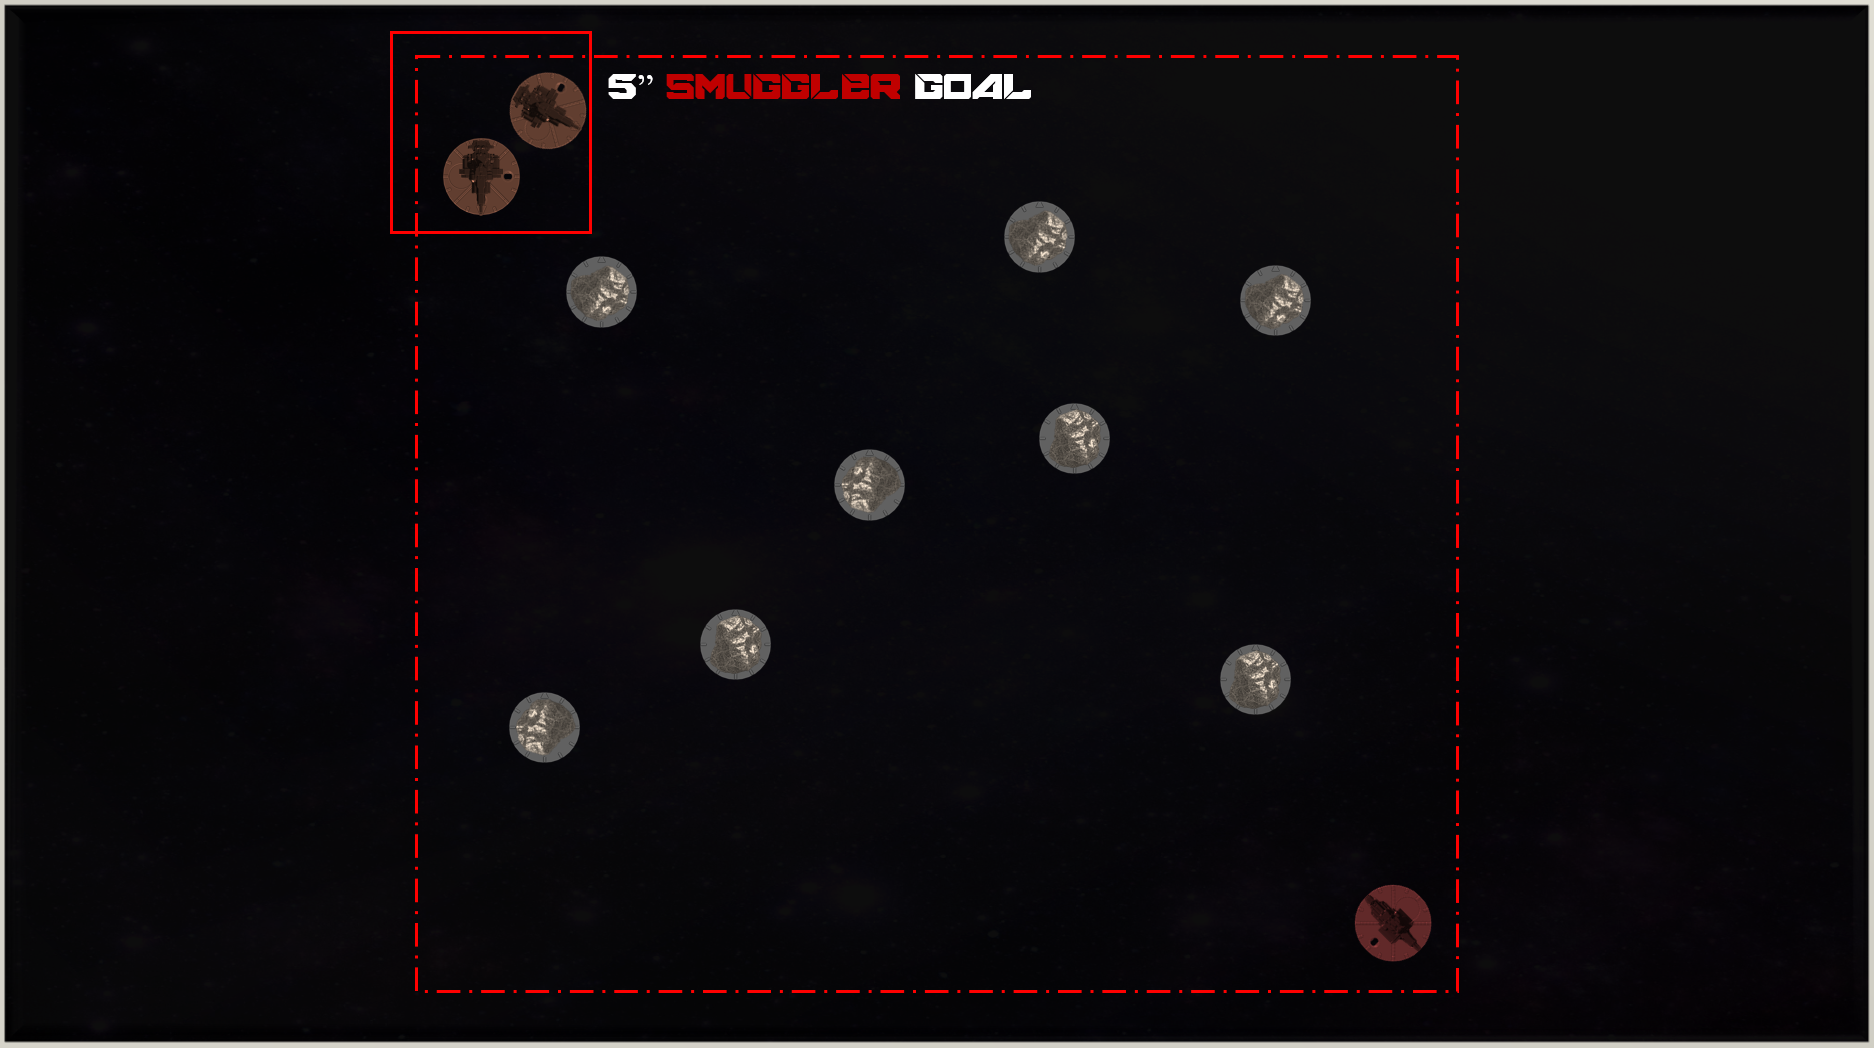
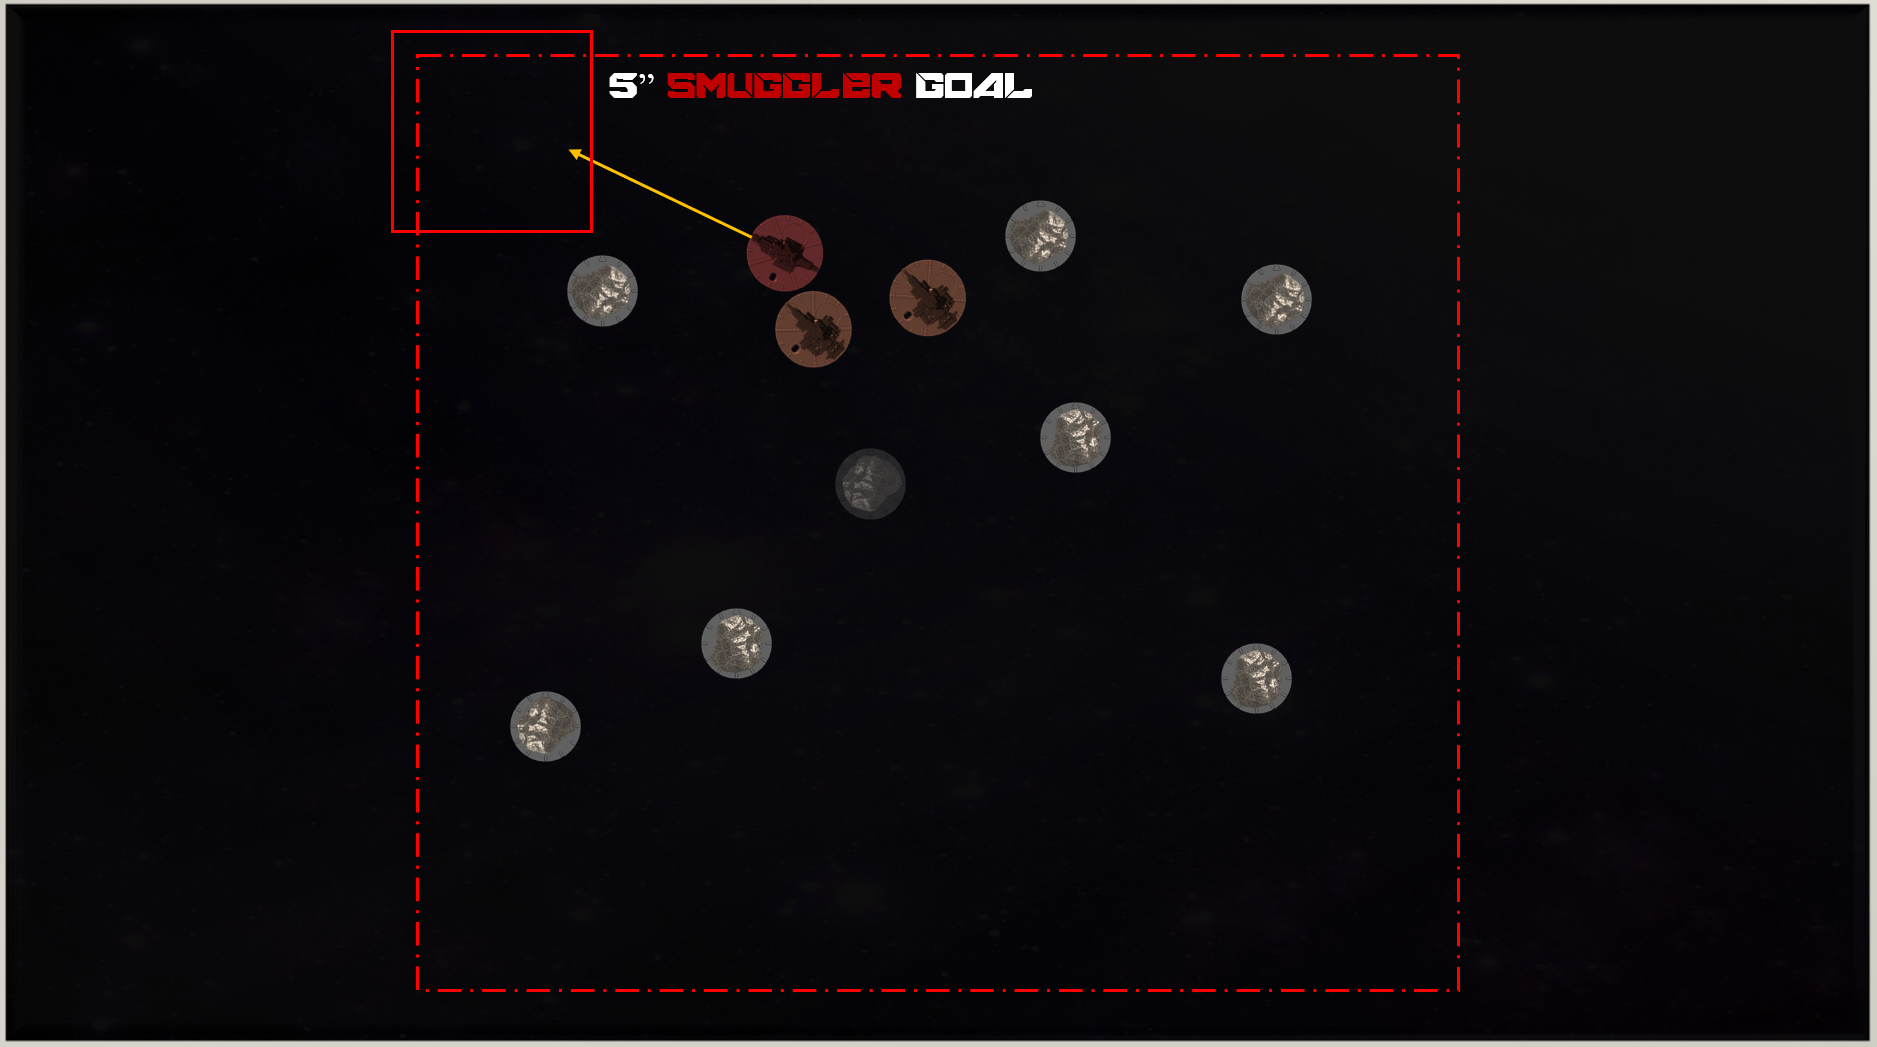
Map Building: Each player takes turns placing up to 8 asteroids randomly on the map. The goal for patrollers should be to create chokepoints and obstacles so the smuggler cannot make a clean straight burn to the exit. Asteroids cannot be placed within 1" of each other and must be at least 2" from the map’s edge.
Once the map is set, the smuggler chooses a corner and spawns up to 2" from the border, facing any direction. The patrol ships spawn in the opposite corner. In order to win, the smuggler must reach any point of the map border within 5 inches of the corner :
(The patrollers will not be able block the entire exit by staying put, they must intercept before its too late)
Mission: The patrol ships must intercept and destroy the smuggler using only the stock weapons on their ships. The smuggler’s ship is lightly armed and may fight back, but its primary objective is to reach the opposite end of the map where the patrol ships start.
[Starting]
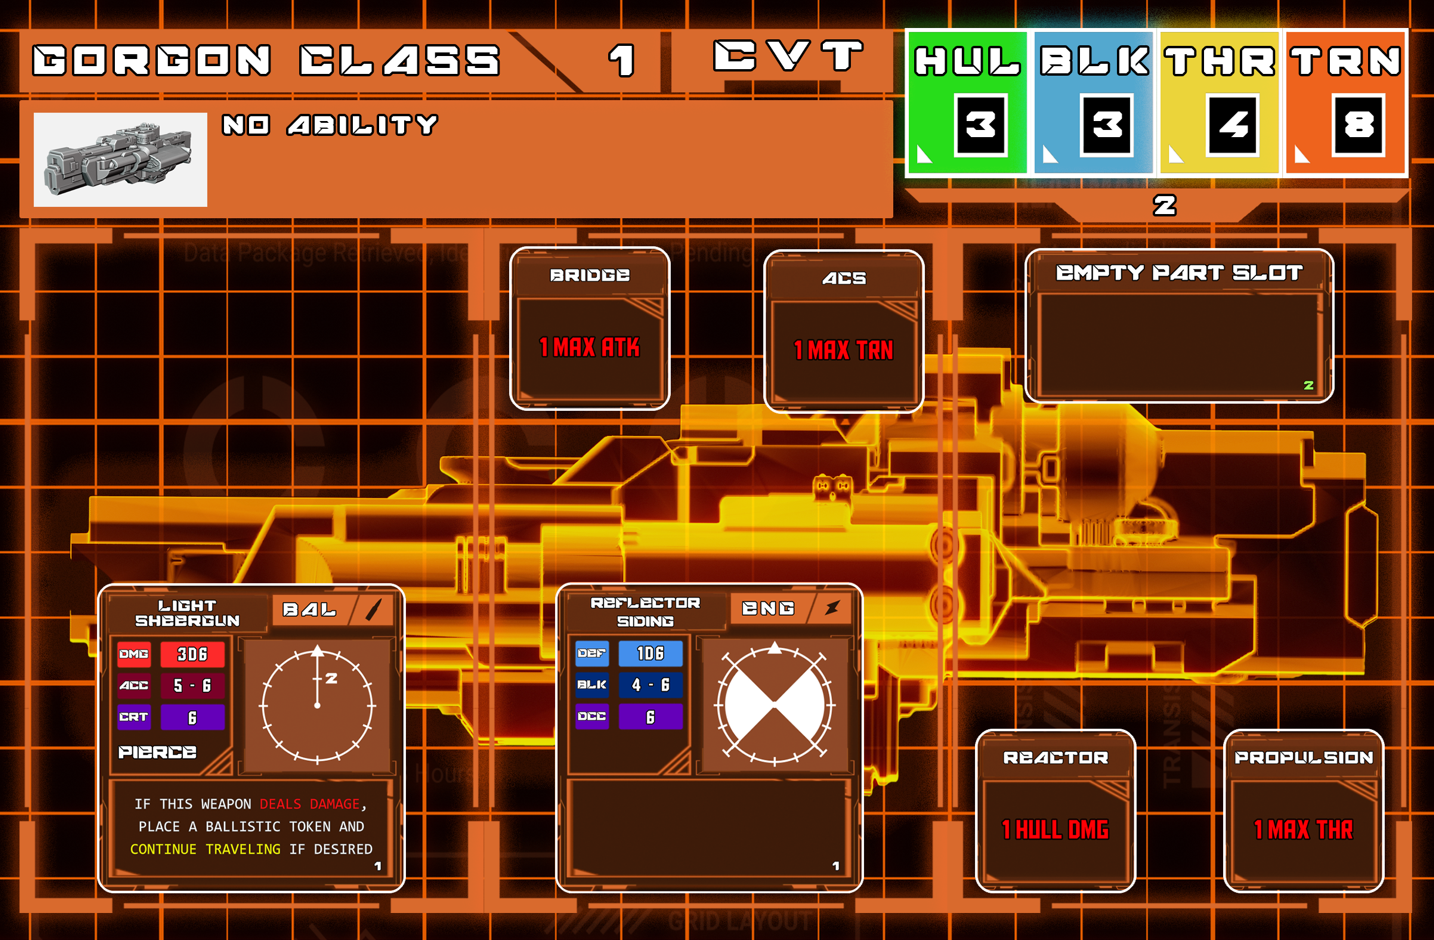
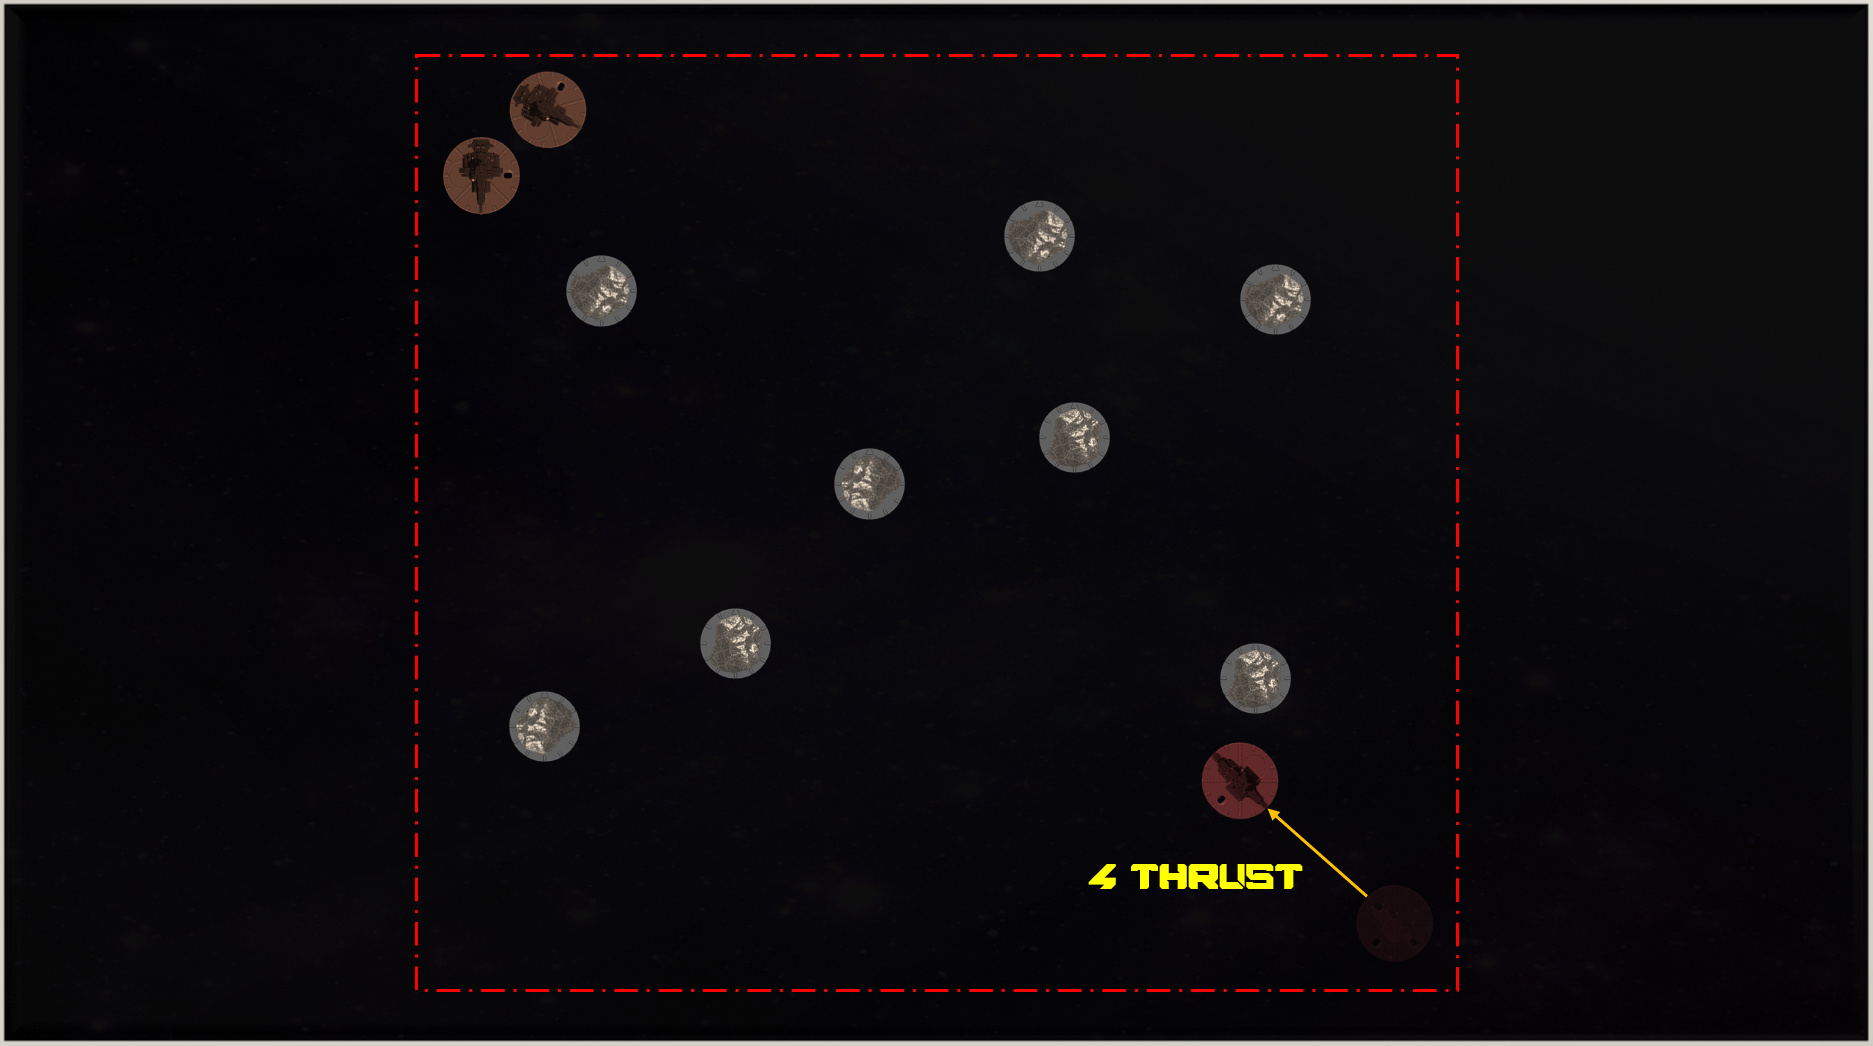
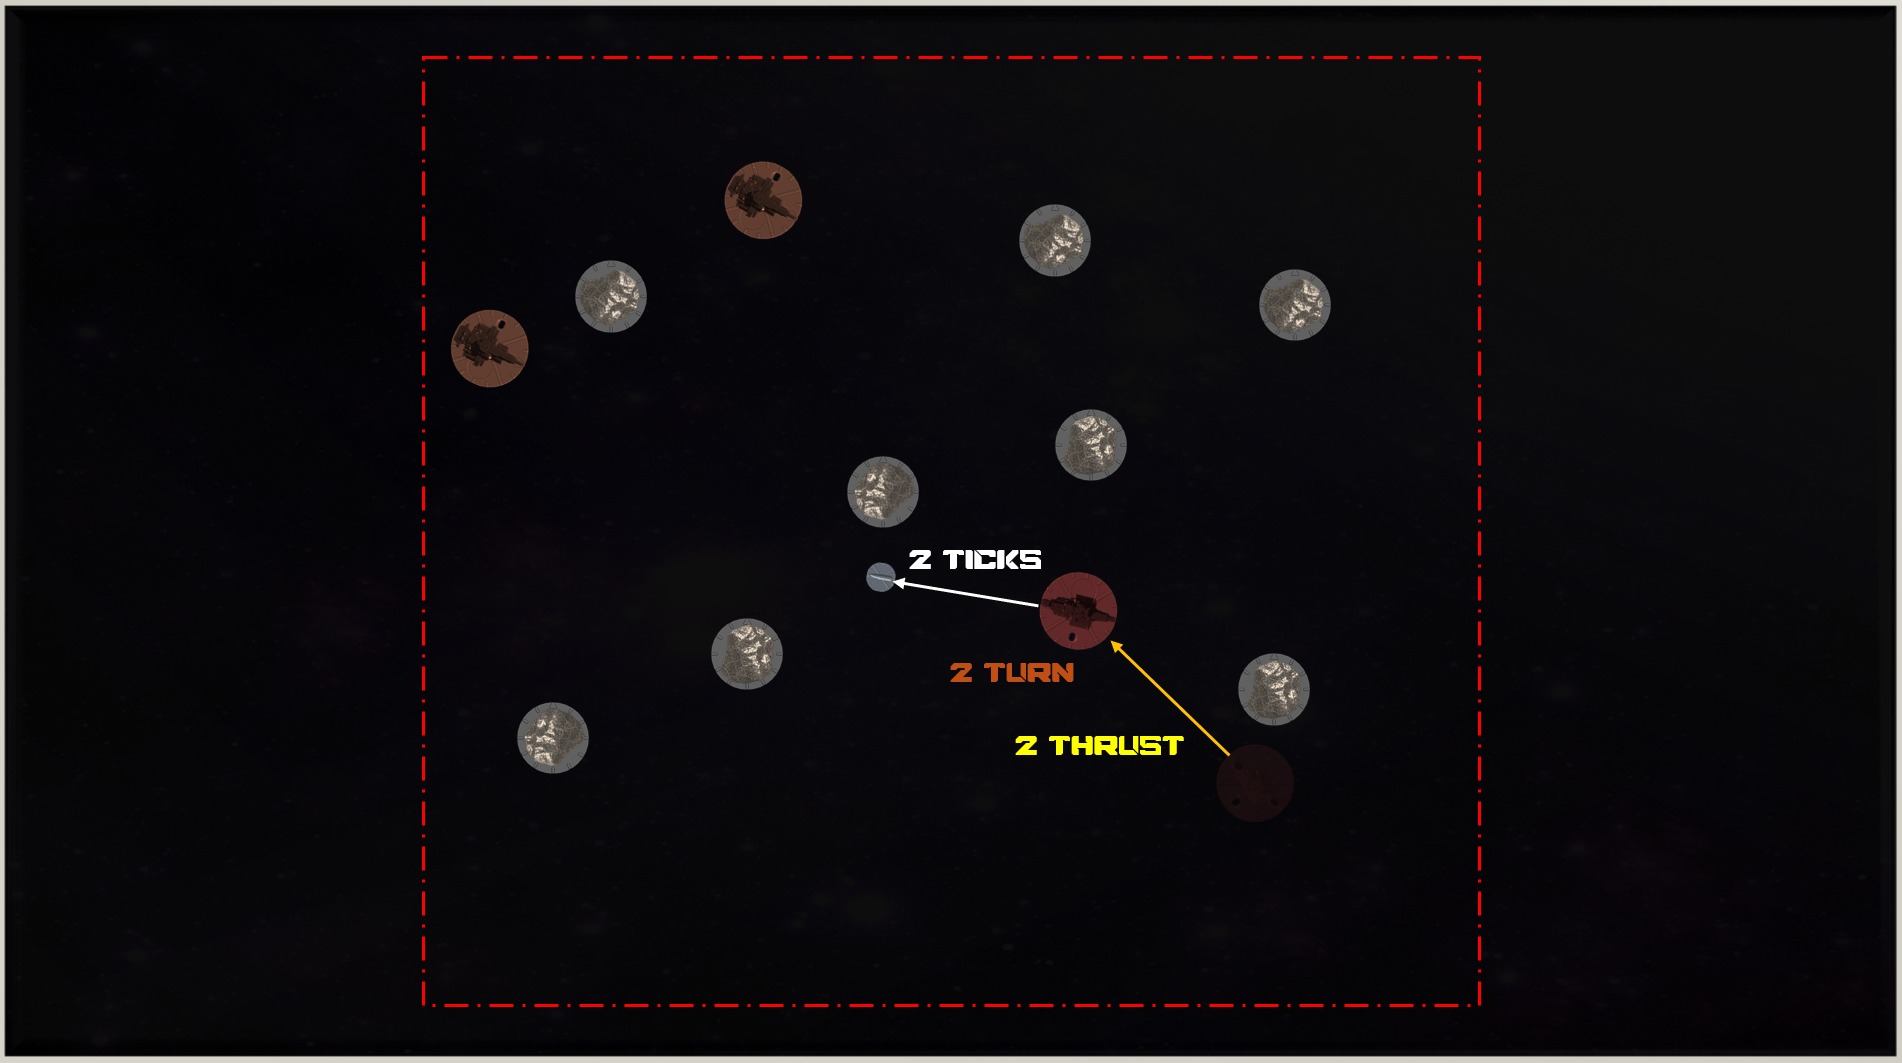
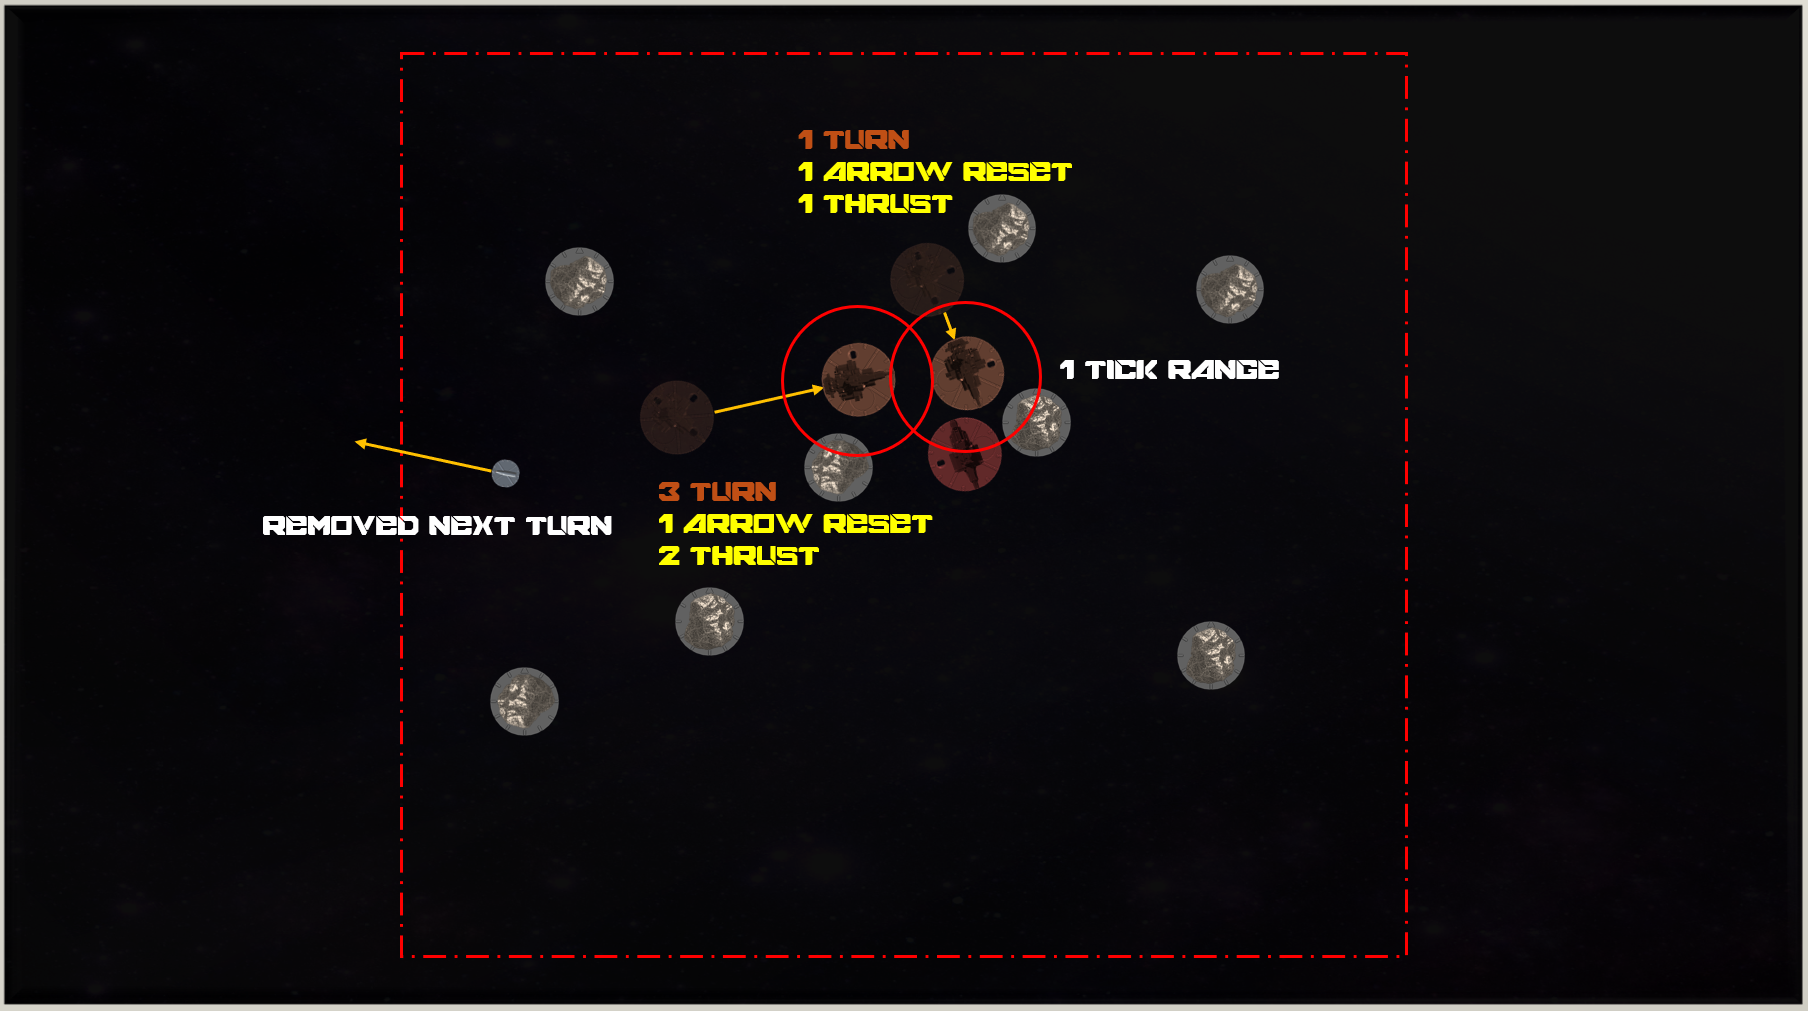
Turn 1 - Smuggler: The smuggler will go first. By looking at the ship card of the Gorgon Class Corvette, we see that it has 4 THRUST and 8 TURN. THRUST is used to move forward, TURN rotates on the baseplate. Before moving in a new direction, you must always spend 1 THRUST point to reset the baseplate arrow.
(Note: Rules for momentum-based movement will be added in a later scenario.)
In the example below, we see the ship rotating 2 Ticks then using 1 THRUST to actually change the direction of travel. Any future THRUST points spent will begin travel in this new direction:
f
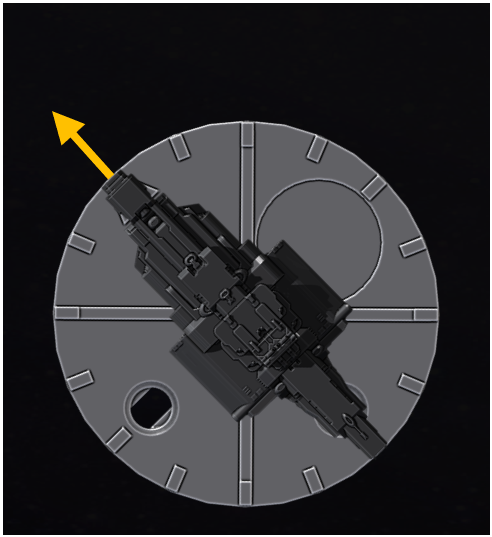
The smuggler in our example game will simply try to cover some ground, then react to the patrols movements.
[Moving and Turning]
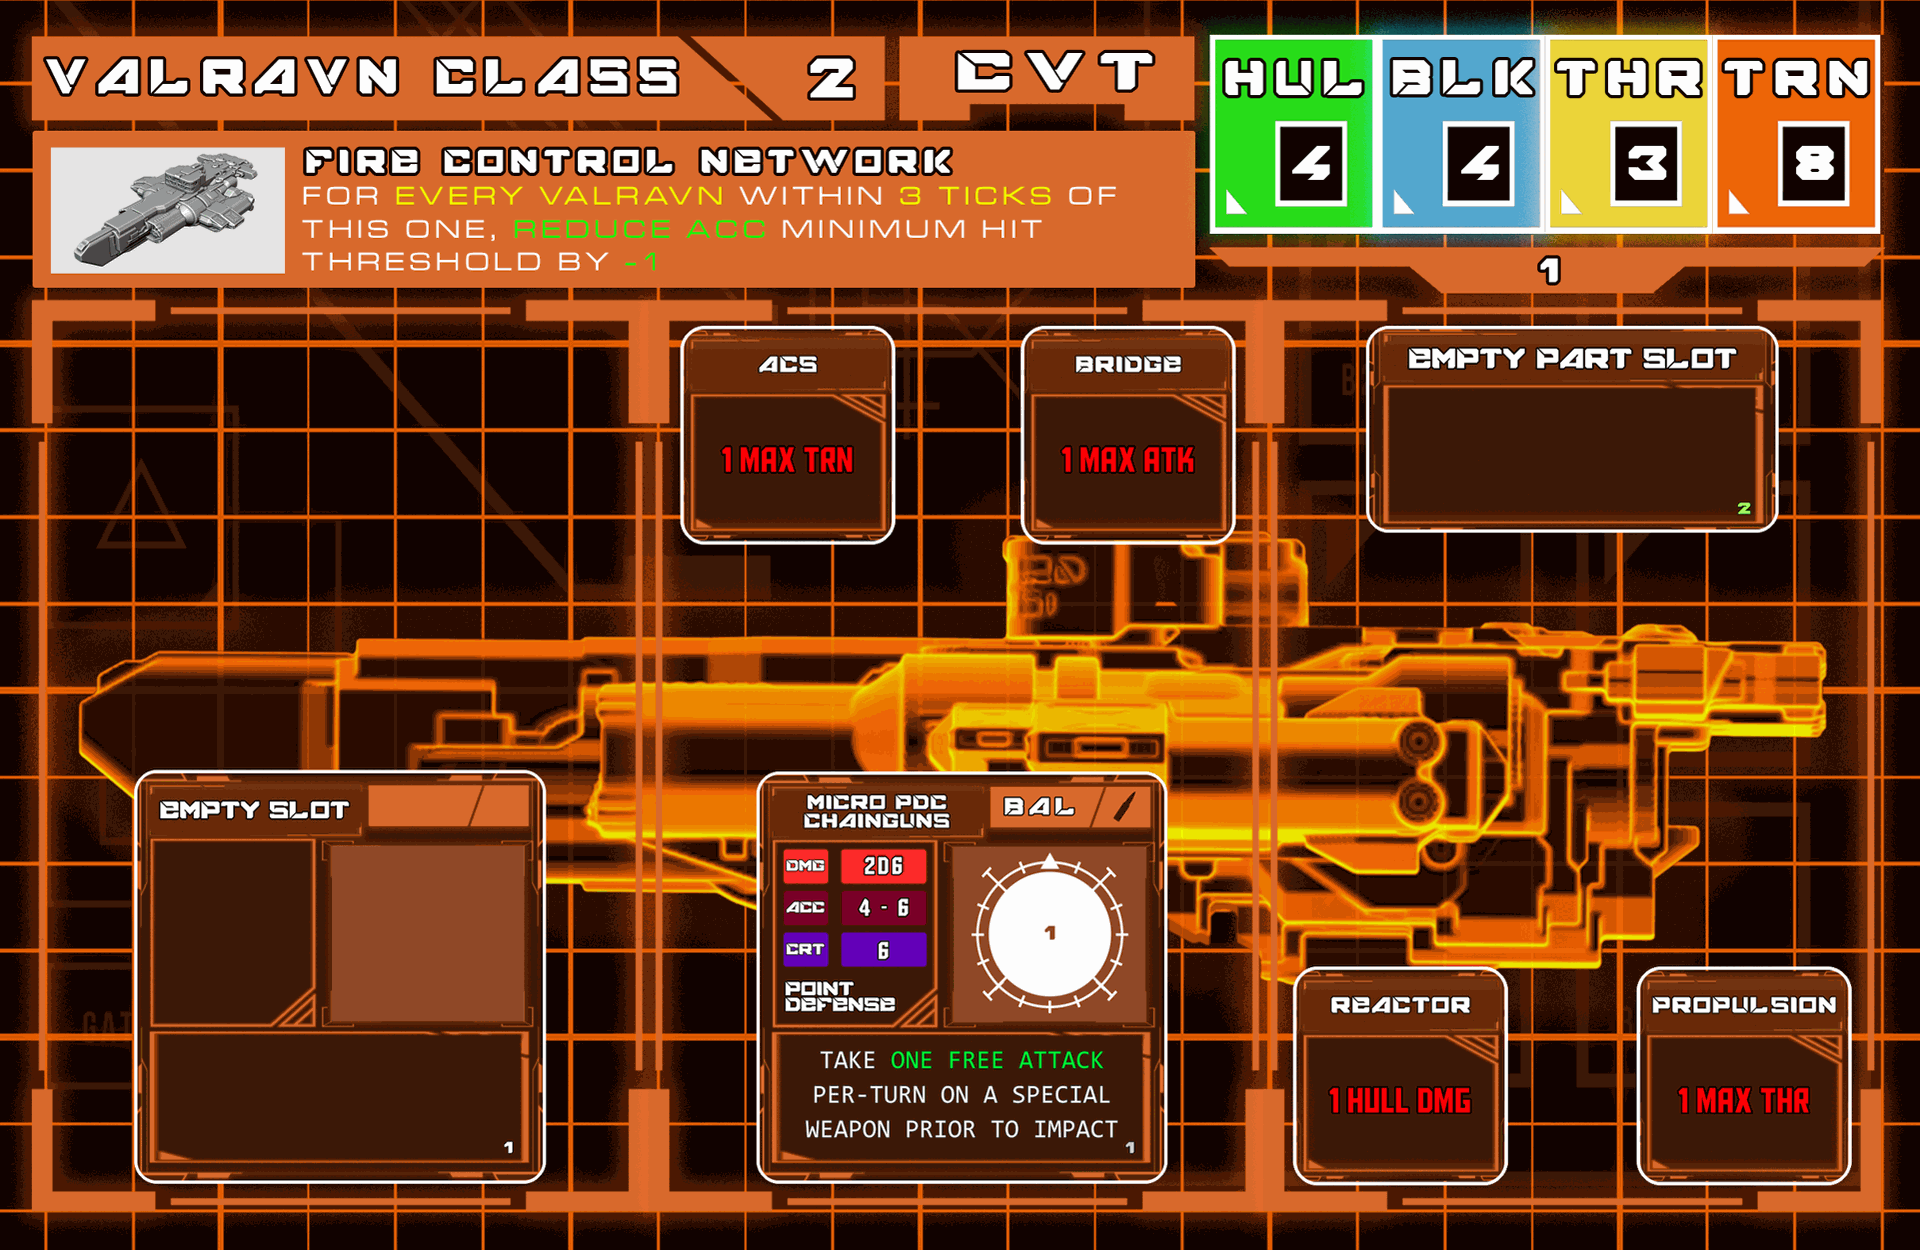
Turn 2 - Patrol: The patrollers will now react and move to close the distance. The Valravn Corvette is offensively weaker than the Gorgon with only close range, inaccurate PDCs with its default design. Despite this, they do have a special ability that might come in handy; the "Fire Control Network". Valravn's that stay within close proximity of each other can feed other Valravn's targeting data for more accurate shots.
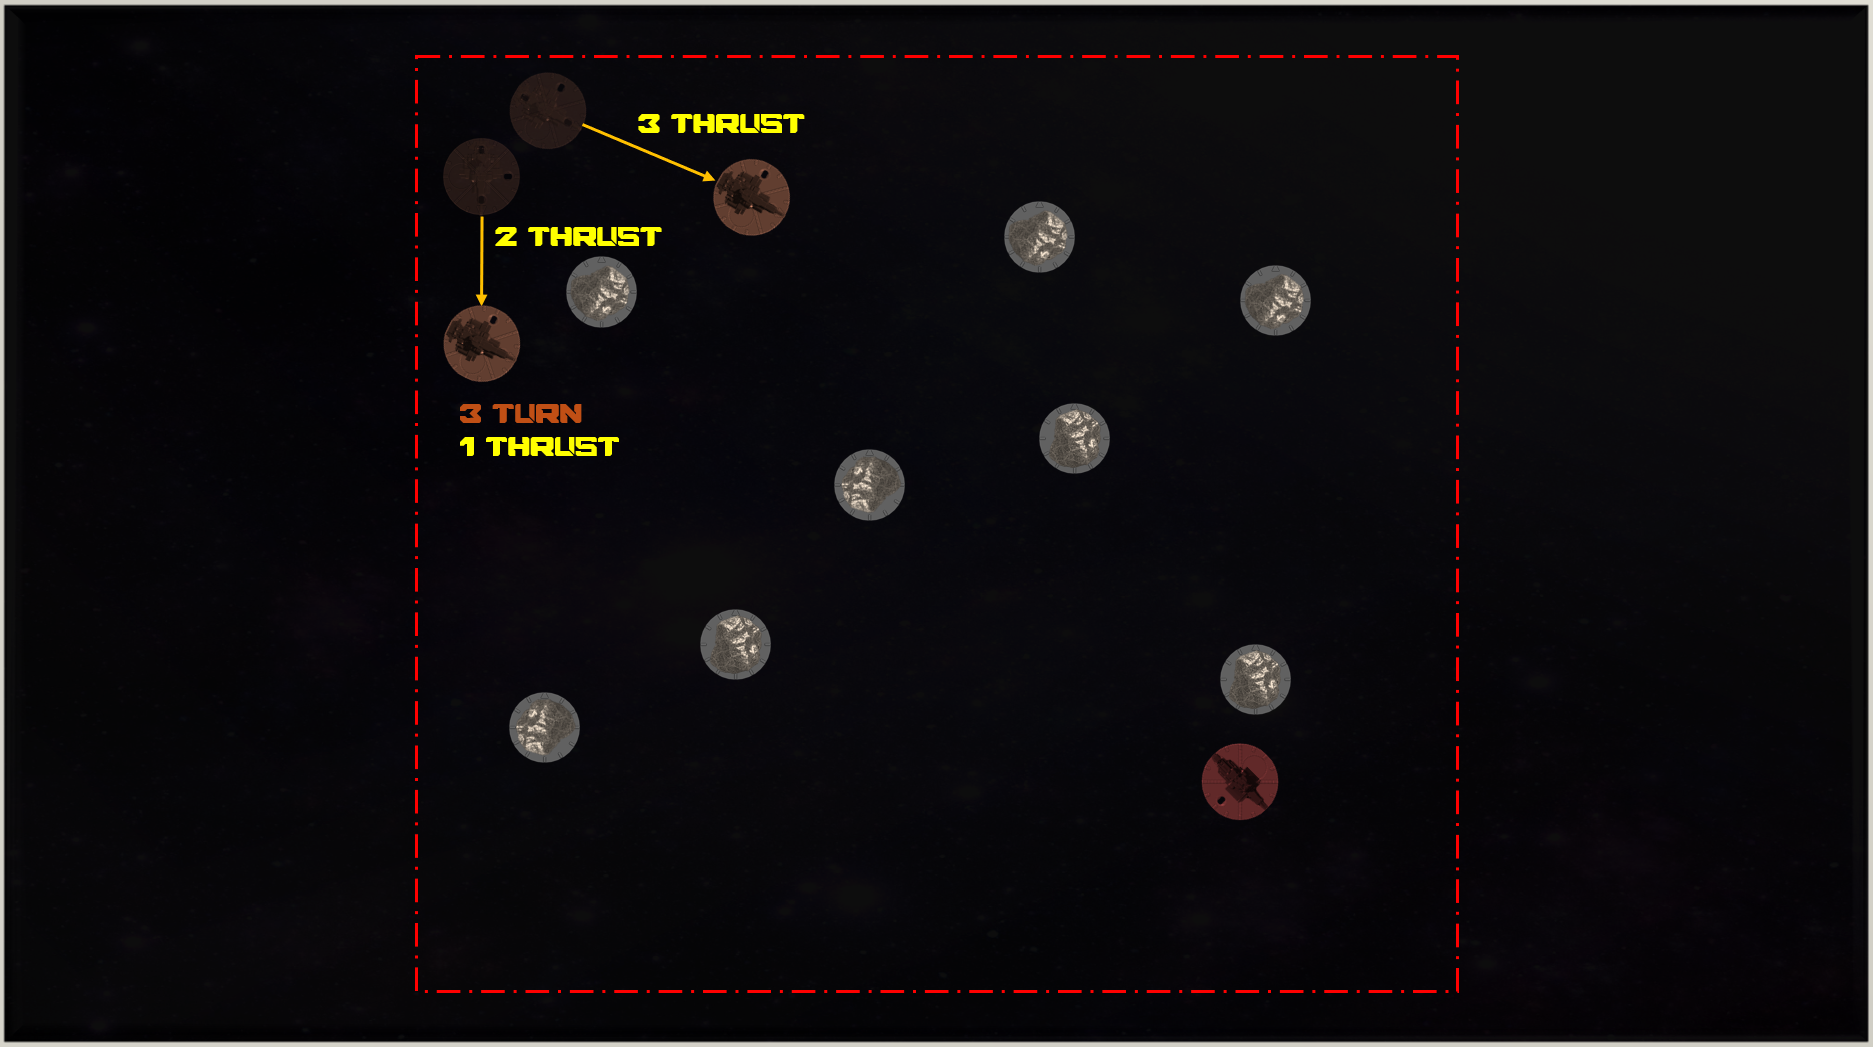
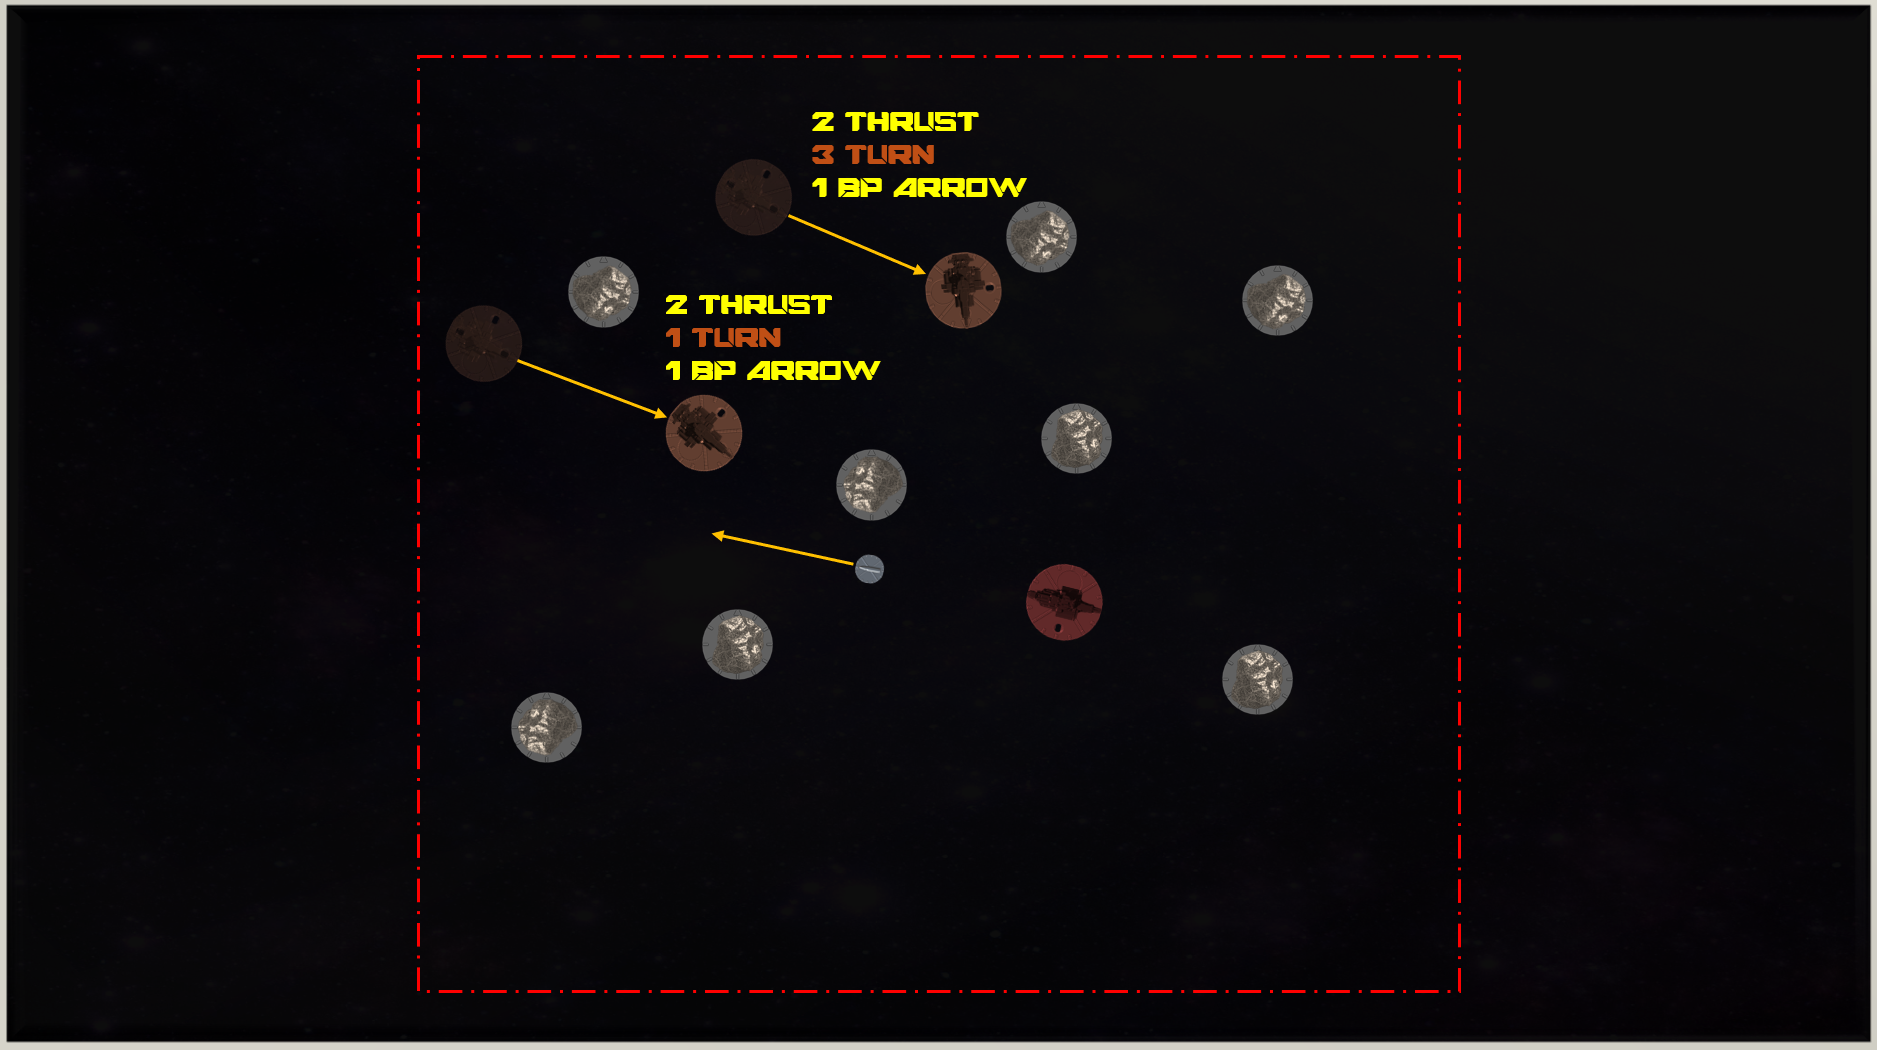
What the patrol will try to do is split slightly, then try to pincer the smuggler when they have a clearer idea of which way they will try to flee. One Valravn will TURN slightly after moving so we'll also only use 2 THRUST so we can change the direction of the baseplate arrow before the next turn.
[Long Range Shots]
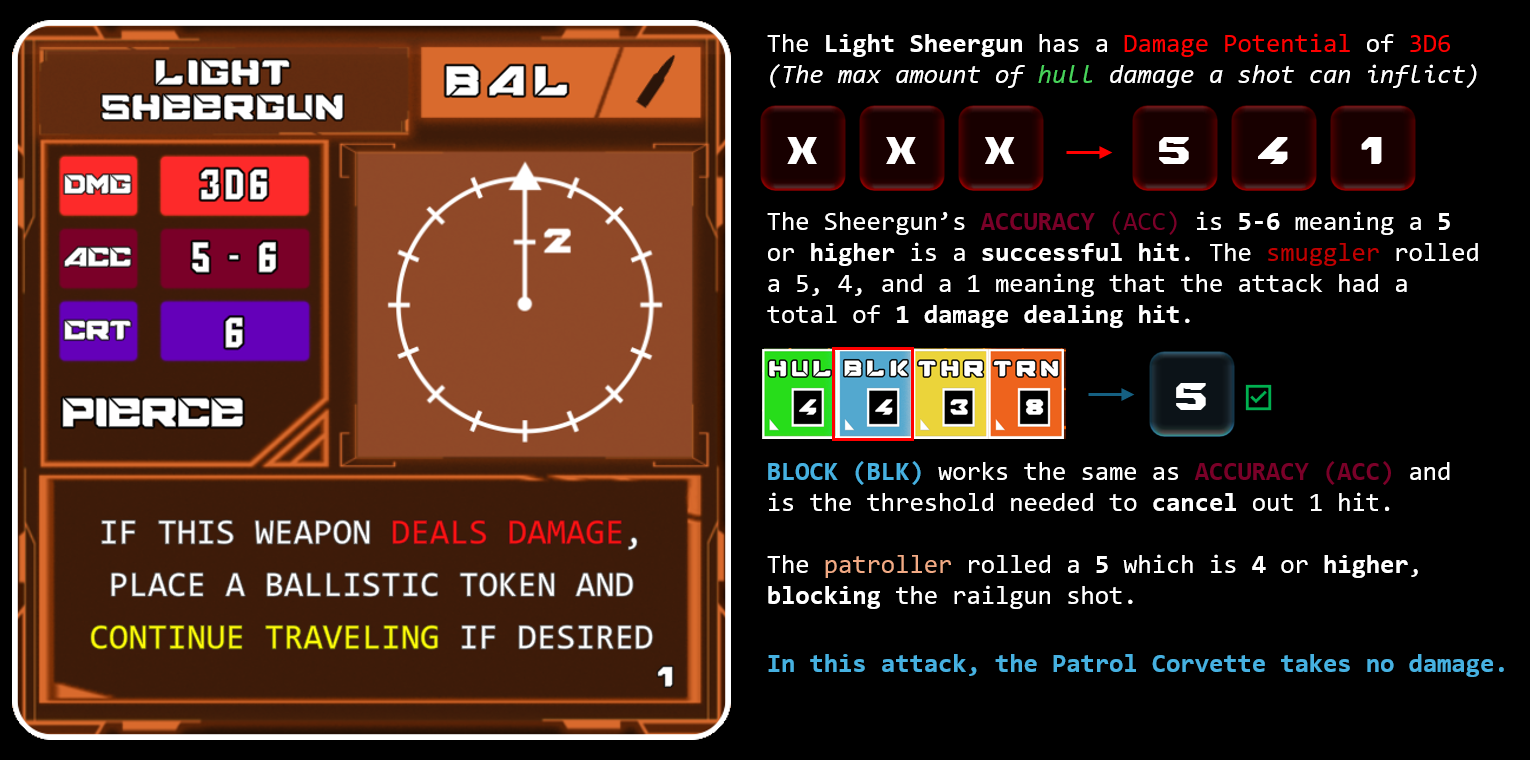
Turn 3 - Smuggler: The smuggler will now get a little aggressive. The main gun of the Gorgon (a light forward-mounted Sheergun ) can be seen on the ship card and is also shown below:
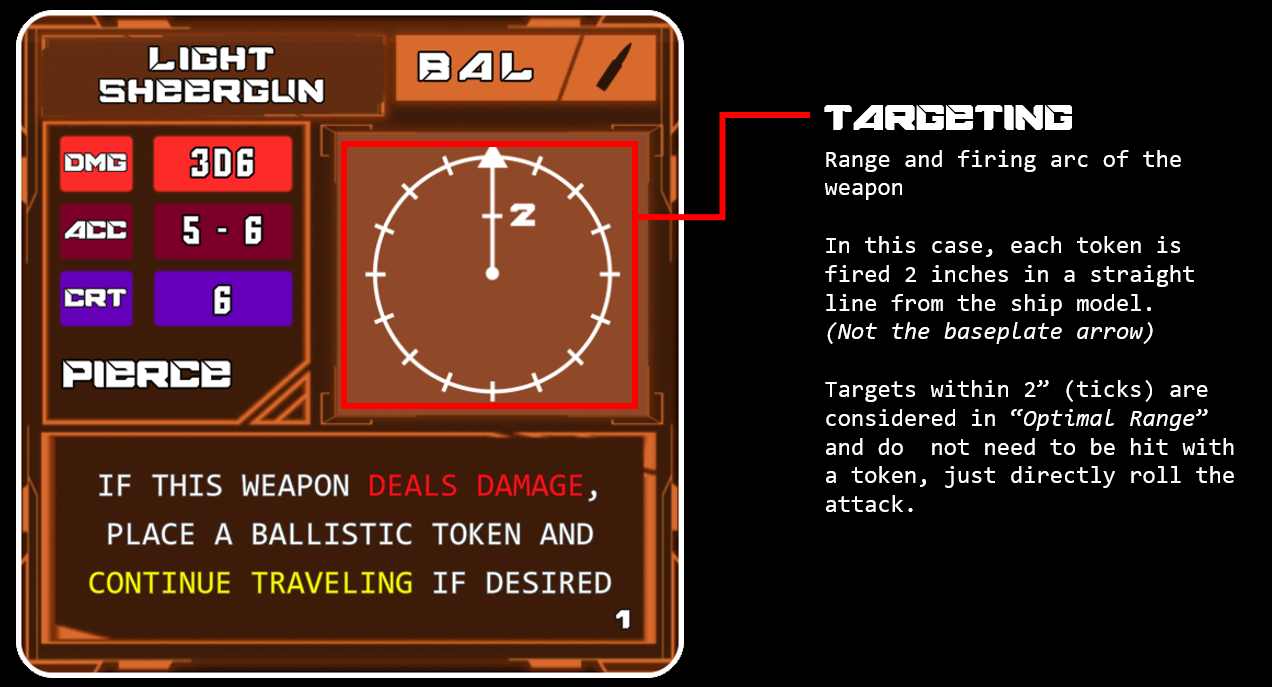
In Armored Stars, the vastness of space means many of your shots will be fired predicting the future location of the enemy, and often, never actually hitting. Even though landing long range shots is difficult, it can still be enough to force and enemy to evade your projectile salvos and leading them into less advantageous positioning.
The smuggler will move forward slightly in the example and fire a shot in between the two asteroids shown. The patrol ship can easily evade of course, but the travelling Sheergun Slugs mean that this chokepoint is now too dangerous to traverse and will likely provide some breathing room as the Valravn moves to avoid any chance to get hit.
[Changing Direction]
Turn 4 - Patrol: With the smuggler closing in, the patrollers will move forward and rotate into a better position to go on the attack soon. The smugglers "bullet" token will move again at its tick speed (2) on the targeting diagram at the start of the smugglers turn so at this rate it shouldn't be a threat to our patrol corvette.
[Direct Attacks and Defense]
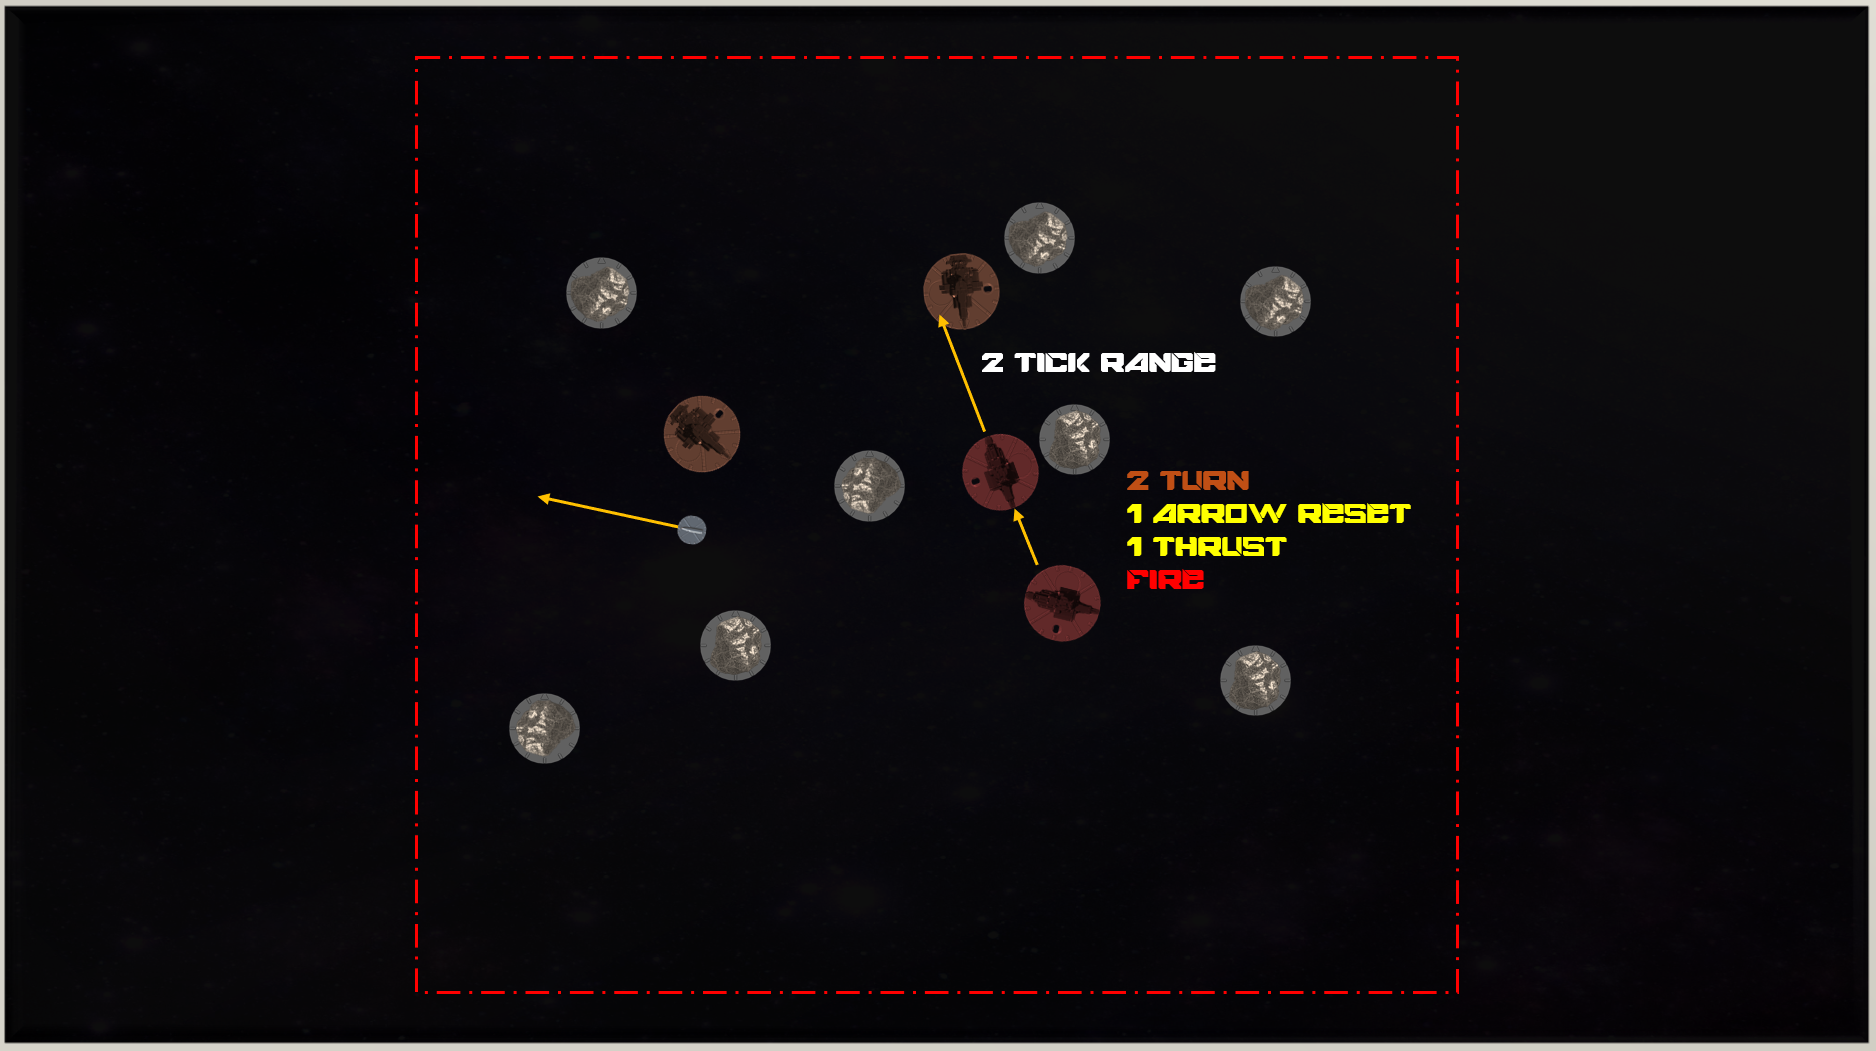
Turn 5 - Smuggler: The smuggler will rotate and move forward a little so that the enemy corvette will be in range to make a direct attack.
"Direct attack" means you get to roll the attack immediately without placing a traveling token.
*The projectile/targeting line has to make contact with the enemy ships baseplate to make an attack*
[Attacking with Bonuses]
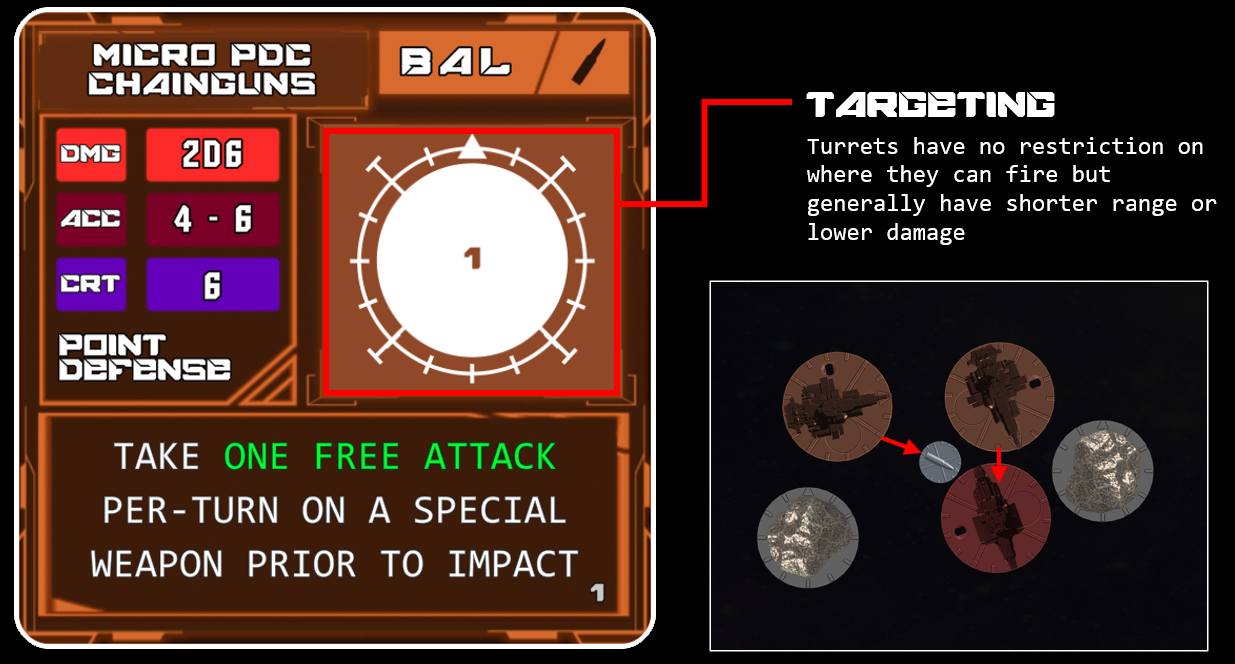
Turn 4 - Patrol: The patrol will now start to fight back by closing in and taking some PDC shots. PDC's are usually turrets meaning that they have the full radius around the ships baseplate to attack. Don't forget to also account for the accuracy bonus from the Valravn's being in proximity to each other.
The left ship isn't quite in range so it will fire the projectile token just close enough to trigger next turn if the smuggler decides to boost forward instead of turning around.
[Evading and Projectile Tokens]
Turn 5 - Smuggler: This isn't looking good! Turning around is an option but the Valravns would likely just catch up in a turn or so. Full Speed Ahead! This means taking the hit from that PDC salvo in our path but it might just be worth it to get closer to the escape route.
Evading is when one ship "jumps" over the baseplate of an object or ship in your way. The difference in size determines how many THRUST points it takes to "jump". Because these are all Corvettes, it only costs 1 point of THRUST to evade. After evading you simply place the ship immediately after the obstacle and subtract from your thrust total for that turn.
Be extremely careful in later games with these maneuvers, it is possible to evade over a ship and then have momentum just carry them into you for a collision anyways.
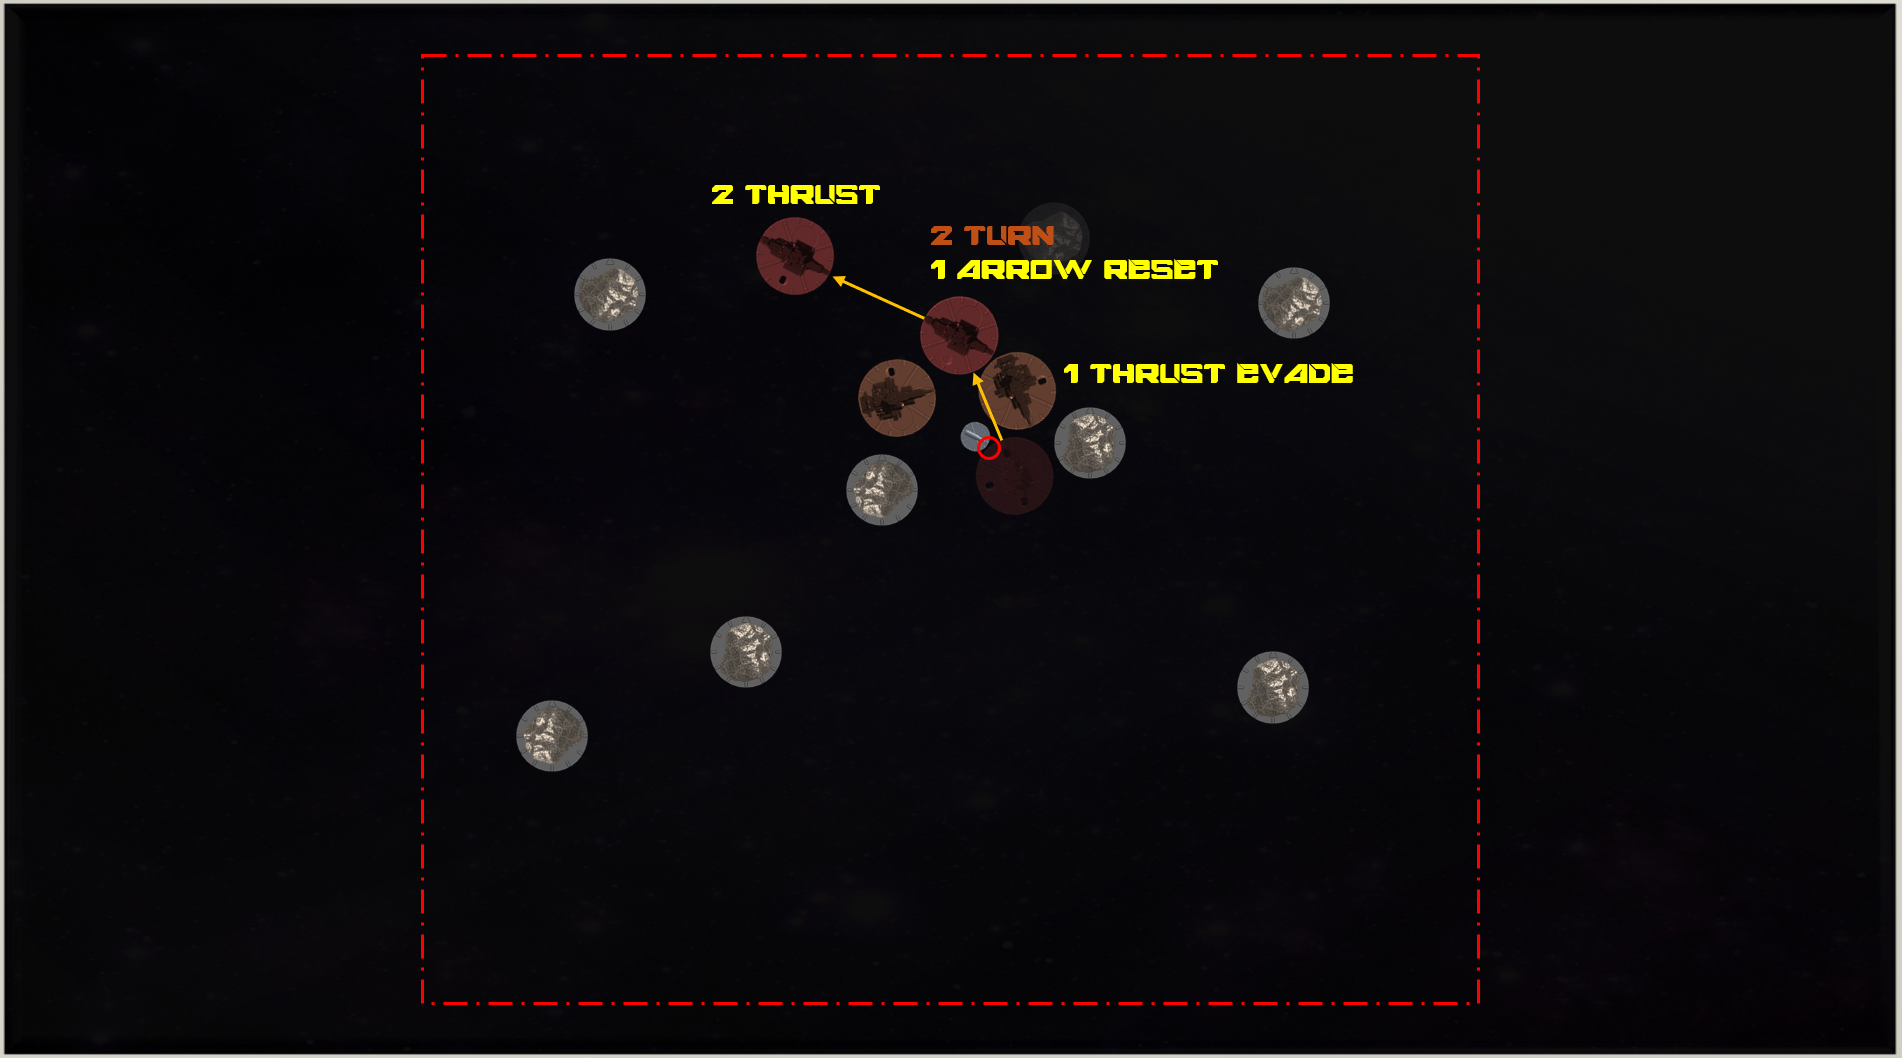
Since we collided with that projectile (Projectiles and Special Weapons CANNOT be evaded like ships and asteroids) we need to resolve the attack as if it was made directly which is a 2D6 DMG attack versus the Gorgon's 1D6 DEF.
The Smuggler's Gorgon Corvette now only has 1 HULL point remaining, if it takes another shot he's done for but now he's also only 1 turn away from the escape route!
[Last Chance to Attack]
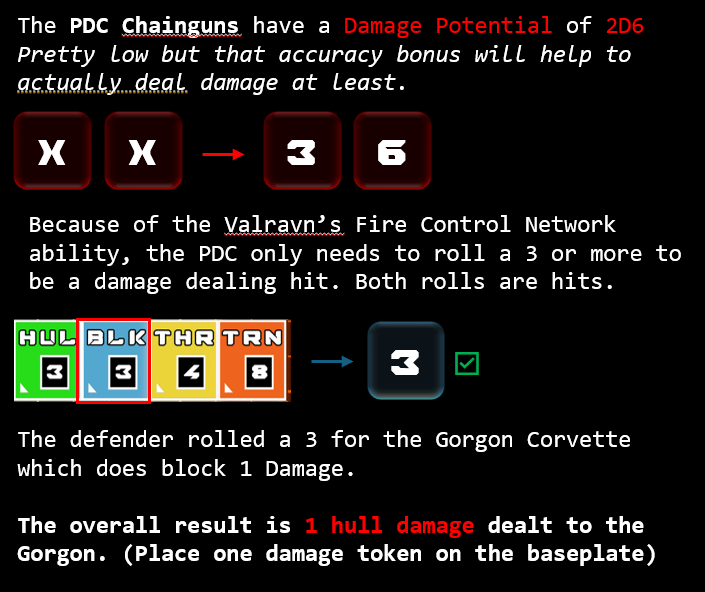
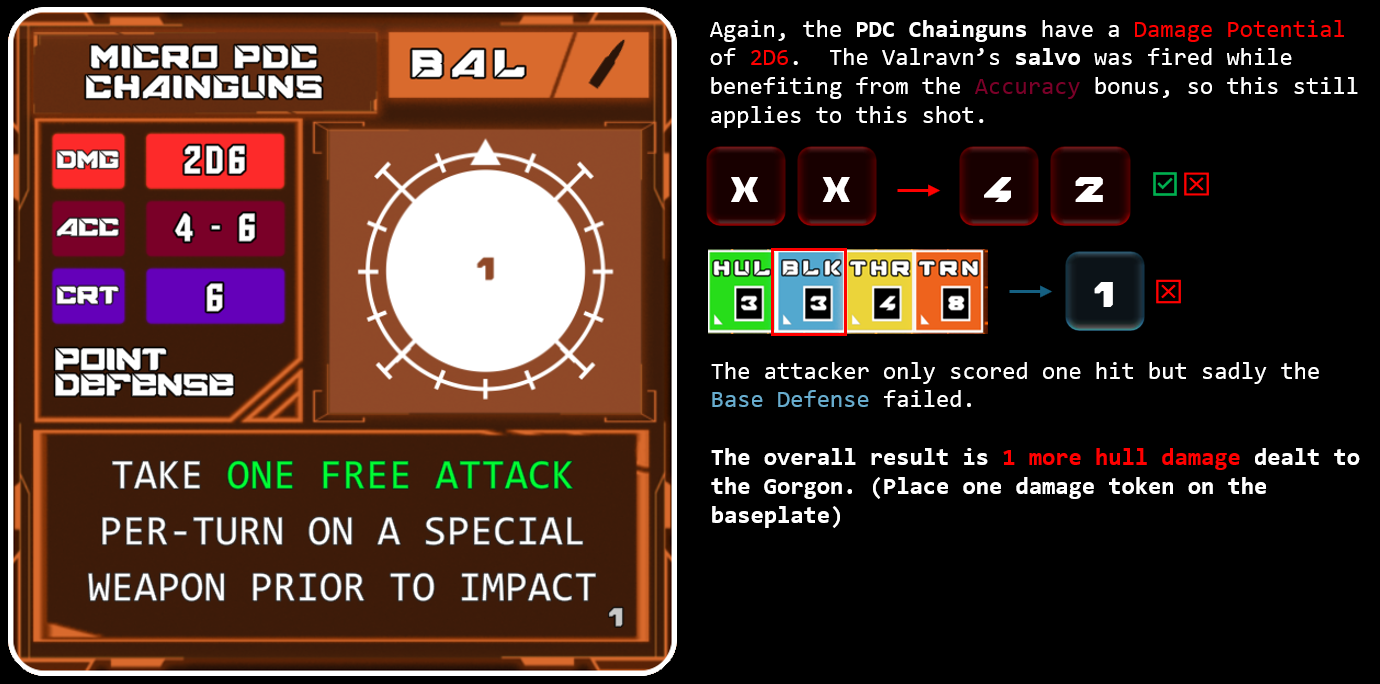
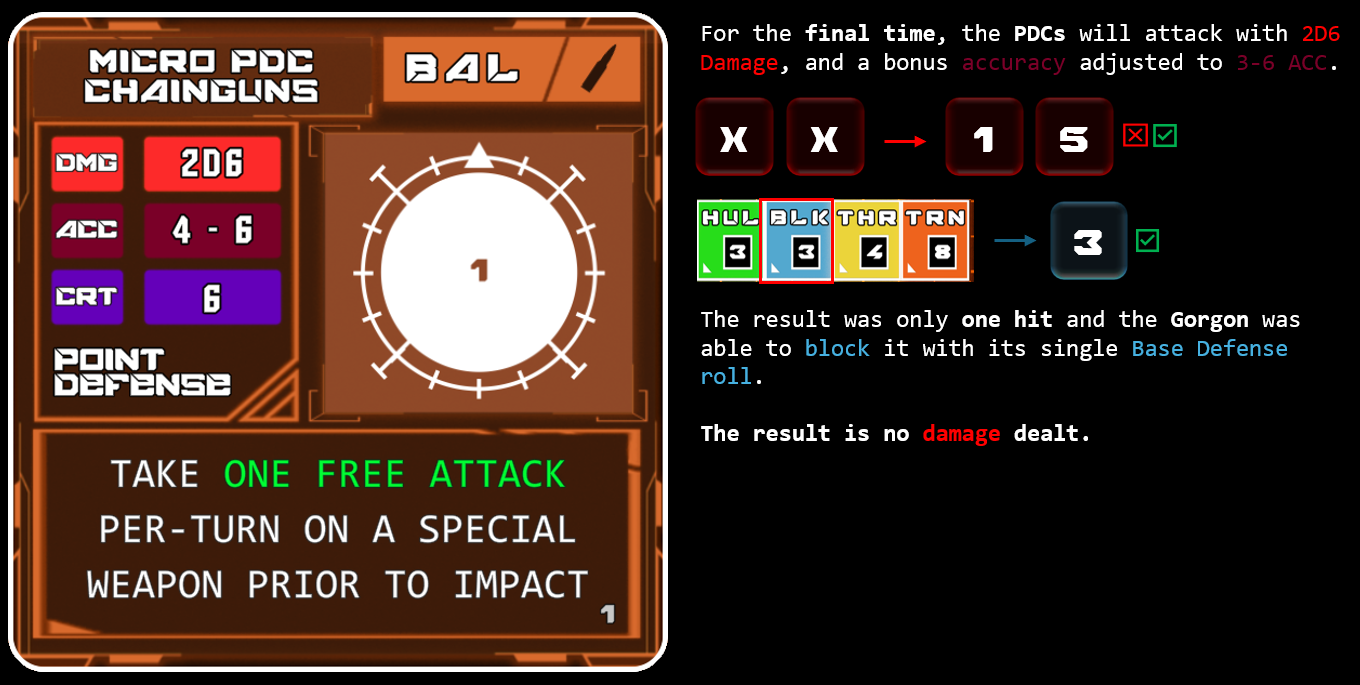
Turn 6 - Patrol: The patrol is going to turn around and try to take their last shots before the smuggler can outrun them. Unfortunately for the patrollers, only one could get into PDC range but at least the other can provide its targeting assistance (They only need one hit to finish off the Gorgon).

The Valravn attacks with its PDC Cannons again:
[Conclusion]
Turn 7 - Smuggler: The smuggler now has just enough THRUST for a full burn into the 5" escape zone. With one HULL point left this was pretty close but Valravns are defensive ships in nature and the Gorgan Corvette is a little faster, making it great for hit and runs (or smuggling).
If you would like to mix things up and try again, try giving the patrollers a Gorgan and see how things play out.
This concludes the first scenario. Play again until you are comfortable with measuring out movement and attacks with the tick ruler printouts (or a ruler/measuring tape). When you are ready to move on, the next scenario will add in some special weapons like missiles and torpedoes.
Scenario 2: Assault on Callisto
Special Weapons and Introduction to Momentum (Simplified)
Earth and Mars are well protected but the same can't be said for many of the planetoids past the asteroid belt. One player will take a small Squadron of Basilisk Missile Frigates or Patrol Corvettes to eliminate a pirate base operating near Jupiter's moon, Callisto. The pirates will be entrenched, have a defensive advantage, and be fitted with close-range weapons; effective use of missiles will be critical to rooting them out of Callisto.
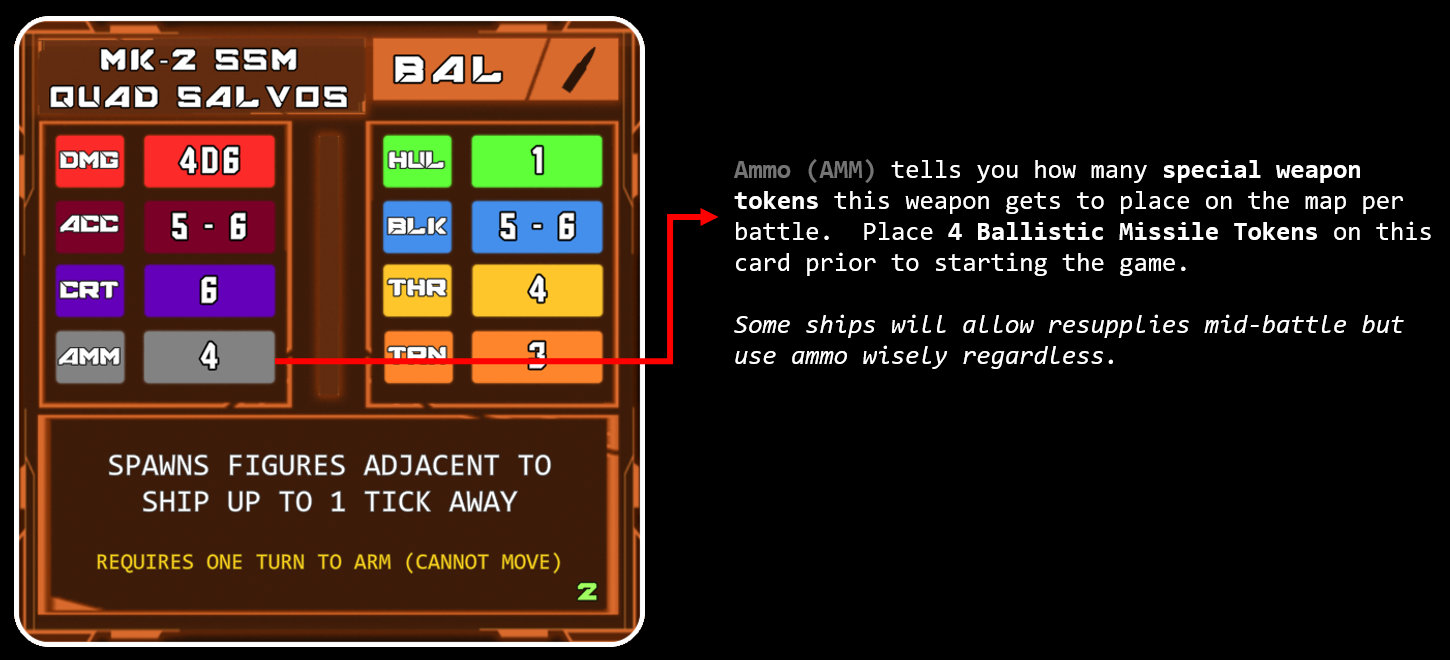
This scenario showcases the most common types of special weapons: Ballistic Missiles and Energy Torpedoes. In addition to new weapons, the momentum gameplay mechanic will be introduced in a very simplified form.
Setup: In this scenario, one player will take control of a Sol League Navy Patrol and attempt to eliminate all other players (pirate players split between points evenly). The pirates have the advantage of setting up the map, but, the attacking Sol League player has the benefit of choosing which corner to start in.
In addition to the items printed out for the last scenario, this one will introduce the Frigate warship classes (cards, models, and baseplates), as well as their special weapon tokens. For the environment, you will also need a moon and its baseplate.
Map
- 8 Asteroids (MAP_MDL_asteroid.stl)
- 8 Asteroid Baseplates (MAP_BP_asteroid.stl)
- 1 Moon (MAP_MDL_moon.stl)
- 1 Moon Baseplate (MAP_BP_moon.stl)
- 4 Border Markers (MAP_MDL_border.stl)
Incidentals
- 4 Six Sided Dice (MISC_d6.stl) or custom
- 8 Hull Tokens (MISC_TKN_hull.stl)
- 8 Ballistic Missile Tokens (MISC_TKN_missile.stl)
- 8 Energy Torpedo Tokes (MISC_TKN_torpedo.stl)
- 8 Ballistic and Energy Projectile Tokens (MISC_TKN_ballistic/energy.stl)
- 1", 2", 3", and 4" Rulers (MISC_tickruler_x.stl)
- 1 Ruler or Tape Measure instead
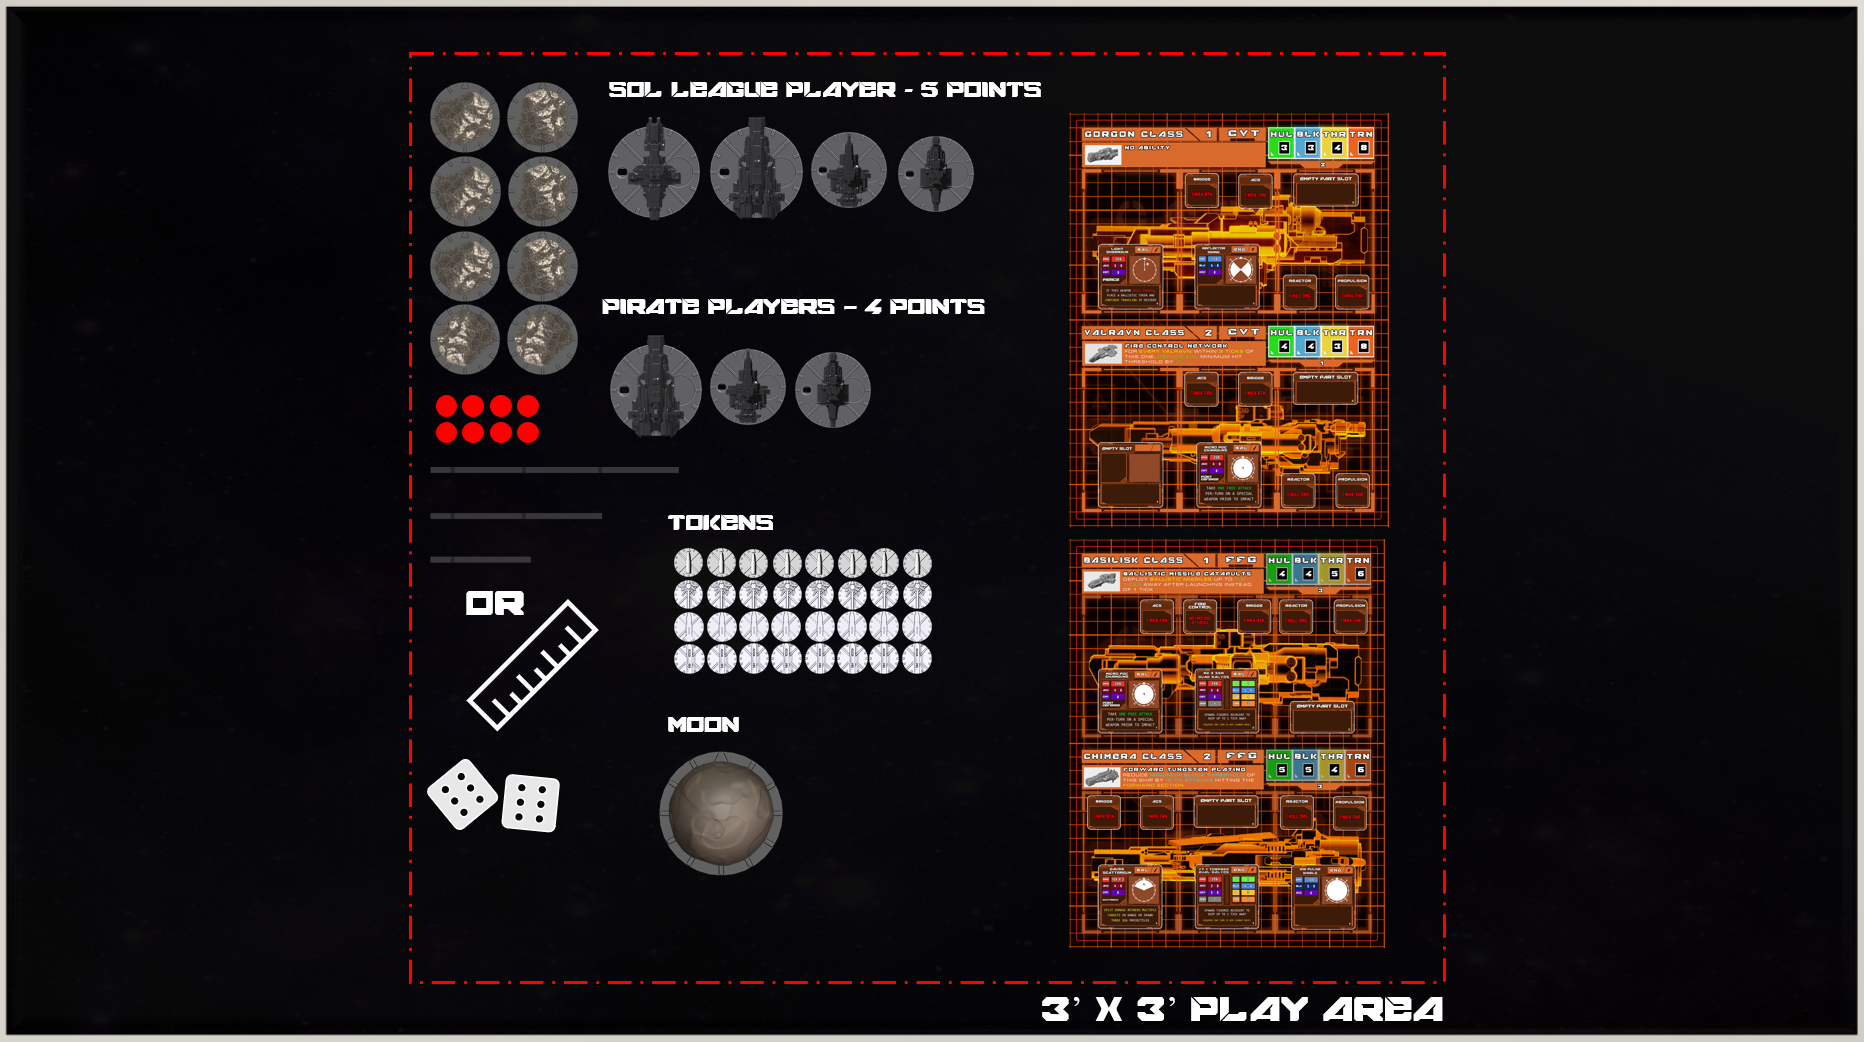
Fleets
- 1 Ship Card per Player (SHP_CARD_SL_CVT and SHP_CARD_SL_FFG)
- Player 1 (Pirates)
- 4 Points split between players
- Draft total points between the following choices:
- Chimera Frigate
- Valravn Corvette
- Gorgon Corvette
- Player 2 (Sol League Navy)
- 5 Points
- Draft total points between the following choices:
- Basilisk Frigate
- Chimera Frigate
- Valravn Corvette
- Gorgon Corvette
Drafting: Unlike the last scenario, we will be spending points to assemble a fleet instead of using a predefined one. Split your points however you like but if you would still like a template to follow, the fleets below are generally pretty well balanced.
(These point values will generally allow you to field either all Corvettes or a single Frigate with support)
Pirate Chimeras: 1 Chimera Frigate, 1 Valravn
Sol League Strike Group: 1 Basilisk Frigate, 1 Gorgon Corvette
After choosing your ships make sure they are loaded with the missile or torpedoe tokens given by their weapon cards:
Map Building: In this scenario, the Defender (the pirates) builds the map into a defensible position. Place the Moon at the center of the map. The defenders may place the asteroids anywhere they choose, as long as each asteroid is at least 2" away from any other asteroid. The defenders may place their ships anywhere within 4" of the Moon.
Once the map is set, the pirates may place their ships anywhere within 6" of the moon in the center. Keep in mind the Sol League Patrol can start at any corner of the map so position yourself to adapt.
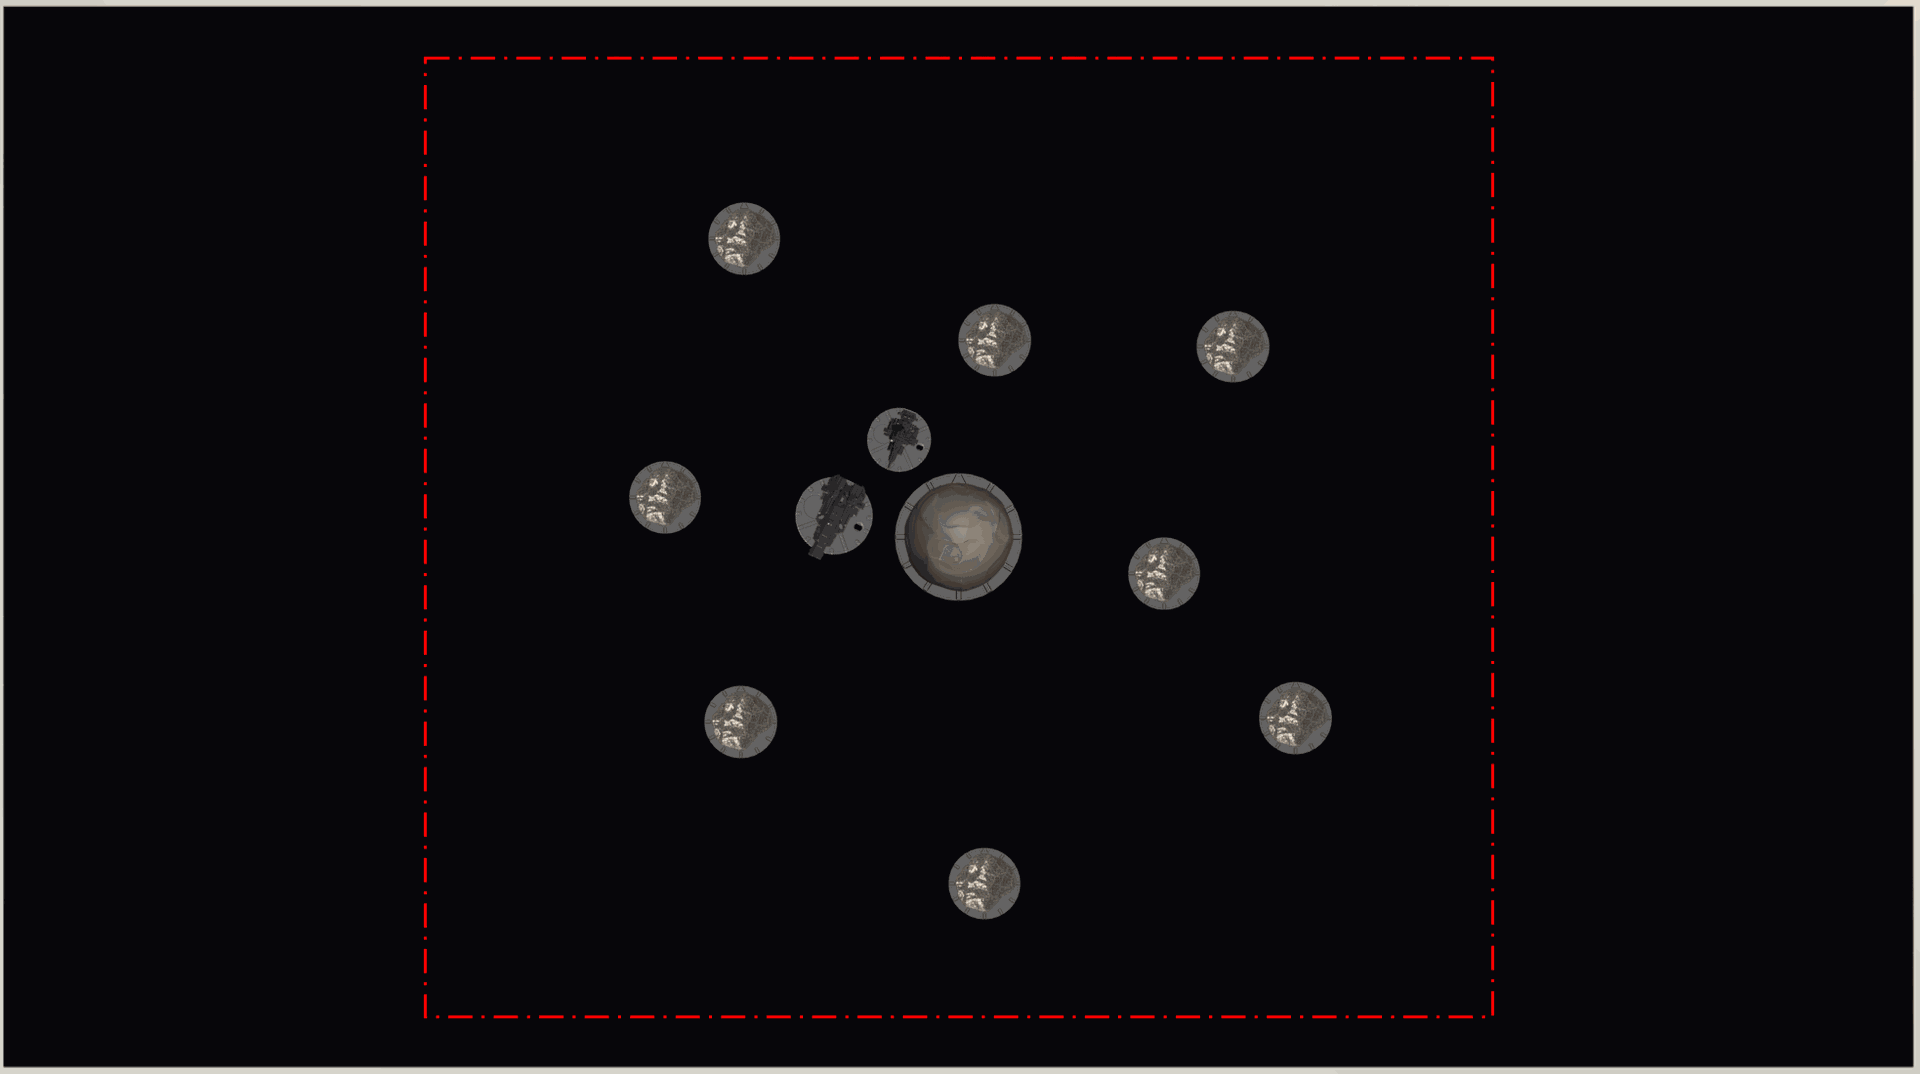
The Sol League Fleet will then be placed together in a single corner of their choosing.
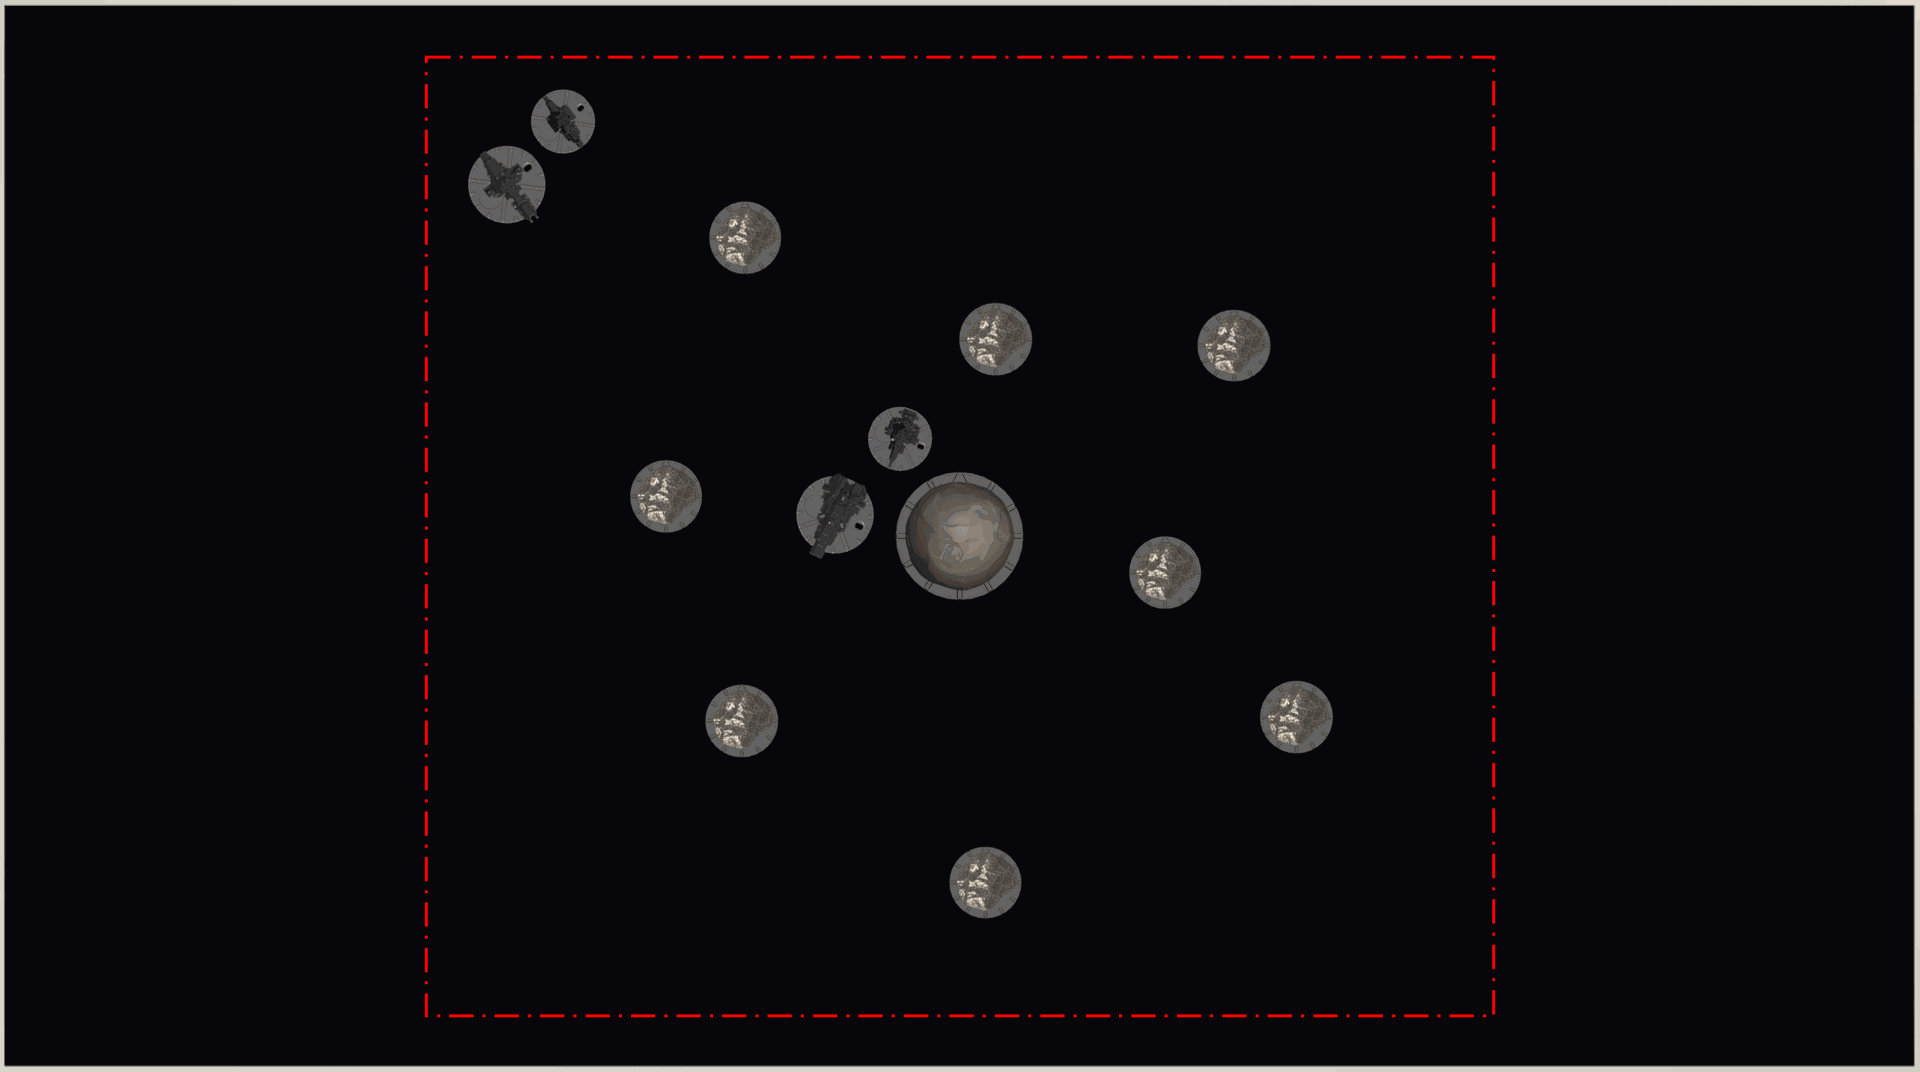
Mission: The pirates will get the first turn of the match. Unlike the last scenario, this is a battle to the last ship(s) standing. For both players the goal is:
Eliminate all enemy ships
[Starting]
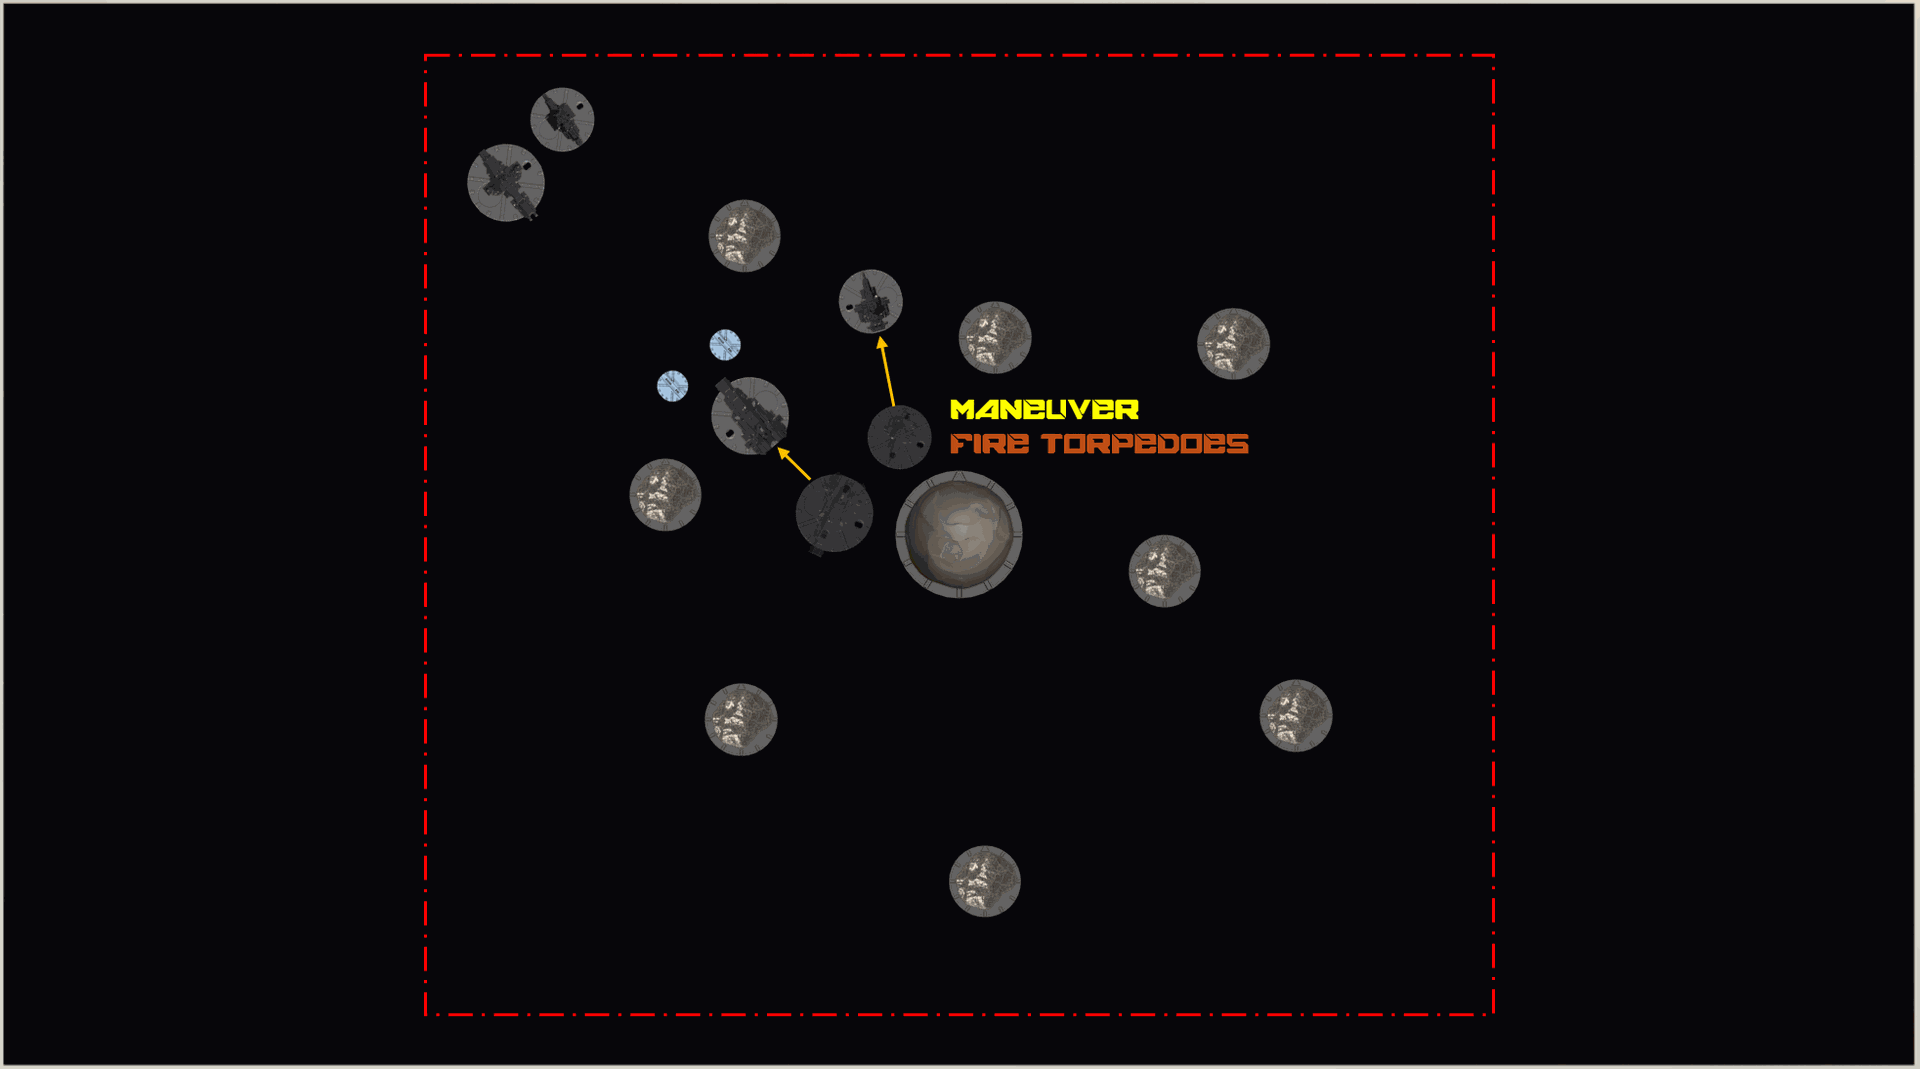
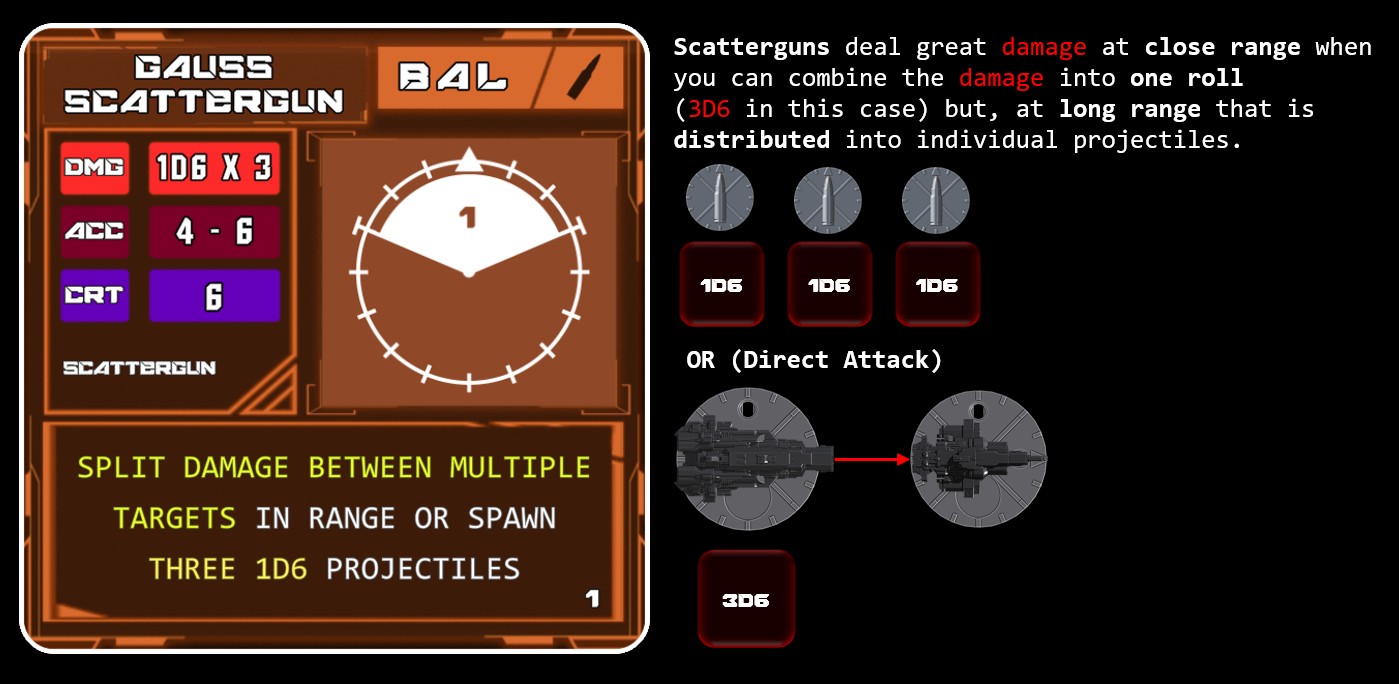
Turn 1 - Pirates: The pirates go first. We see that the Sol League Fleet chose to start in the top left corner so we'll turn to face them. Chimera Frigates can fire multiple projectiles in one shot with their scattergun, but it should close the distance a bit first. The pirate will move towards the patrol, then fire torpedoes (tokens shown in blue) that will also move to intercept.
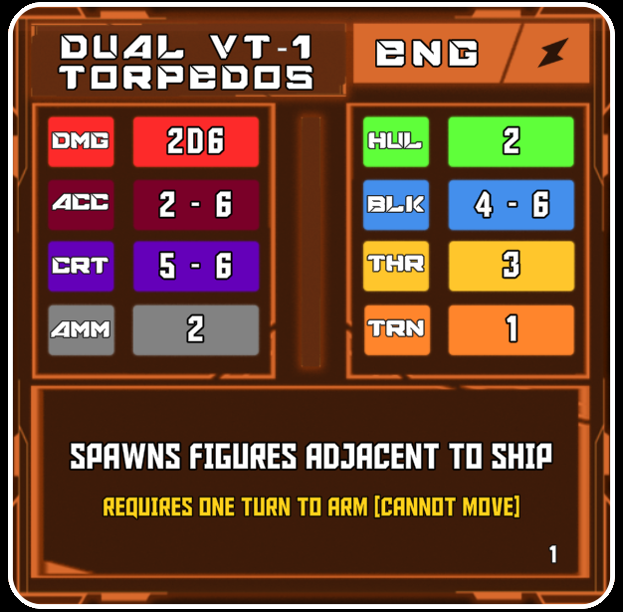
Torpdoes (specifically the Chimera's VT-1's) trade off speed for additional armor, leaving weaker PDCs struggling to intercept them when overwhelmed. As a general rule, torpedoes are very easy to hit with but deal less damage than a direct ballistic missile hit would.
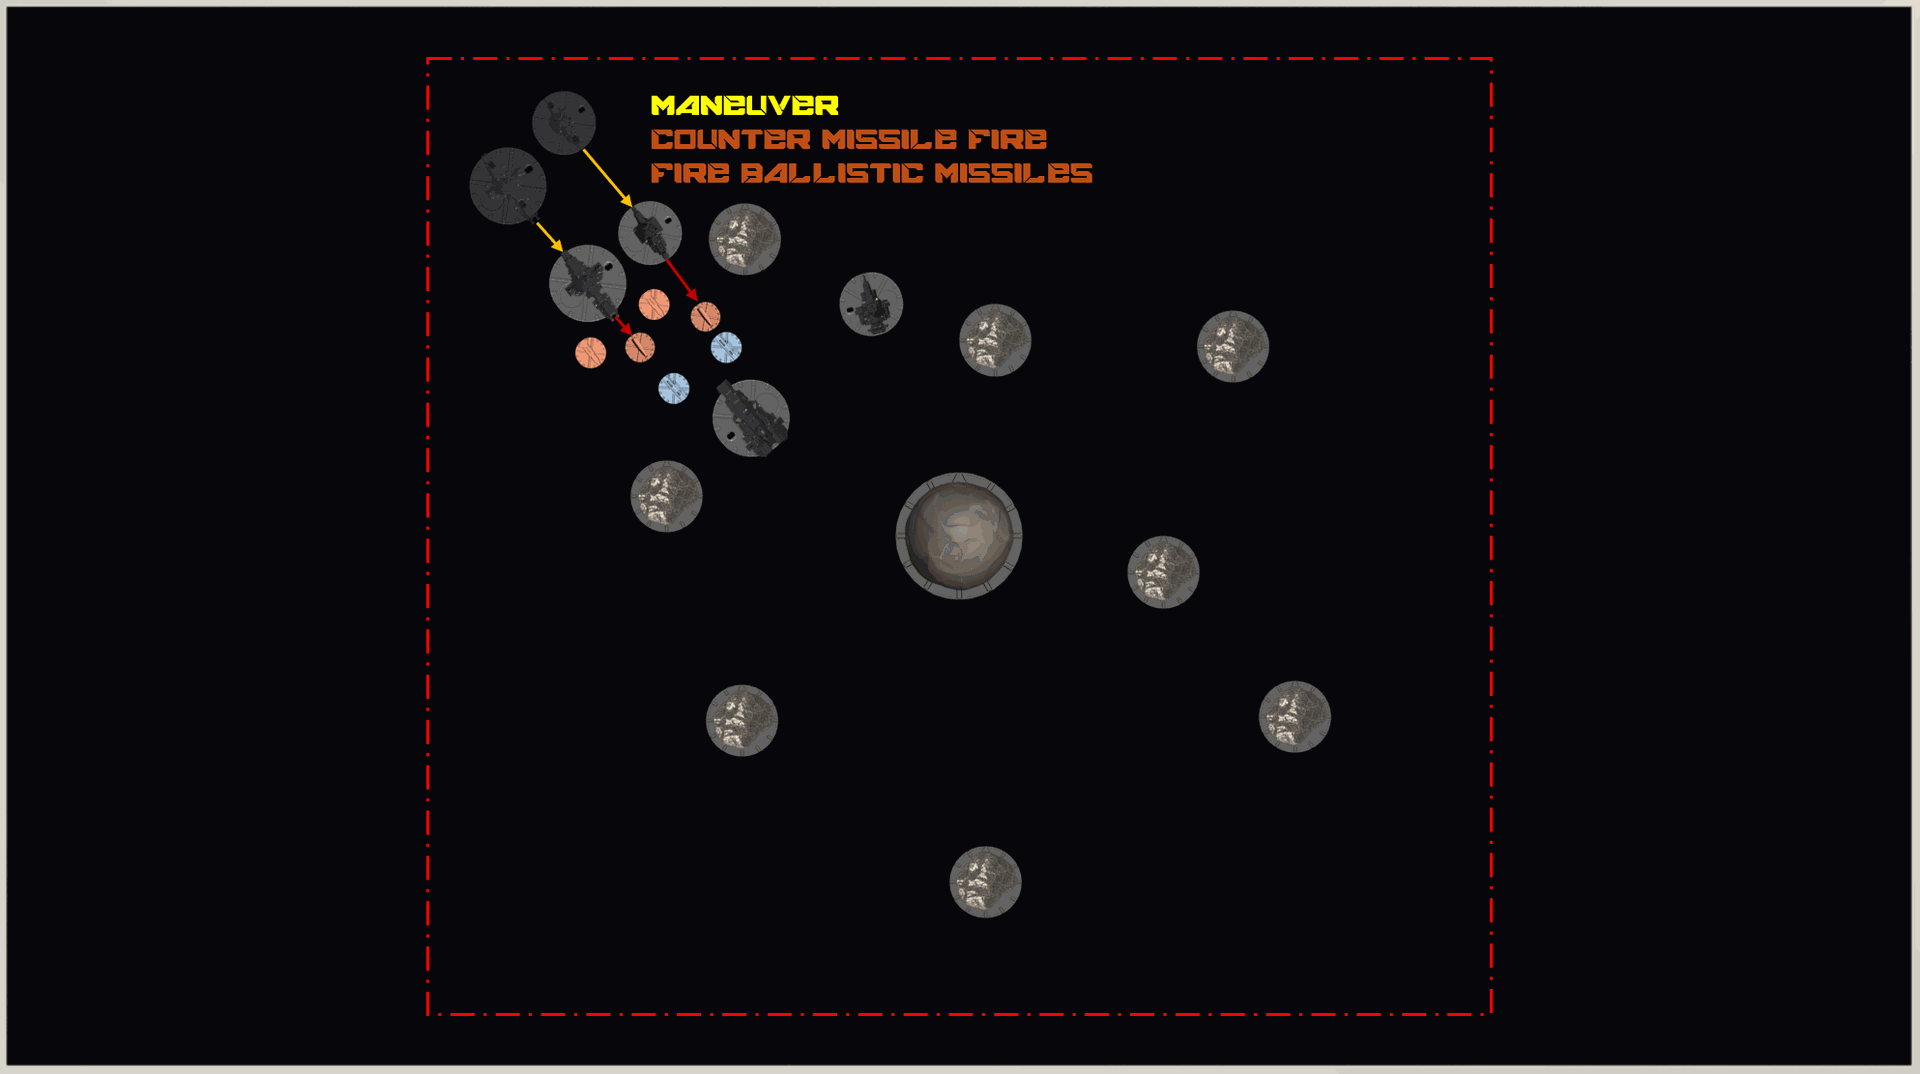
[Counter-Missile Fire]
Turn 2 - Patrol: The patrol will likewise maneuver into attack range. The Basilisk Missile Frigate may fire all four of its missiles at once, but, to spread them out better, it will wait a turn to fire the next two. Both the Gorgon Corvette and the Basilisk will fire a salvo from their railgun and PDCs, respectively to try and chip away at some of the incoming torpedoes' hull.
[Intiating the Attack]
Turn 3 - Pirates: To begin the turn, we will resolve the momentum of each of the pirates' figures on the board.
Momentum will be simplified for this scenario a SINGLE tick of forward movement at the start of each turn. The direction of momentum is indicated by the arrow on the baseplate of each ship figure and the token of each projectile token. In future games, momentum is tracked using the square D6 trackers.

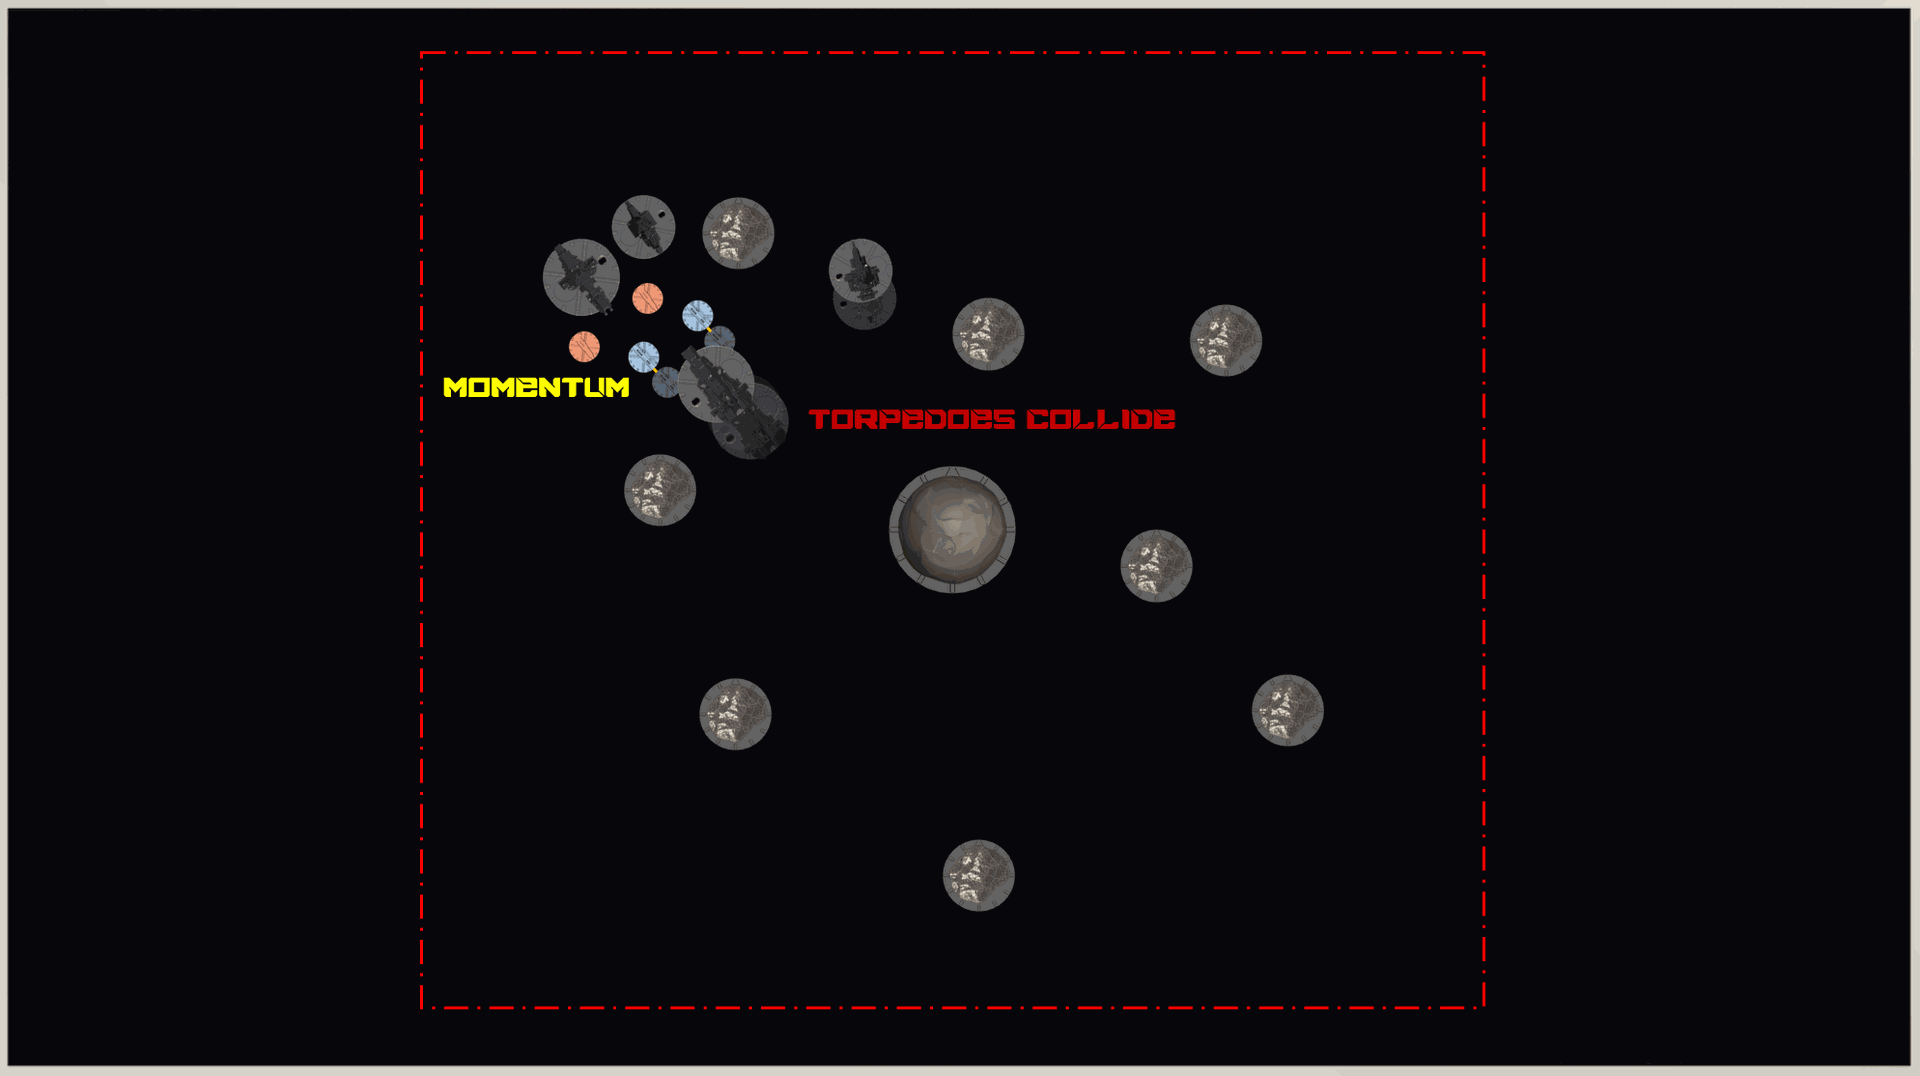
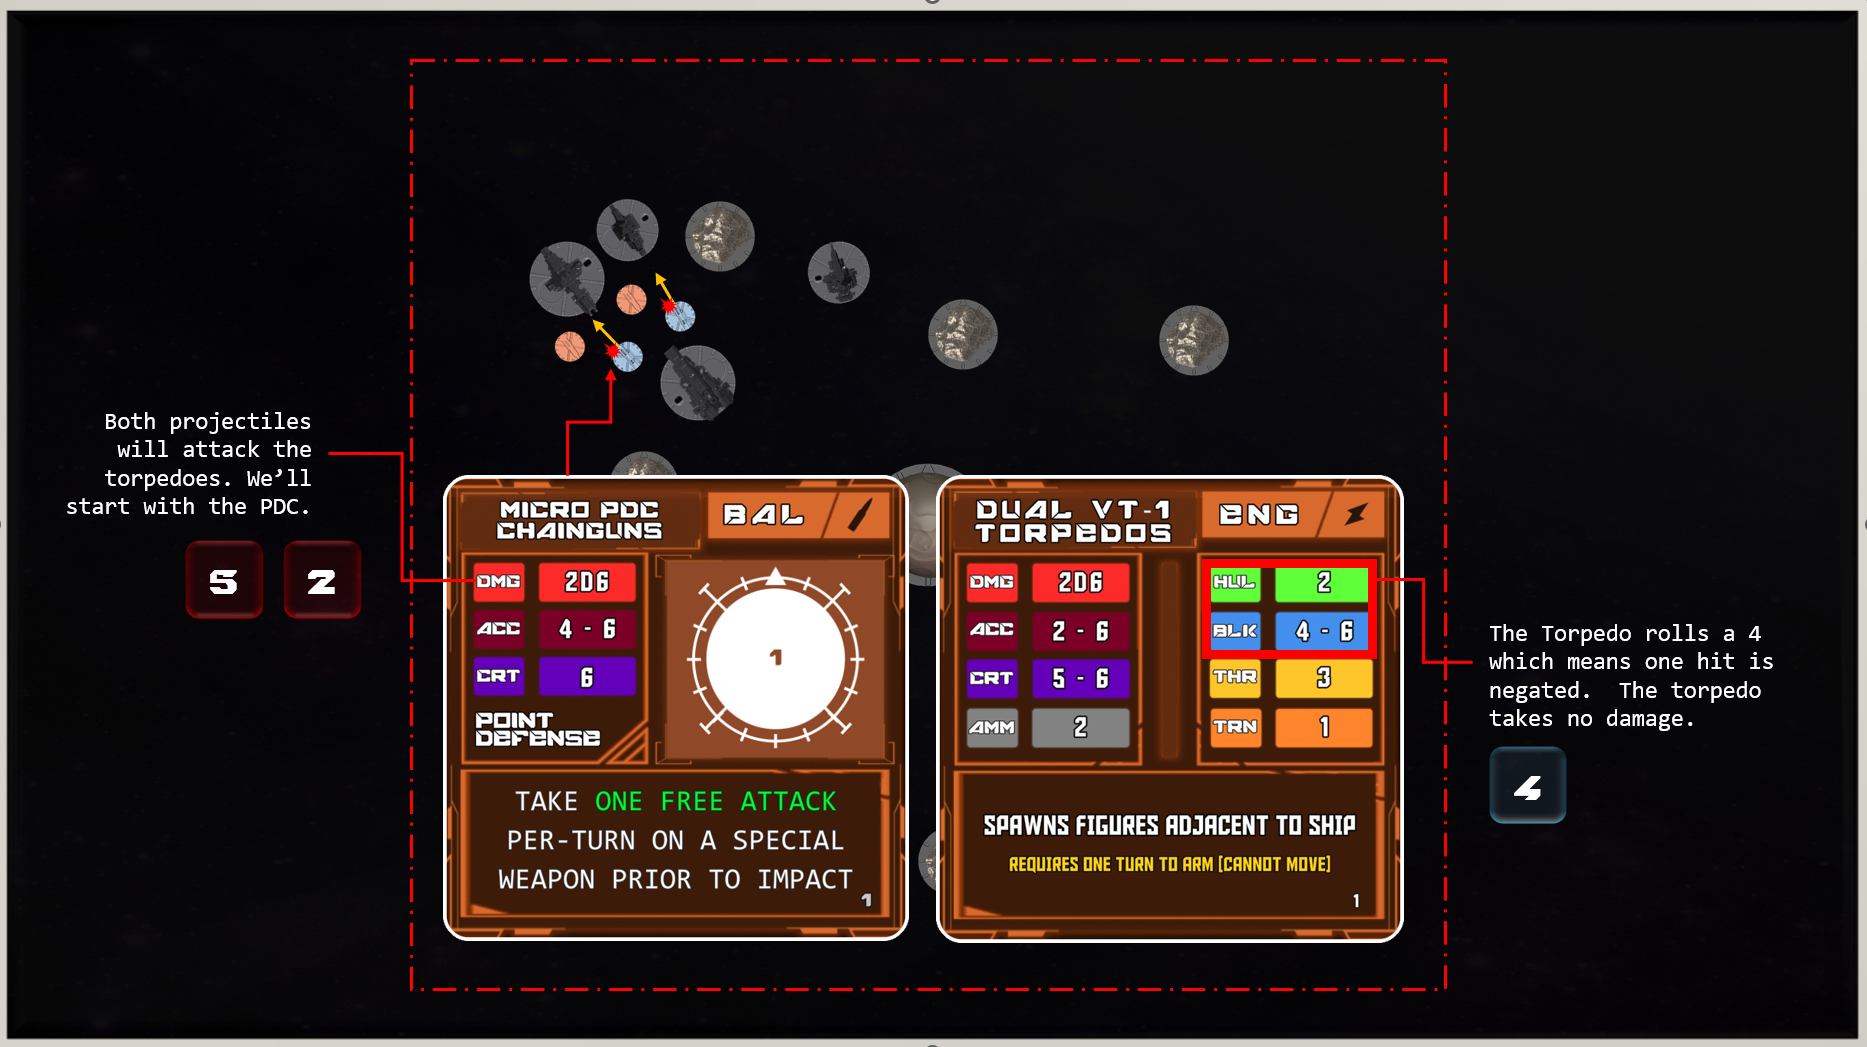
The torpedoes that were previously launched will move first, which will lead to them colliding with the projectile salvos directly ahead. This triggers an attack roll. We see from the results below that one of the torpedoes took some light damage and the other blocked all damage. (Lining up early counter-missile fire is very important, and even essential if a defending ship has no PDC cannons.)

The pirate's ships will then also resolve their momentum with one tick of forward movement.
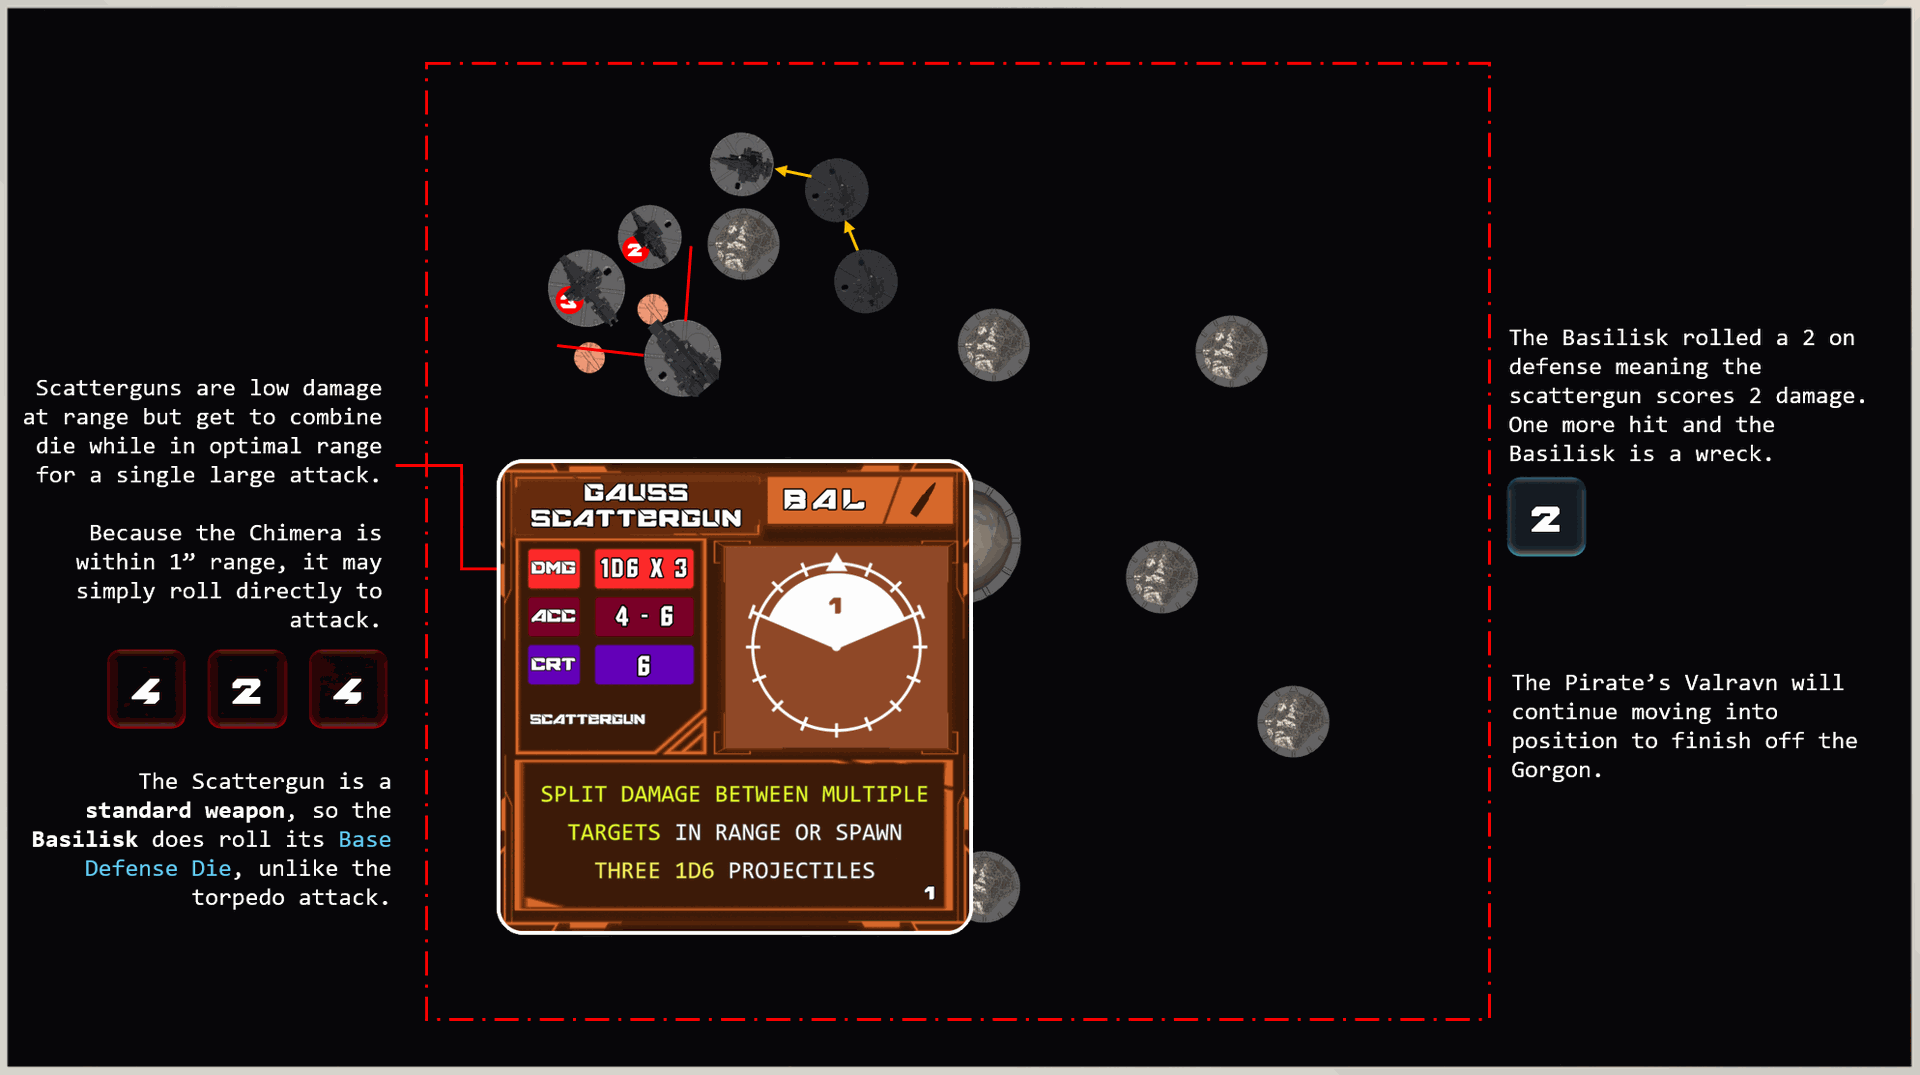
After momentum is resolved, the pirate player's controlled phase of their turn now begins. The Valravn will continue around the asteroid for a flanking maneuver and the Chimera Frigate will close the distance on the Basilisk for a scattergun shot (the scattergun is in range to split the attack between enemy ships with its ability but the Chimera will instead focus on the Basilisk after the torpedo softened it up a bit).
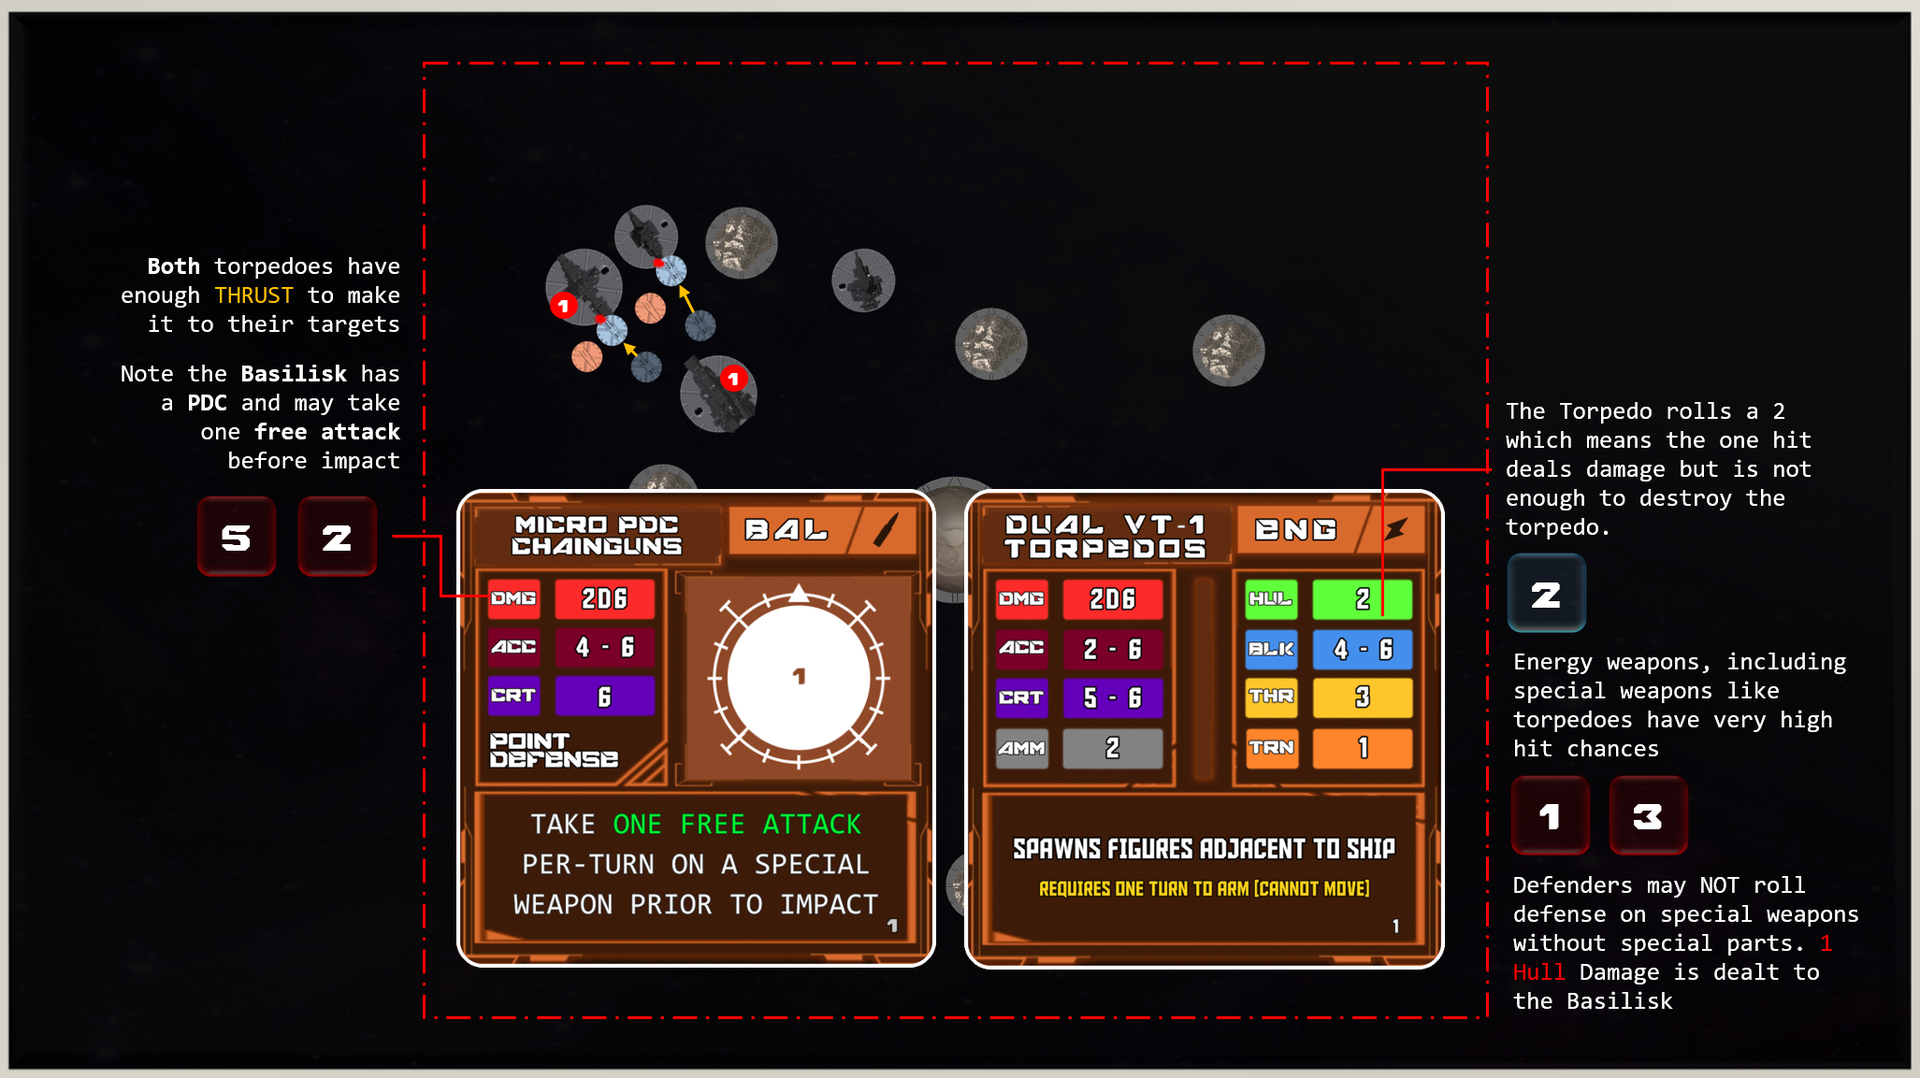
Prior to attacking with the scattergun, the VT-1 Torpedoes will move forward until colliding with each ship. The Basilisk does have a PDC so it get a free defensive attack prior to the pirate rolling for their attack. The Gorgon Corvette did damage the torpedo, however, it is not equipped with a PDC and will not get a free attack. The Basilisk will have to get very lucky to have a chance at stopping the torpedo, requiring 2 unblocked hits on its free attack:
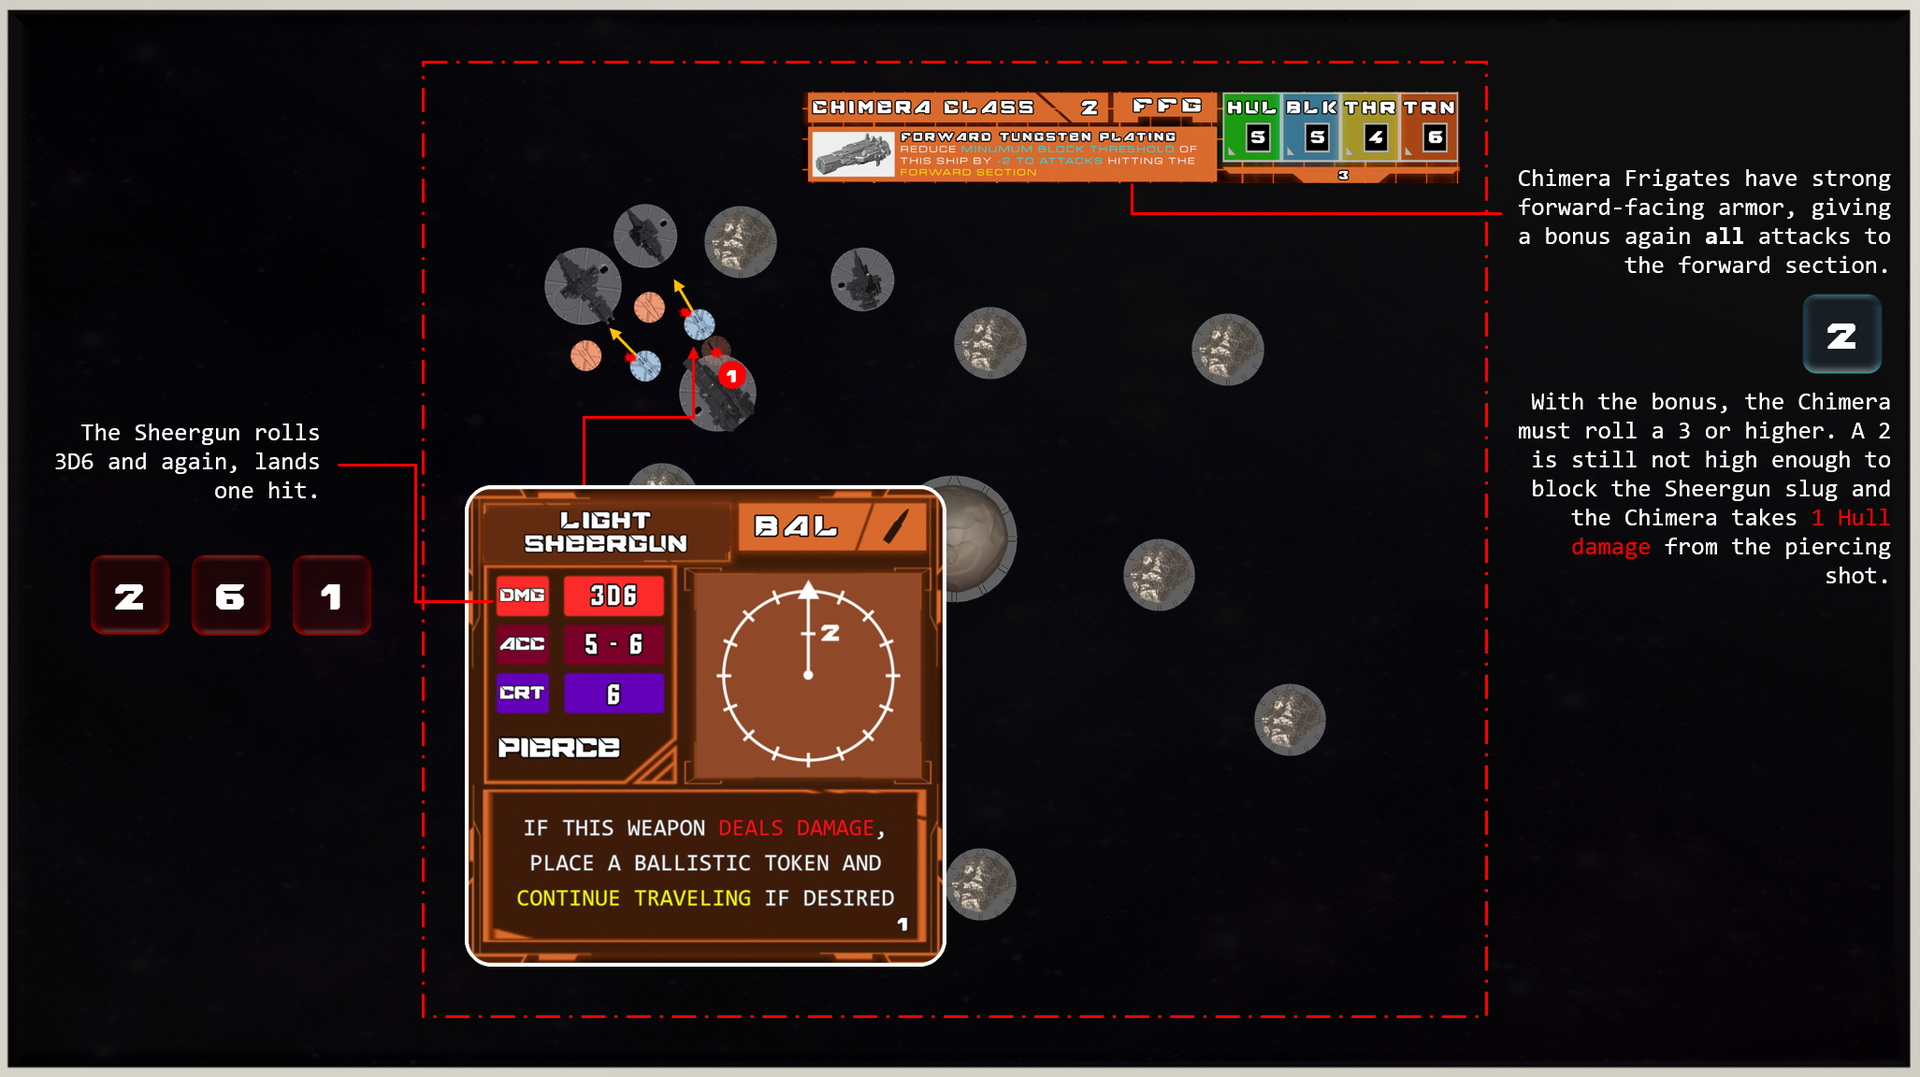
Now the pirate player's Chimera Frigate will get close enough to shoot the Basilisk directly with its scattergun. This means that the ballistic missile in front will collide on its next turn due to momentum, triggering an attack, but this risk could be worth it to stop the Basilisk from launching another salvo of missiles.
Note: Special Weapons are autonomous and do not require the host-ship to be alive in order to continue seeking a target.
To quickly recap:
- Both torpedoes found their mark and the pirate's scattergun also scored some hits.
- Both Patrol ships will be destroyed after one additional hit.
- The pirate Chimera has accepted that momentum will carry the missile salvo into it at the start of next turn. (Brace for shock!)
- The pirate failed to eliminate the Basilisk before it could launch another salvo.
[Counter-Attack]
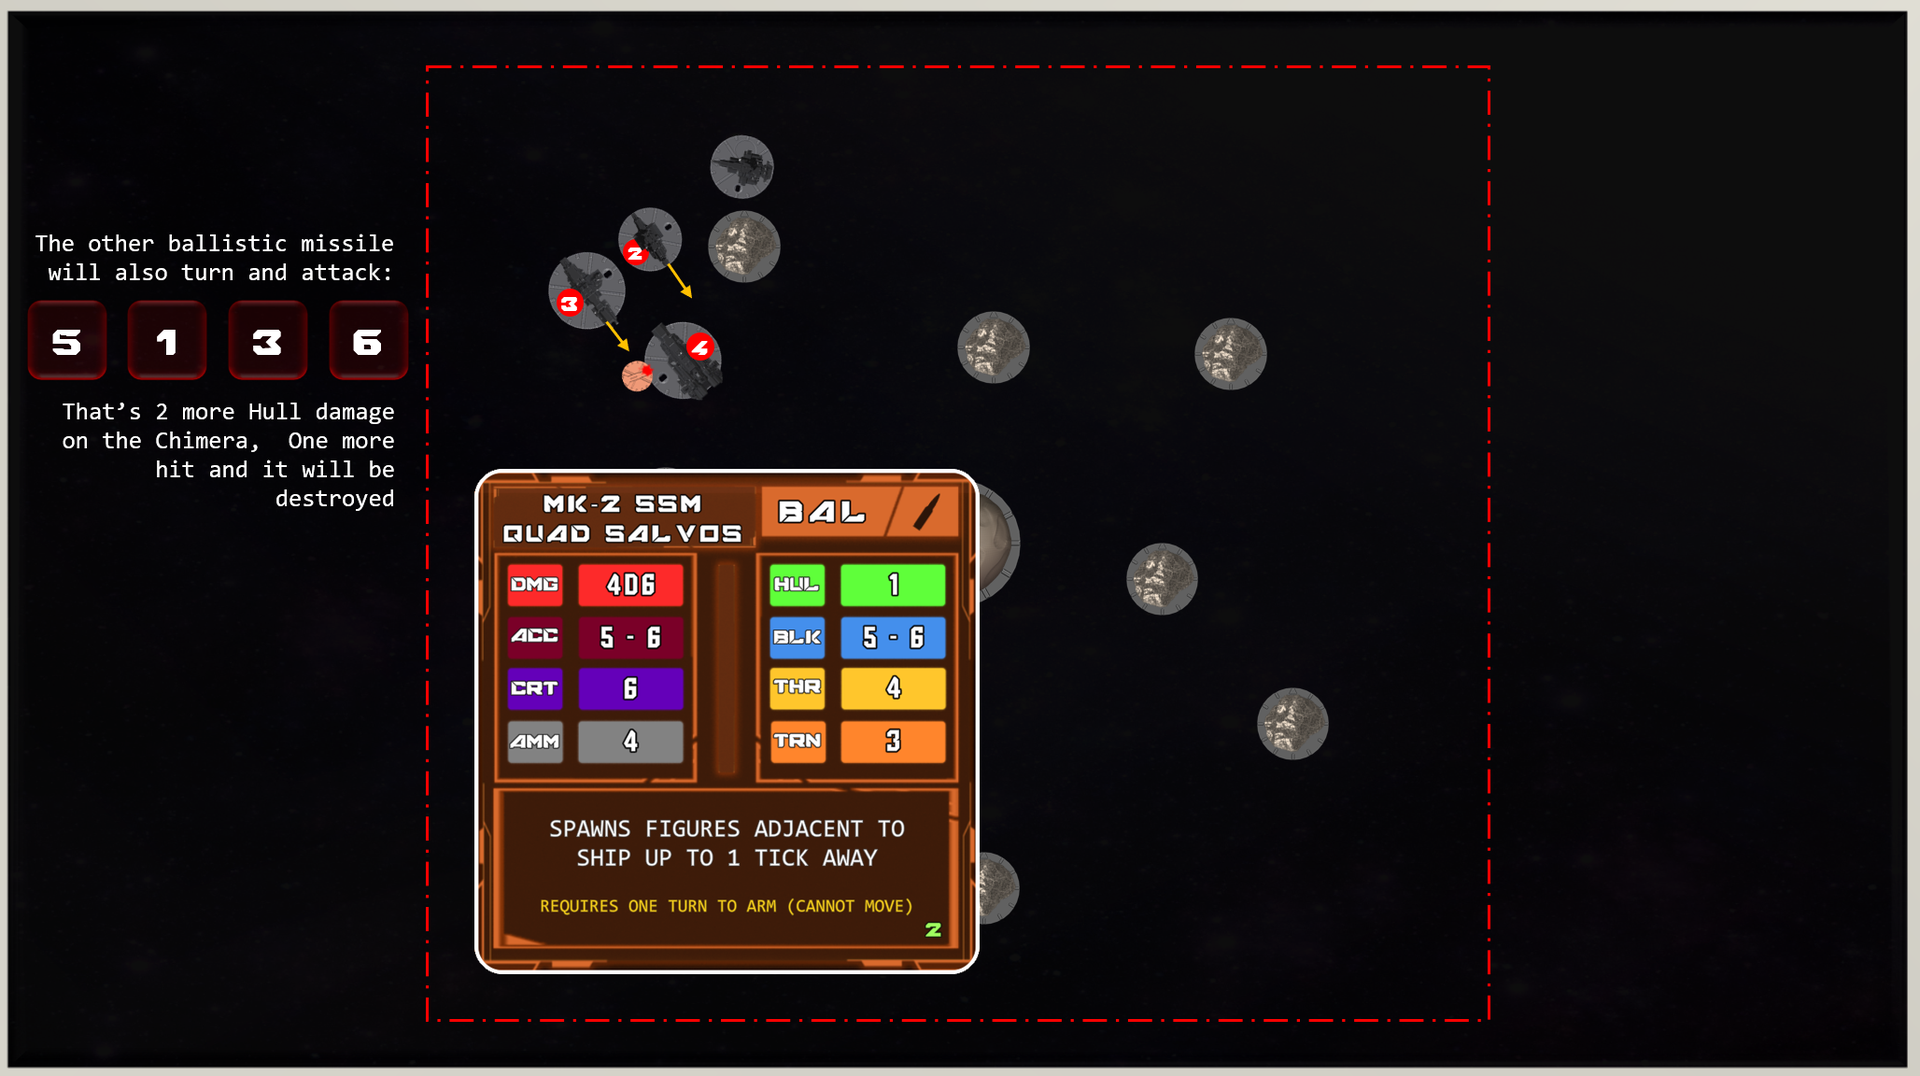
Turn 4 - Patrol: The patrol ships have taken a beating but the pirate frigate has severely overextended itself. The plan going forward will be to maneuver past the Chimera and surround it with missiles and ballistics. (Note from the ship card that the Chimera has special forward armor, but this bonus does not apply to attacks from the sides/behind OR special weapons.)
First, we'll resolve the momentum from the missiles already on the board, which also comes with a free attack, then momentum for the ships.

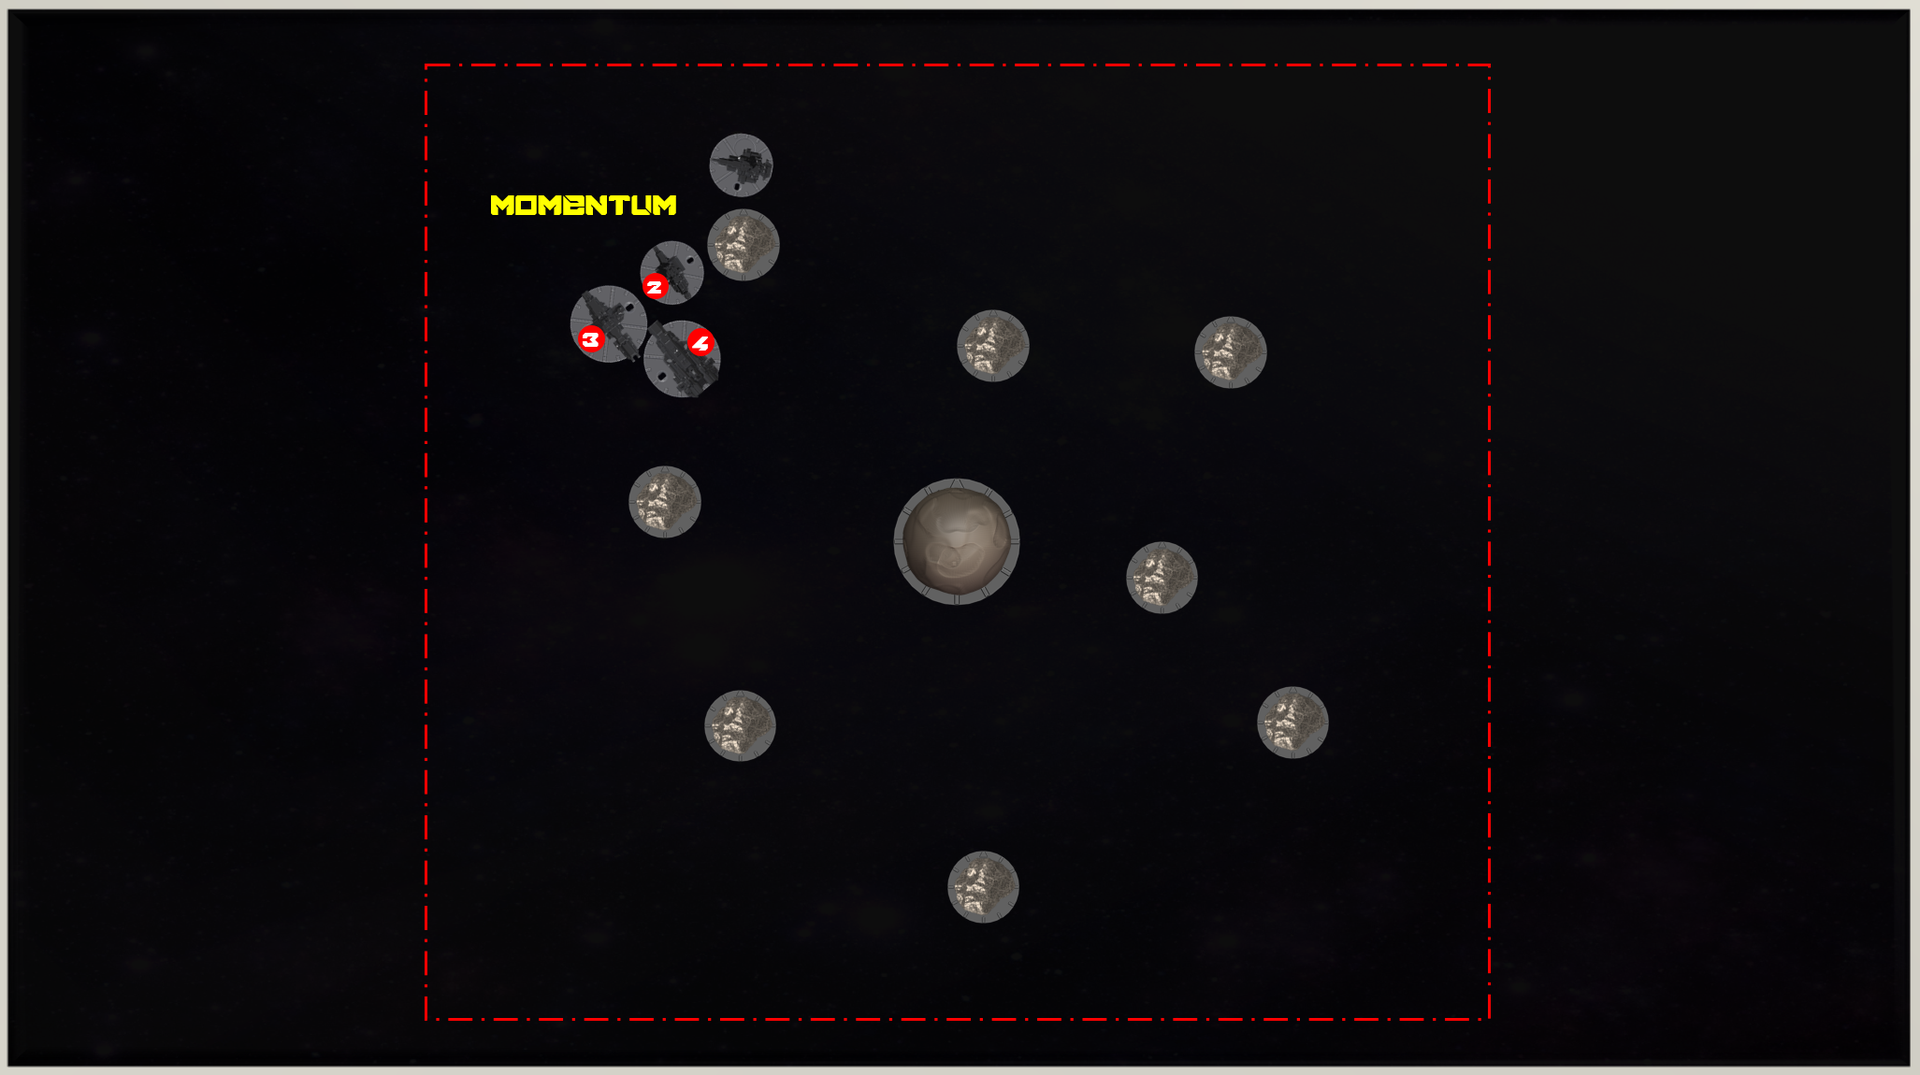
Next, the patrol ships will take advantage of the fact that the order in which your ships take their turn is entirely up to you. The Basilisk Frigate will take its full turn first which will make some room to drop a missile salvo in the Chimera's path.
Scenario 3: Armored Star Invasion
Armored Stars, Auxilliary Ships, and Full Movement System
The Sol League Navy has no tolerance for smugglers and pirates during wartime. Patrol ships near the asteroid fields of Sol have orders to shoot-on-sight any ships that ignore hails or refuse inspections. Recover whatever cargo can be salvaged and return to New Anchorage Naval Station for further orders...
Setup: In this scenario, one or more players will take on the role of a smuggler piloting a single corvette-class ship. The remaining players will attempt to intercept the smuggler before they reach the opposite corner of the map.
To play this scenario, you will need the following minimum requirements: