
SECTION 1 - Getting Started
Armored Stars (AS) is a tactical space combat game that puts you in command of a fleet of powerful warships in a vast galaxy of warring factions. AS players must outmaneuver their opponents, manage their ship’s unique systems, and dominate the battlefield through superior tactics and planning.
In Armored Stars, you will:
- Be part commander and part engineer as you customize and deploy ships with unique stats, weapons, and parts.
- Use a physics-inspired movement system that includes momentum and thrust mechanics on a 2D surface.
- Engage in tactical combat with different weapon types, including ballistic cannons and laser-based artillery.
- Use special weapons like missile swarms and deployable starfighter squadrons to add versatility to your fleet.
- Balance offense, defense, and positioning in a dynamic, randomized star system with each battle.
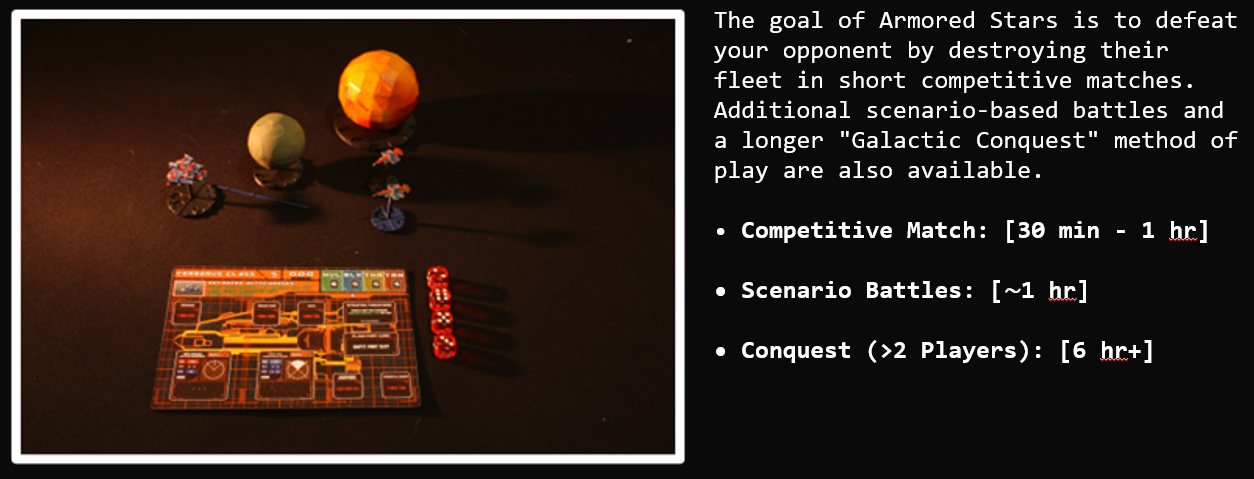
Each method of playing Armored Stars offers a unique experience. Enjoy quick, easy-to-set-up skirmishes for fast-paced action, or immerse yourself in multi-day galactic wars (with room for some light politics among friends).
Armored Stars can be printed using either filament spool printers or resin printers. Both options are viable for printing the game in its entirety, though there are trade-offs to consider:
FDM Printers:
- Easier to learn and use, making them more beginner-friendly.
- Generally, produce lower-quality prints compared to resin printers.
- However, with proper optimization and a well-tuned FDM printer, you may be surprised by the quality you can achieve.
Resin Printers:
- Offer significantly higher-quality prints with more intricate details.
- Require slightly more involved setup and maintenance.
- Some components may need to be printed in multiple parts due to the smaller average build plate size of most resin printers.
Both methods are acceptable, and the choice largely depends on your experience, preferences, and available equipment. Regardless of the printer that you choose, after you download the game files you will be presented with a zip file called ArmoredStars.zip.
Extract this file to a folder of your choosing then skip to either the FDM or Resin Printing section.
Fused Deposition Modeling (FDM) Printers – The Spool Ones
After extracting the game files, navigate to the FDM folder.
Inside you’ll notice that it’s separated by Supported or Pre-supported files.
Both are provided but understand that with unsupported, you will have to use your slicing software to generate them on your own due to the complex shapes of some ships (especially around the thrusters in the back).
Due to the variety of slicing software out there, we would recommend that you use un-supported and generate them with your own software.
Slicing Software
A slicing program is the software that prepares your 3D model for printing on an FDM printer. Think of it as a translator between the 3D design file (the STLs) and your printer that spits out code for each layer. Some printers have their own proprietary slicers like the Bambu X-1 that I’ll be using for a lot of the images presented in this book. Its up to you to research which one you want to use but if you’re stuck… use Ultimaker Cura, its great and its free.
Regardless of your software the steps are usually always the same:
- Import the Model: load the 3D model (In our case, the files with .stl) into the slicing program. Most programs will let you just drag and drop.
- Settings and Preferences: This is the most case-by-case part of the printing process because you have direct control over these settings, and they can ALL contribute to print quality. The main ones of note are:
- Layer Height: Smaller layers mean smoother prints but longer print times
- Infill: How solid or hollow the print will be. For the most part, default will be fine but for the Baseplates of your ships we recommend raising this value to reduce the chance of snapping under stress.
- Print Speed: How fast the printer moves which may also affect quality.
- Align and Support the Model: Most ships print best when oriented straight up like they’re on the launchpad. This gives the best quality with less post-processing needed due to the low amount of supports needed (pre or unsupported versions).
- Slice: Hit the slice button and wait for it to finish compiling. Inspect the model to make sure any overhangs are being supported. If you let your own slice do the supports, you should be fine.
- Save and Print: Save the G-code to a memory card or send it directly to your printer, depending on your setup.
The example below uses the “High Quality” models, that must be glued together but offer drastically better quality than printing a solid ship in one go. Printers that “String” a lot are not ideal for this method but in my experience the post processing is still worth it.
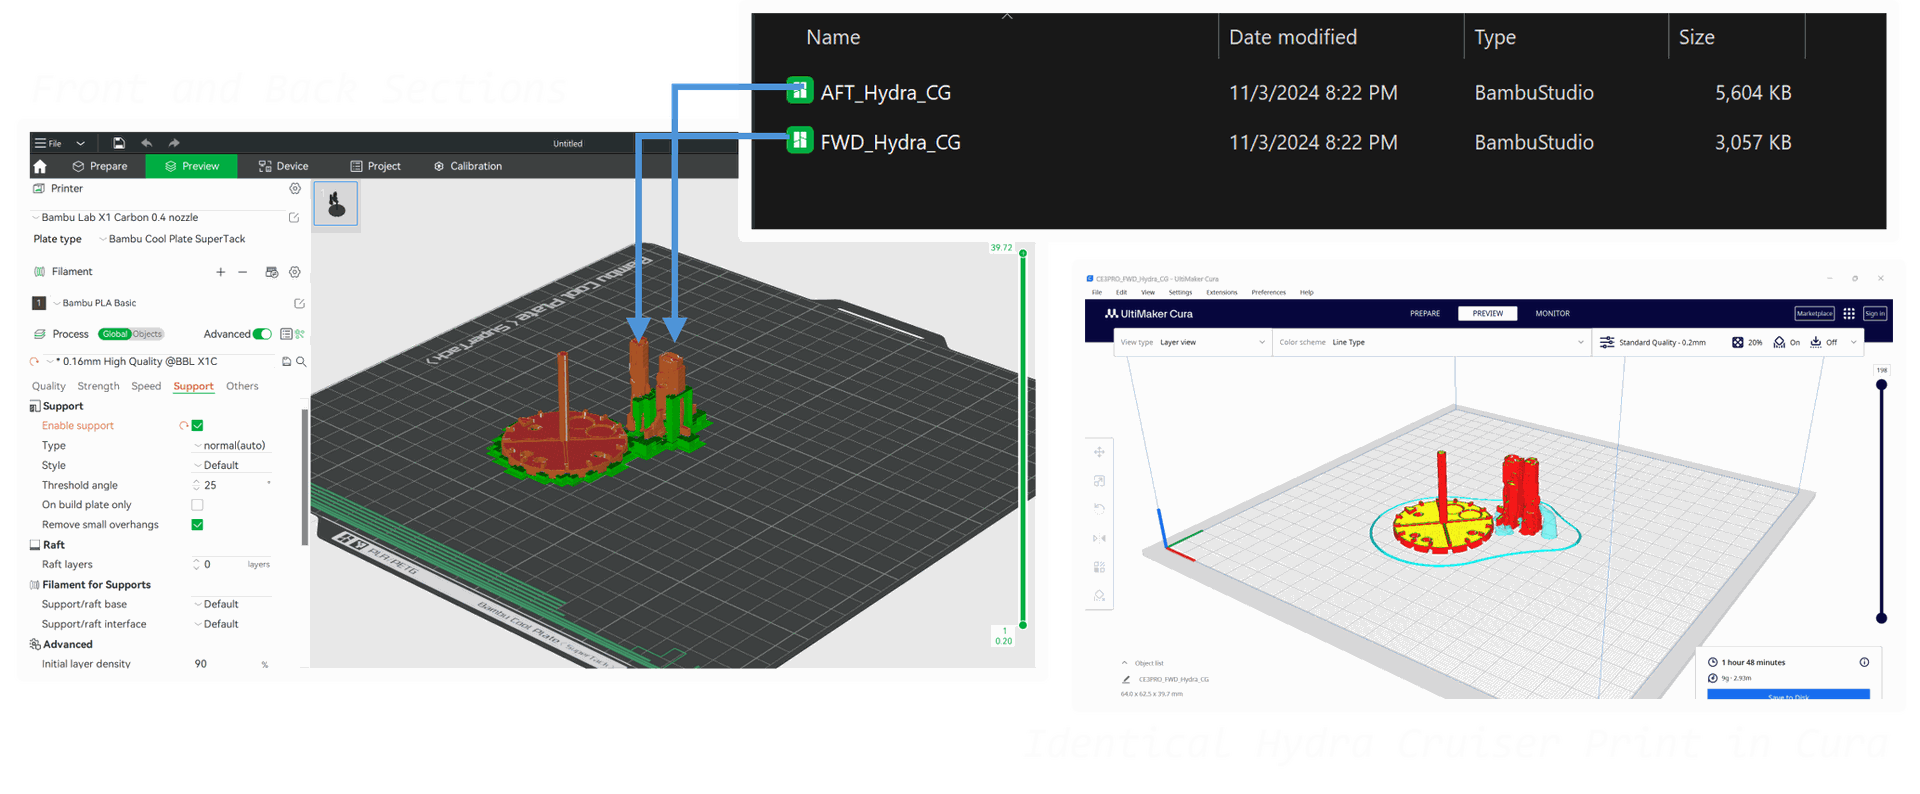
In addition to the ship itself I’ve added the cruiser sized baseplate for the Hydra Class Battlecruiser to snap into later.
These models were not pre-supported and sliced with Bambu Studios auto-support generation.
Supports play a vital role in successful 3D printing. However, pre-supported models are typically designed with a focus on maximizing print success rates rather than prioritizing surface quality.
For better results, we recommend using the unsupported models and customizing your own support settings. This allows you to minimize the amount of support material needed, reducing post-processing time while maintaining high-quality prints. Saving a preset for future use can make this process even more efficient.
For a (growing) list of best-known printer settings, use the Printing chat in the Armored Stars Discord Server or find the list on the Armored Stars website.
Filament Printers Bottom Line
|
For the best results, use small layer heights to help hide layer lines. If your slicing software offers an “ironing” feature, it’s worth enabling for an even smoother finish. |
|
Printing models straight up can improve detail, but it requires precise bed leveling and strong adhesion to avoid print failures. |
Every ship in the game has its own corresponding Ship Blueprint Card.
Ship Cards are provided in two formats.
1. Portable Document Format (PDF)
2. Portable Network Graphics (PNG)
Either format is fine but there are a few mandatory printer setting to keep in mind to ensure the best results and proper sizing.
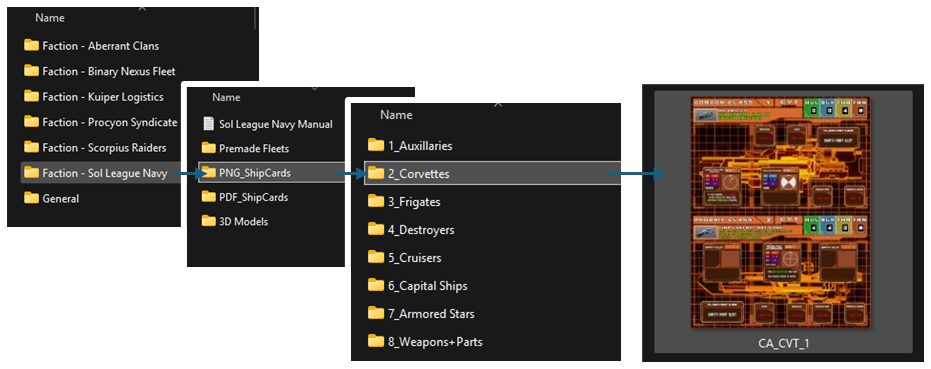
First, find the files you want to print. In this example we’ll print out some cards for a couple Sol League Navy Corvettes (They come in 2’s whenever possible to save paper).
Depending on your Operating System the next steps may vary slightly but the settings should generally be the same.

Multiple copies are only needed if you're printing for other players. Each ship card serves as a template for all ships of that class in your fleet, meaning you only need one card per class, regardless of how many individual ships you have.
SECTION 2 - Gameplay Basics
Turn order is extremely flexible in Armored stars. Each turn starts with a movement phase that simulates each figures momentum traveling through space but, players can move, attack, and use abilities in any order they choose.
Turn Execution Order

Each ship is made up of multiple "Part Cards" and its best to think of each part as having its own action each turn. The specific process of taking a full turn with a ship is covered below.
Reading Ship Cards
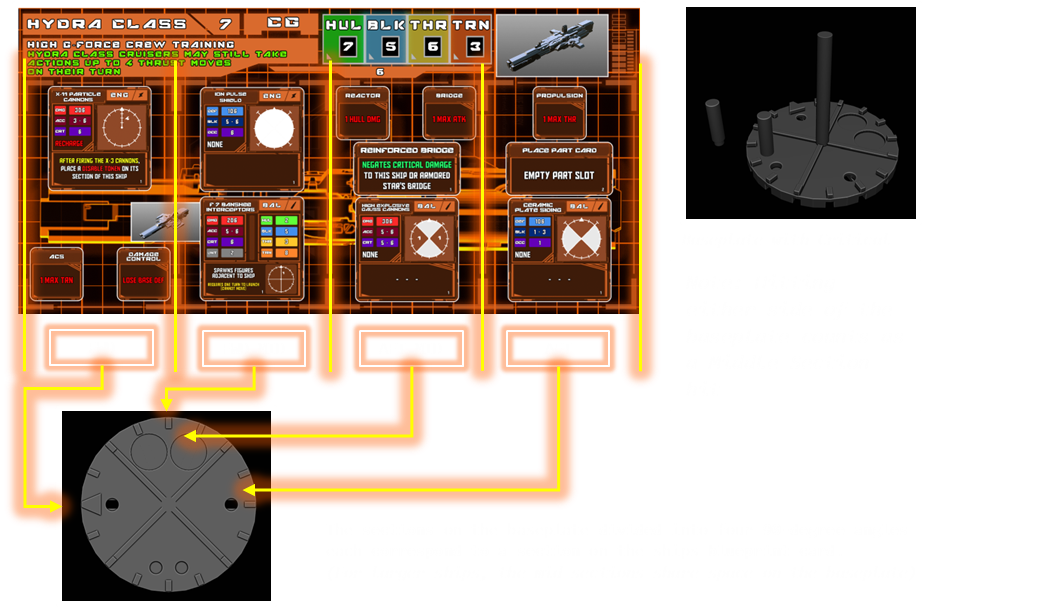
All ships in the game, including the Armored Star-class stations that give the game its name, have individual blueprint cards. These cards showcase each ship's parts, weapon systems, and defenses. Armored Stars allows you to manipulate these blueprints to customize how each ship functions within your fleet.
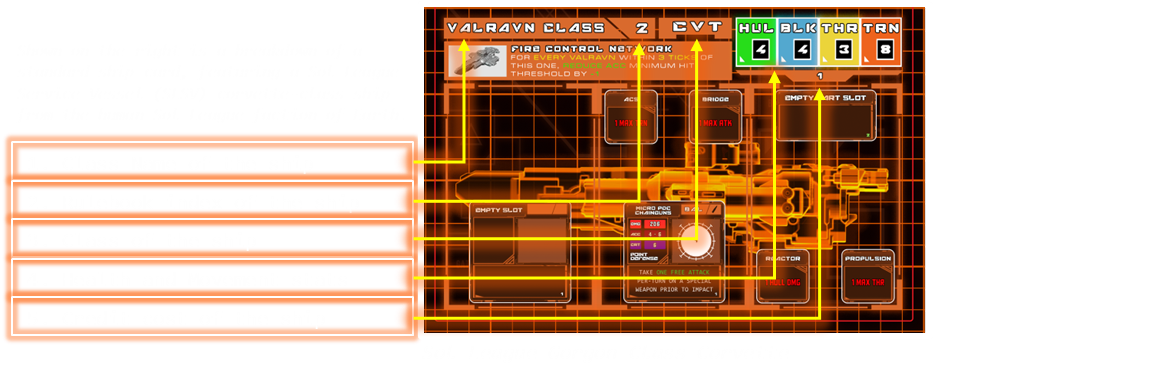
1. Class Name
Class is important because it serves as the blueprint for all ships of that class in your fleet. For example, if you swap out a part card, every ship of that class in your fleet will reflect the change. Keep in mind that this also applies to the additional cost per ship.

2. Rulebook Index
The Rulebook Index refers to the page number in the Sol League’s Naval Academy section of the core rulebook. This section serves as the faction codex, providing weapon and part synergies, a rules FAQ related to the ship, and background lore about the ship and its role.

3. Ship Class
Ship Class, on its own, may seem arbitrary but directly corresponds to specific ship traits. For example, corvettes are typically more affordable, have less room for parts, but excel in maneuverability during space warfare.

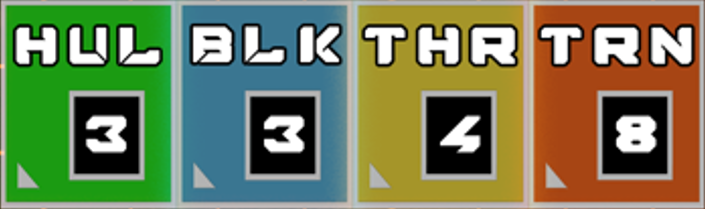
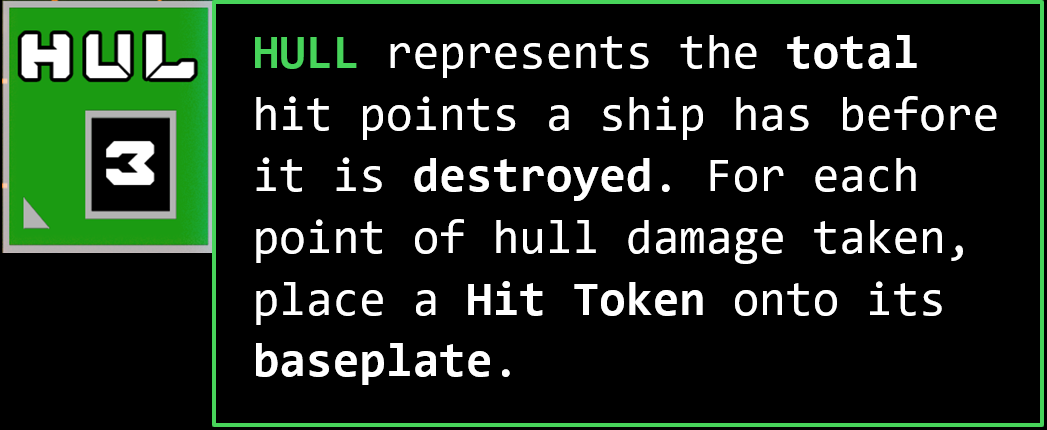
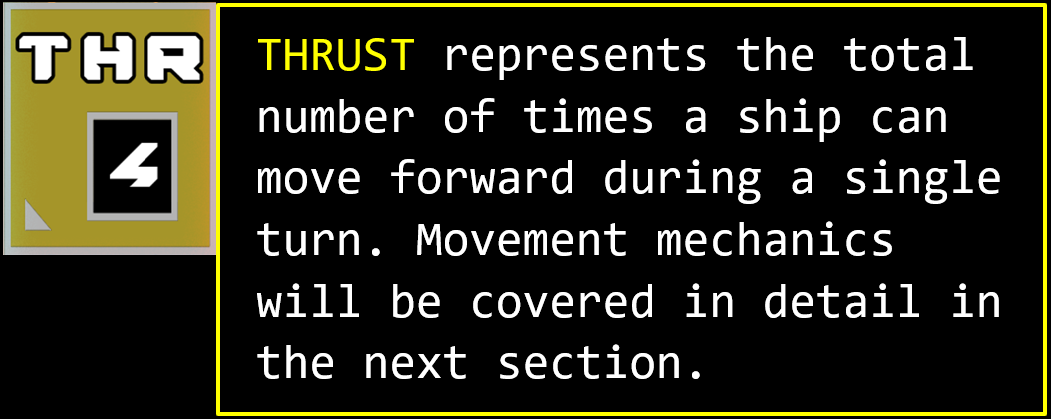
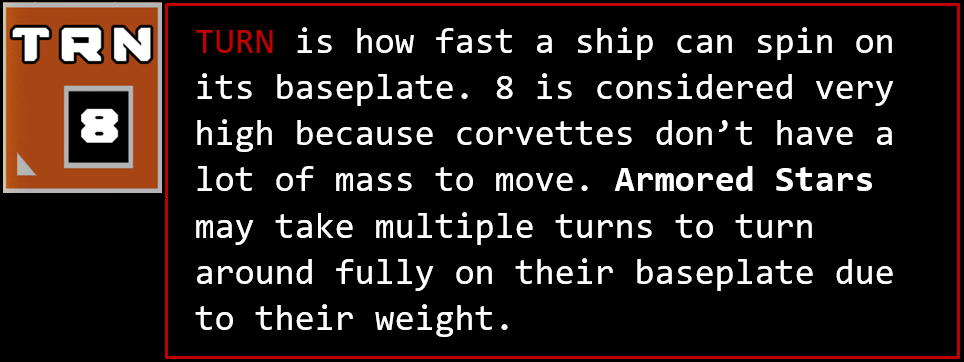
4. Health / Movement Stats
These stats will be broken down individually in the next section, but in short, they correspond to a ship's survivability and mobility in combat.
5. Ship Cost
This is the base price of the ship per unmodified unit. Parts, weapons, and defenses will increase the cost of each ship.

Note : Different factions will have different themed blueprints, but the card structure will always be the same.
Ability Bar
If a ship has a special effect or ability it will be listed in the block shown below:
Ship Stats
For this next section we’ll use the same Gorgon Corvette class ship as before.

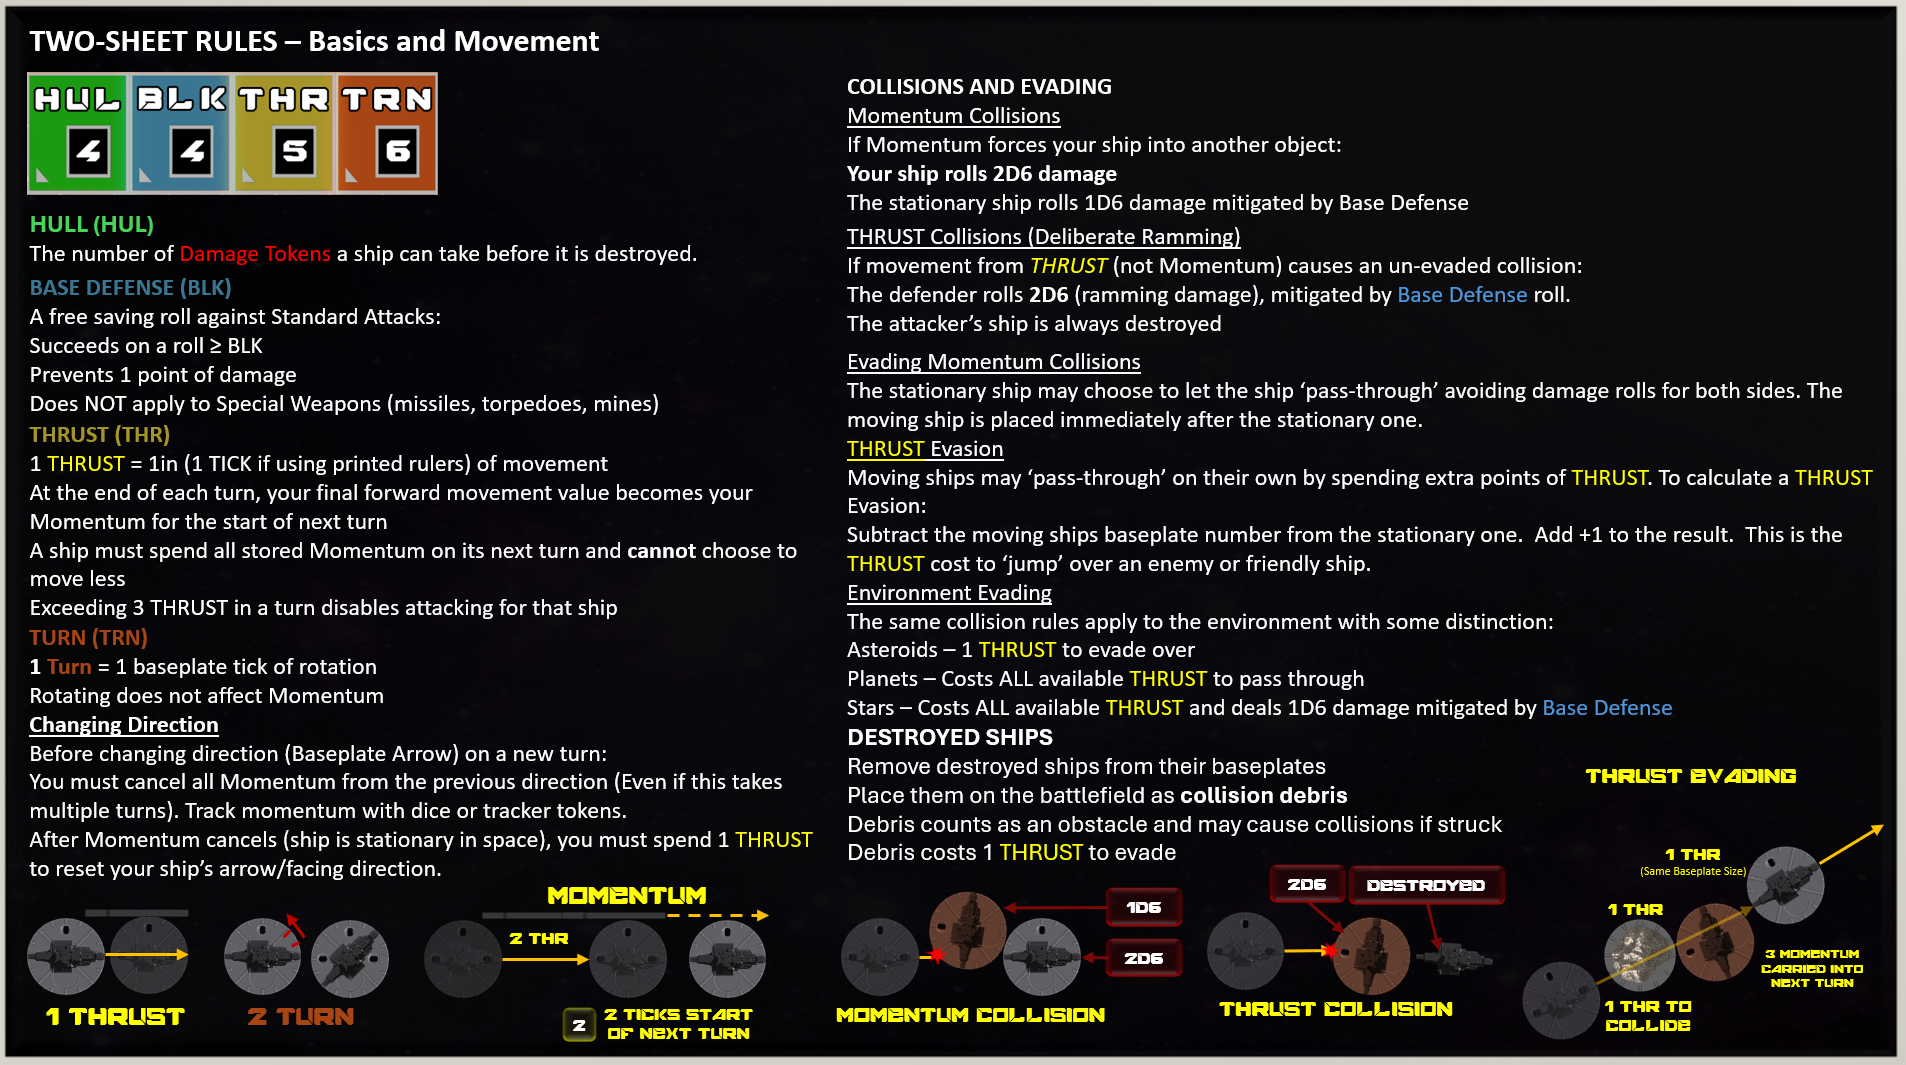
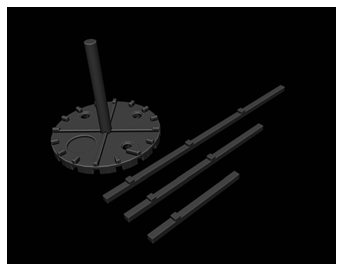
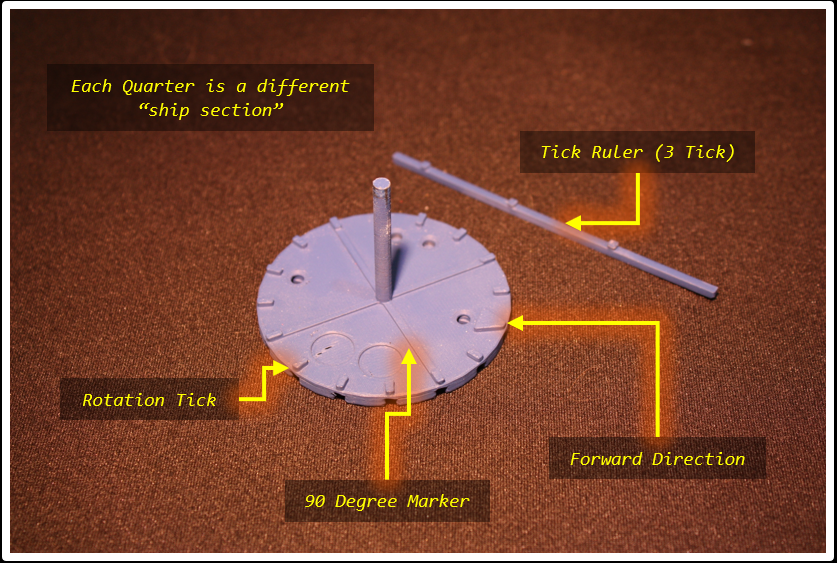
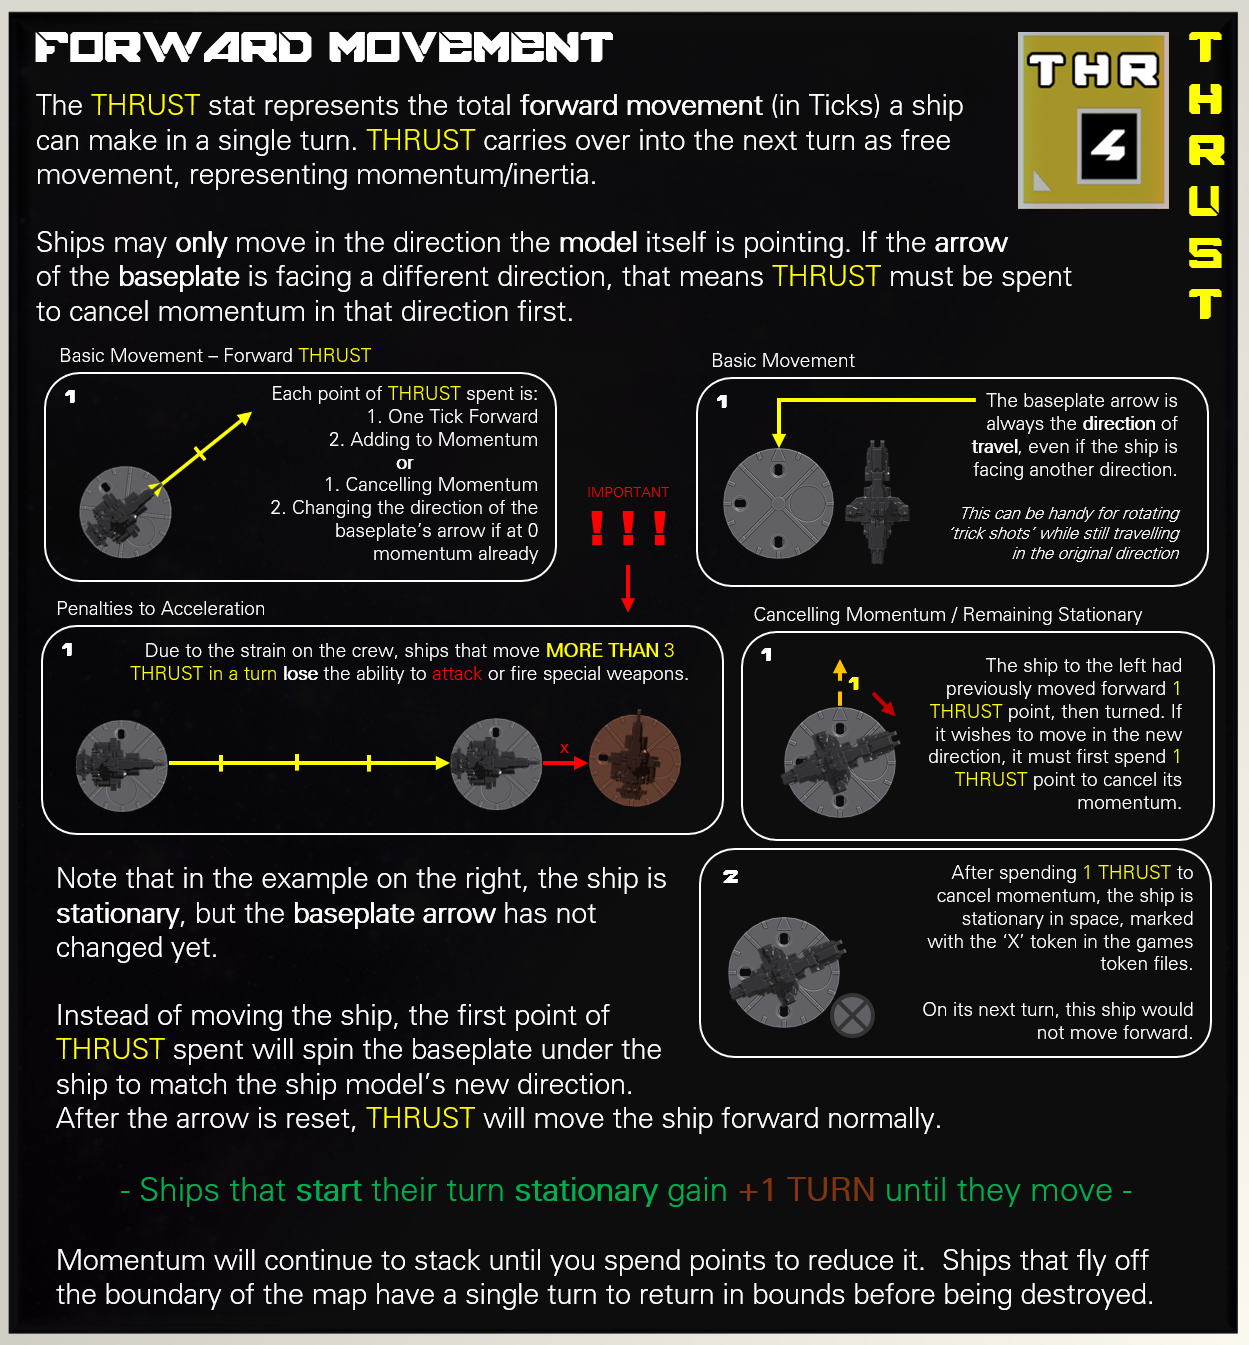
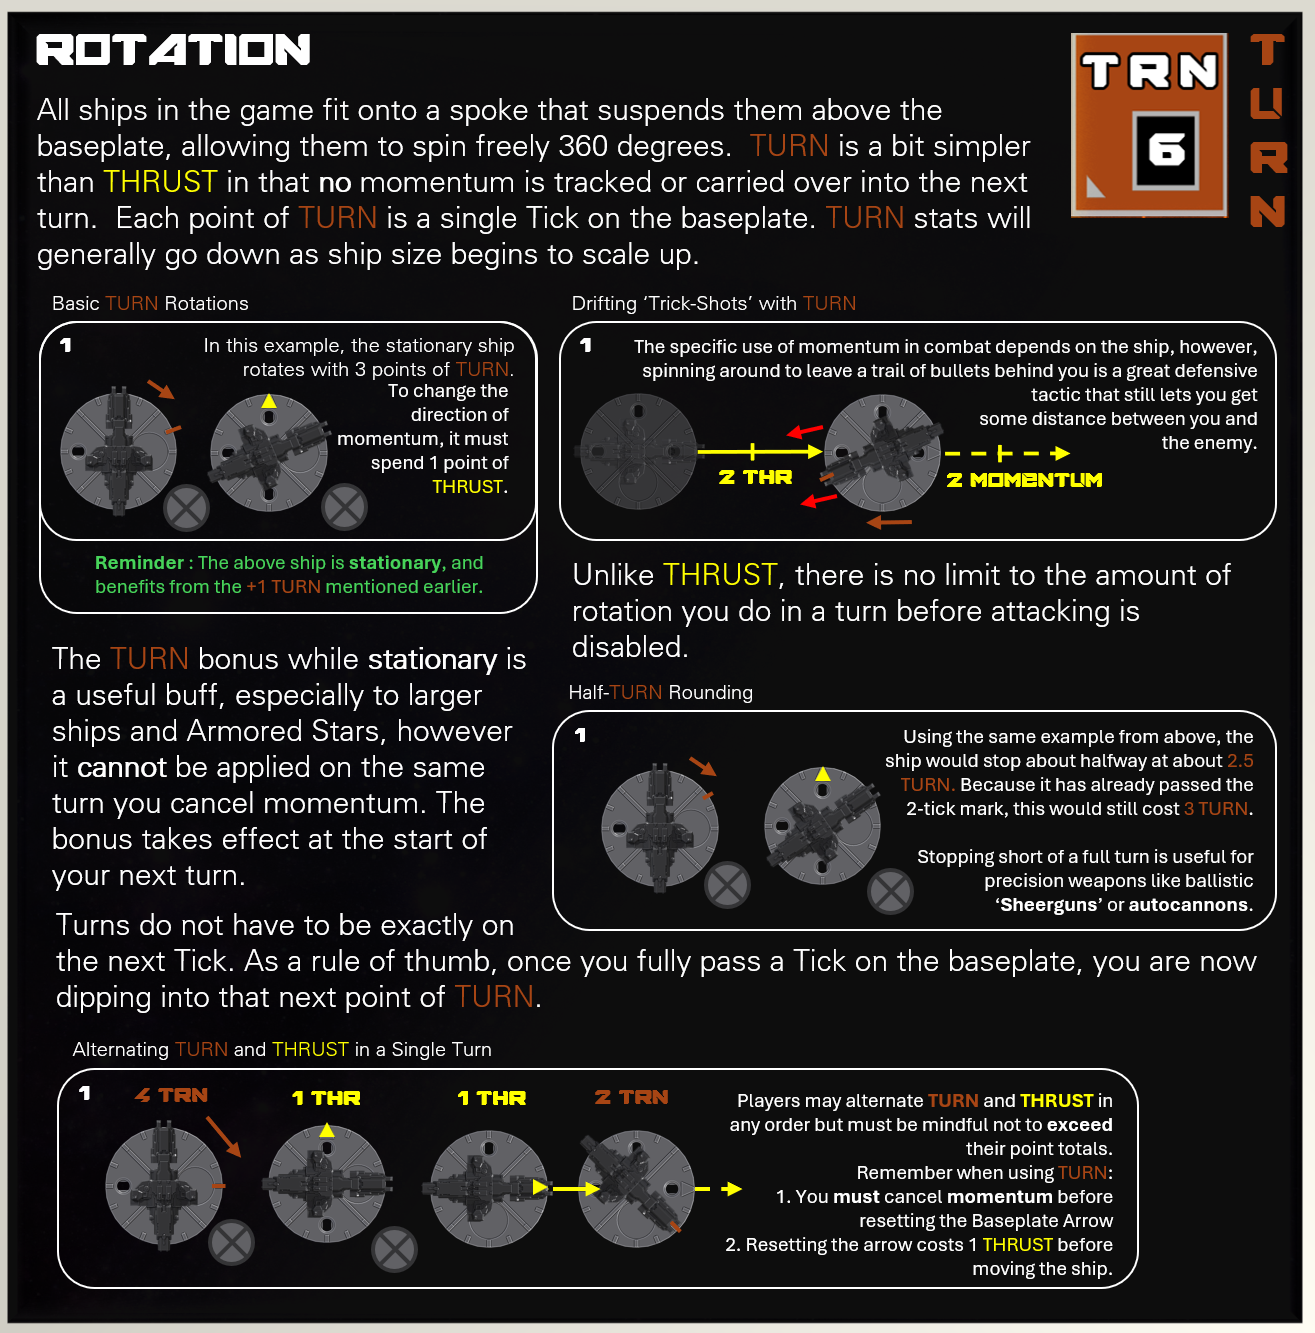
Armored Stars measures distance in inches, not centimeters or millimeters (sorry). For turning, each baseplate has 16 ticks similar to a clock in ~22-degree intervals. As it may mean slightly different things in different context, one inch and one 22-degree increment will be referred to as a “Tick” for simplicity from this point on.
To assist in movement and weapon targeting, you may print out different “Tick-Rulers” that slide into the baseplates of your ships for easy measurement. These come in increments of 1, 2, 3, and 4 ticks. These are also handy for measuring out the firing arcs of different weapons.
3D STL File for Corvette Baseplate (with rulers)
 Armored Star Class Baseplate & 3 Tick Ruler for Long Range
Armored Stars' Targeting
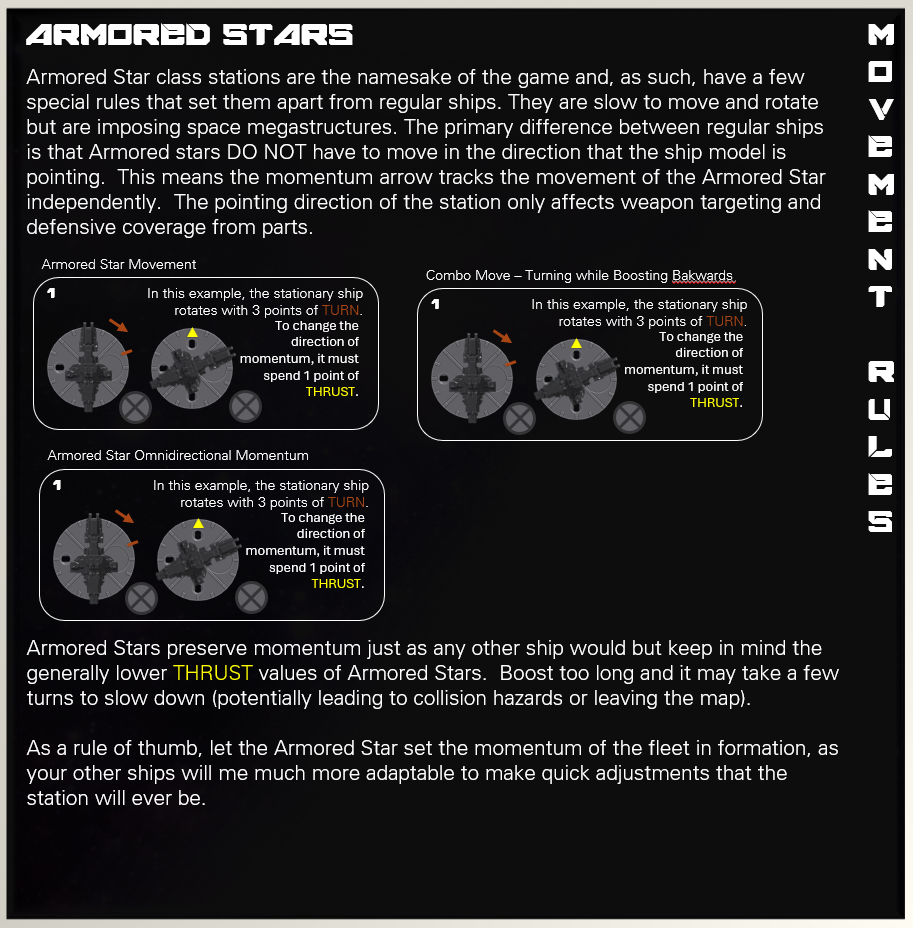
Armored Stars rely heavily on turreted weapons, meaning they do not need to rotate to face their targets. Some stations are designed around specialized weapon systems, making positioning and range crucial for effective combat. While Armored Stars lack mobility, upgrading their TURN speed can help compensate for fast-moving enemies that may otherwise be difficult to track.
RECAP:
|
Thrust will always move the ship in the direction it is pointing, and move the baseplate arrow first if needed |
|
After exceeding 3 Thrust points in a turn (accelerating), you may no longer attack (you may attack while drifting with momentum at any number) |
Thrust can be used alternating with rotation in any magnitude or order |
After Turning, 1 Thrust point must be used to reset the baseplates arrow to its new travelling direction |
A ship may spend Thrust points to cancel all momentum to remain in place with a +1 bonus to TRN while stationar |
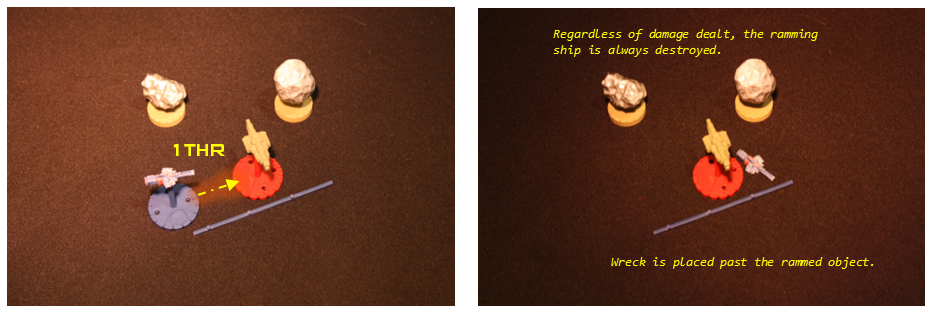
Thrust Ramming
Ramming is the most direct—and lethal—way to remove an obstacle in your path. A ship that performs a ram is always destroyed, regardless of its size or the target. The effect on the opposing ship or object is detailed in Collisions & Environmental Damage.
Ramming is a deliberate action and requires at least 1 point of THRUST to declare.
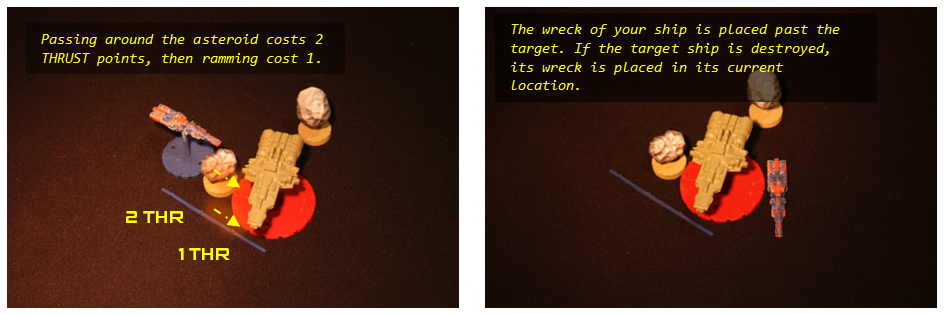
After resolving the ram, place the attacker’s ship just beyond the obstacle as wreckage, regardless of the outcome.
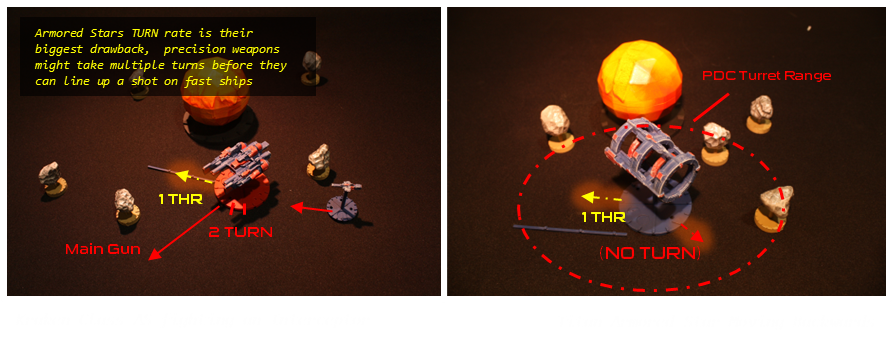
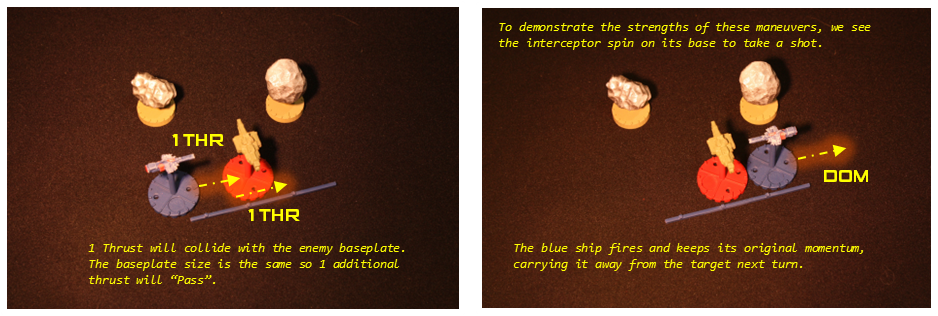
Collision Avoidance Maneuvers (Passing)
In the example above, it would have been far more beneficial to just evade the ship and spin around for an autocannon shot. To do a “Pass Through” maneuver, the ship must make contact as if colliding, then spend 1 additional THRUST point for each baseplate size above the ship moving to clear the baseplate. The ship is placed past the obstacle without triggering a collision.
A ship may only evade through another ship using THRUST if they are smaller than or equal to the baseplate size of the ship in the way.
(Example: An Armored Star cannot "evasively maneuver" around a corvette)
––––– IMPORTANT –––––
FORCED COLLISIONS
If a ship moves into another ship during its own turn and does not have enough THRUST to evade, the Defender chooses the outcome:
- Ram — Resolve collision damage and effects. (destroyed Attacker)
- Pass Through — The defending ship 'evades' and the moving ship continues its path as if it had enough THRUST to clear the contact.
This rule also applies to movement caused by MOMENTUM. Any time a moving ship has no remaining THRUST, the Defender decides whether the result is a ram or a pass-through.
This can give the Defender a free kill if they have enough HULL to survive the collision, so plan carefully to avoid leaving yourself vulnerable.
––––– IMPORTANT –––––
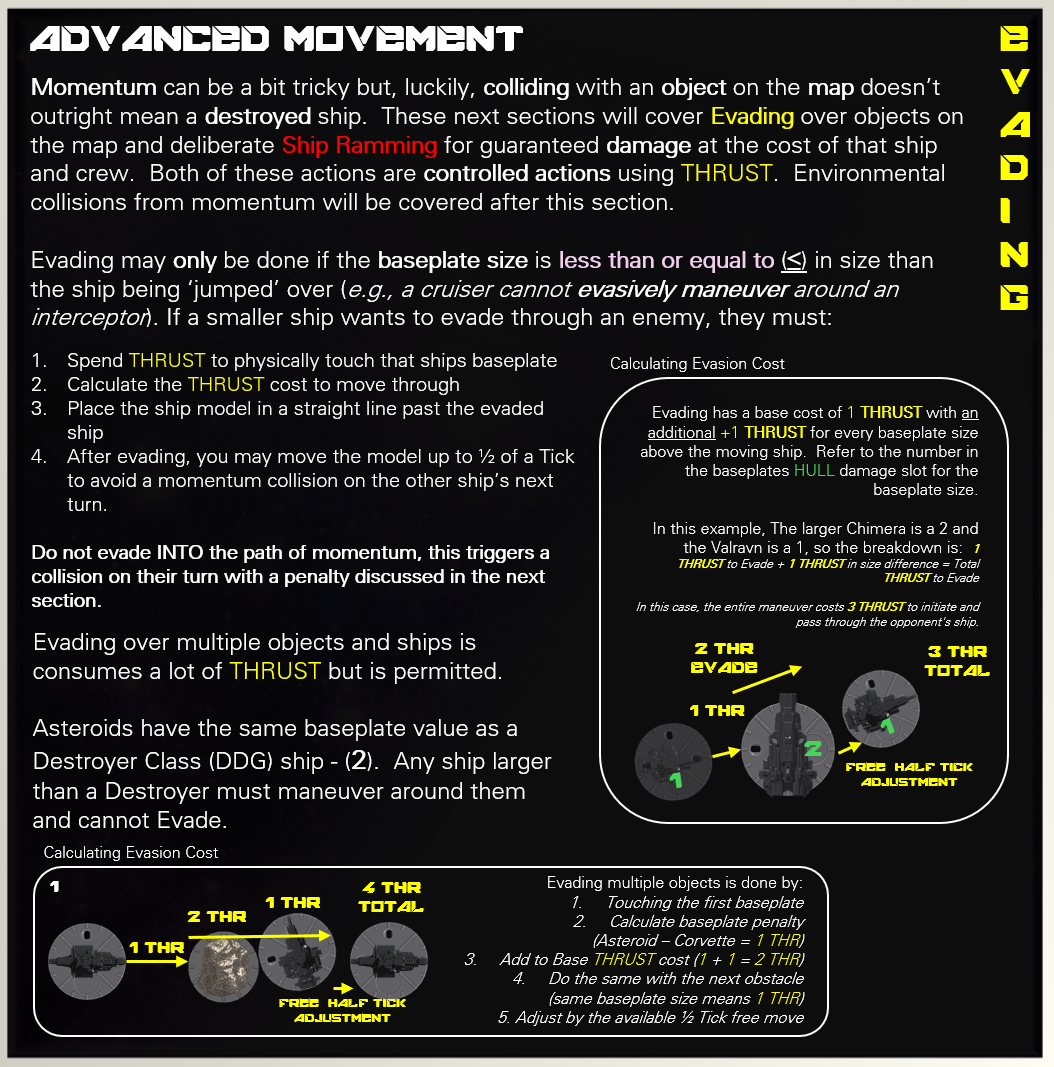
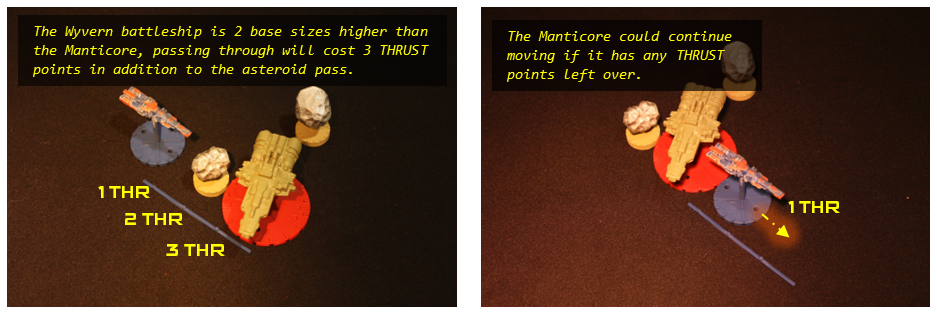
Not many ships have the THRUST required to “Pass” multiple times in one turn, but it is a valid move. The following examples cover evasion over long distances or multiple objects. (Which may be combined with asteroid fields or ships but NOT planets/stars)
Double Passes
Asteroids are the same as ships with respect to collisions. A very high-thrust ship such as the Manticore Destroyer (pictured below) can simply boost around multiple object at once.

Pass Ramming
If your goal is to ram another ship, you can still do so through an asteroid by passing directly to it. The baseplates only need to touch on the other side, therefore, you may still ram a ship if there is a slight gap between the obstacle and the ship you are ramming.
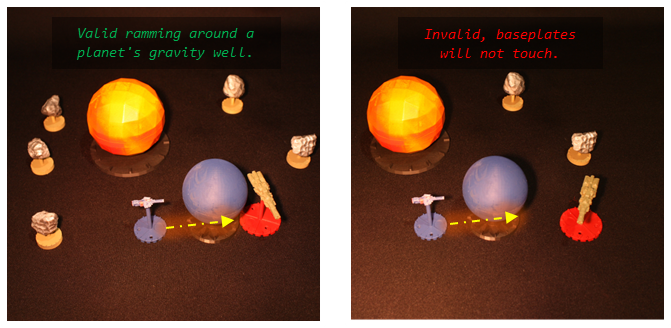
Evading Over Planets and Stars
Evading across the base of a planet or star is far more restrictive than evading across ships or asteroids. When a ship evades over a planet or star, it immediately loses all remaining THRUST for the turn to escape its gravity well.
A ram is still possible, but only if the intended target ends its movement close enough that the ramming ship’s baseplate would physically touch it after the evade. Unlike asteroids—where you can boost afterward to close the distance—planets and stars do not allow any follow-up movement. If the target isn’t already within base-to-base contact after the evade, the ram cannot be declared.
Cancelling Momentum (Remain Stationary)
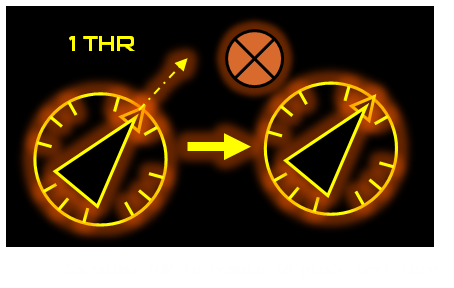

As stated previously, if you do not want your ship to drift forward 1 tick at the start of its next turn (like the ship shown to the left), you can nullify any momentum by spending 1 THR point, representing a decelerating thruster fire.
Any ship in a stationary state must be marked with an “X” token (or a flipped special weapon token) to indicate that it will not move at the start of its next turn.
Canceling momentum makes you more agile for precision shots and lets your ship turn around faster.
Advanced Thrust Maneuvers Summary
|
Ships must be smaller or equal to the class size of the other ship to evade. Larger ships must redirect or halt forward momentum to avoid collisions. Defenders choose if a ship without THRUST gets to pass through or ram |
|
The cost of evading goes up 1 THRUST point per class/Baseplate size above the ship that is evading. |
Environment pieces can be passed but at greater cost and risk of damage. (covered in Environment Hazards) |
Spend 1 THRUST to remain stationary and gain a +1 TRN Bonus. |
Projectile Movement (Weapon Tokens)
Most weapons do not use projectile tokens. If you fire a weapon within its Optimal Range, resolve the attack normally and do not place a token or track projectile movement.
Projectile tokens are only used for Precision Shots, which represent long-distance or highly aimed attacks that physically travel across the map. When a Precision Shot is declared, place a projectile token and follow the rules below.
Token Placement
When declaring a Precision Shot, measure a straight line from the edge of the firing ship’s baseplate in the weapon’s firing direction out to the weapon’s Precision Range in inches.
Place the projectile token so that the front tip of the token rests exactly at the end of that measured distance. This prevents any extra reach gained by placing the token first and then measuring. The projectile always travels in a straight line and cannot rotate or change direction once placed.
Movement Distance
As the projectile continues to move in later turns, move the projectile token straight forward from its current position. It moves a number of inches equal to its Range, which also functions as its per-turn momentum unless otherwise stated by the weapon.
Obstacles and Hazards
If the projectile’s line of travel intersects any obstacle such as planets, asteroids, planets, or debris fields before reaching a valid target, the projectile is removed from play. Colliding with a ship or special weapon will initiate an attack roll.
Ballistic Token
This token represents a salvo of slugs fired from a ballistic cannon, scattergun, or similar weapon. Ballistic projectiles travel in a straight path, continuing forward each turn at the range determined by the number on their targeting diagram. When fired as a precision shot, the token is placed at its maximum range and must move in increments of that value each turn, until it either collides with an object or is removed from play.
In the vastness of space, ballistic weapons are relatively slow. While they deal significant damage, they require careful planning or closing the distance with the target before firing. Otherwise, a defender can easily boost away, avoiding the attack with minimal effort. Even if you are unlikely to hit, ballistic weapons are useful for forcing the enemy to maneuver away or block the narrow gaps between environment objects like asteroid fields.

Energy Tokens
This token represents a burst of energy fired from an Energy Cannon, Particle Gun, or similar weapon. Energy projectiles travel in a straight path, advancing each turn at a greater range than ballistic weapons, as determined by the number on their targeting diagram. When fired as a precision shot, the token is placed at its maximum range and must move in increments of that value each turn, until it either collides with an object or is removed from play. While energy weapons offer superior speed and accuracy, they typically deal less damage than their ballistic counterparts.
Combat in Armored Stars is straightforward, as it is entirely handled by rolling varying amounts of six-sided dice (D6). There are many different weapons but all fall under one of two damage types: Ballistic and Energy.
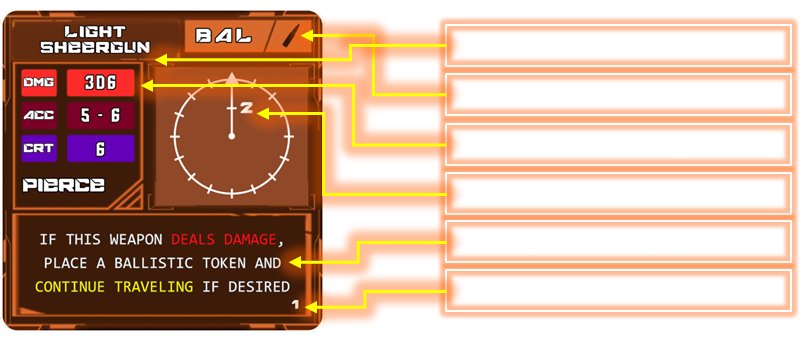
Reading a Weapon Card
1. Name of the Weapon - The name itself will reveal quite a bit about the weapon. For example, this part tells you it is a low-damage, forward precision weapon.
2. Weapon Type - Weapons type can make a huge difference in a fight. Shields, for example, don’t do much against ballistic weapons but can block energy weapons easily. Using the right weapon against the right ship can be the difference between destroying it in 3 turns or 6.
3. Weapon Stats
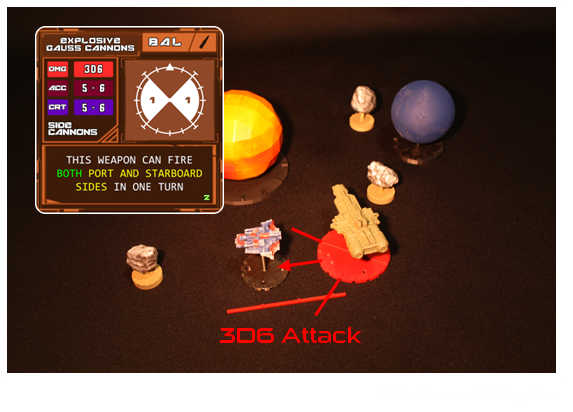
DAMAGE (DMG) - DMG is the total damage potential for a weapon in a single attack. The light railgun above has 3D6 therefore, if all dice are hits, the maximum damage you can deal is 3.
ACCURACY (ACC) - ACC represents the odds that one of the dice in the attack salvo will actually hit. For example, this railgun has a 5–6 ACC, which reflects a very difficult weapon to hit with. To hit with this weapon, a D6 must be a 5 or 6.
CRITICAL THRESHOLD (CRT) - CRT is like ACC in that it is a D6 threshold you need to reach with your roll. If you roll a Critical hit and the defender fails to block it, you will disable a section of the target ship. Critical damage is covered in a later section.
Ammo / Units (AMM / UNT) - AMM / UNT is a unique stat that appears on special weapon cards and auxiliary ships like interceptors. This tells you how many figures you have of each to place on the board. Cards with Ammo can be replenished from certain ships with resupply parts.
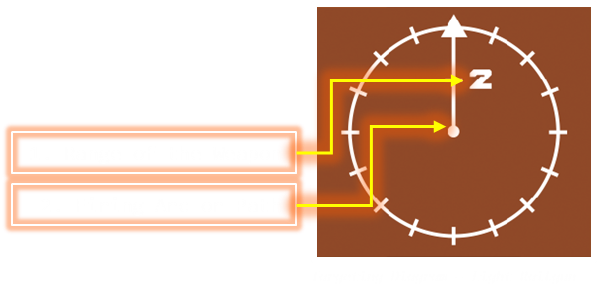
4. Targeting Diagram
Targeting diagrams indicate the range of your weapon and the firing arc within which you may attack (or, in this case, the straight line the projectile travels).
The light railgun targeting diagram can only fire in a straight line; however, different weapons offer a lot of diversity in the directions they can attack.
In the examples below:
The forward cannon can shoot within a 90-degree arc.
Side cannons fire in 90-degree arcs on either side.
The turret has a full 360-degree firing arc to all targets in a 3-tick Range.
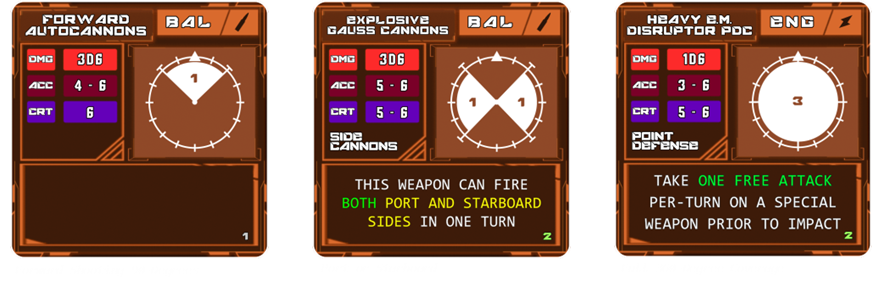
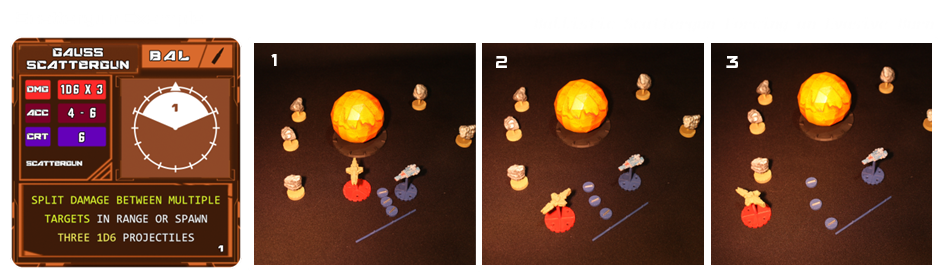
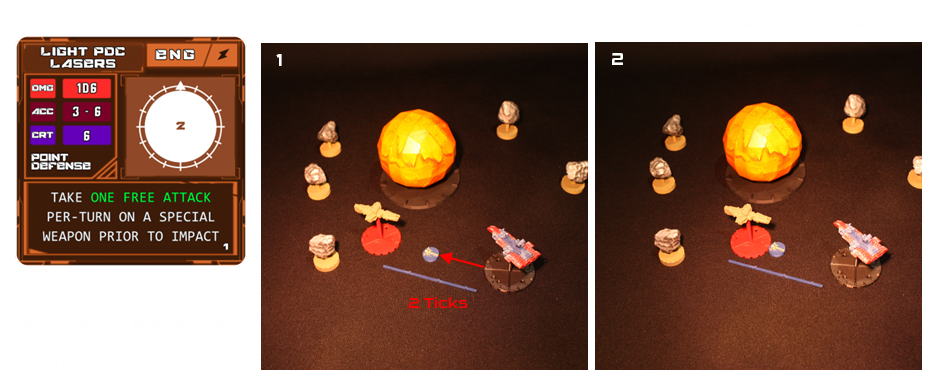
5. Special Ability - Special abilities vary greatly and are best referenced in the Weapons section of this Rulebook. Common Special abilities are piercing railgun slugs that continue past the target they hit or point defense cannons getting free attacks on incoming missiles prior to impact.
6. Cost / Level Cap - Cost is how much the part raises the total blueprint cost if you are adding it to the ship. Level cap is the highest cost a part can be to fit on the slot
Special Weapons / Auxiliary Ships
Special Weapons / Auxiliary Ships
These cards are similar to standard weapon cards but include a few additional stat boxes for ammo, unit count, and a targeting diagram (if the auxiliary ship or special weapon has its own weapons).
Missiles, Torpedoes, and Mines
Missiles are fast, lower damage, guided projectiles that must be launched by placing a token on the boards. Torpedoes are similar but travel slower for the tradeoff of high yield energy type warheads. Mines are the slowest but can devastate a ship that gets too close.
When deploying special weapons:
- They must wait a turn before moving
- All may be deployed up to 1 tick away
- They may be facing any direction but keep in mind they will have forward momentum (you can shoot yourself)
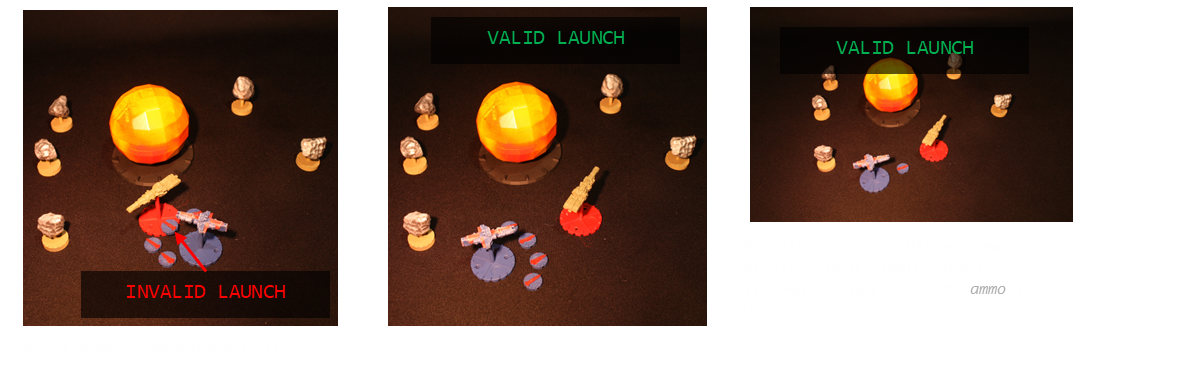
- They CANNOT be deployed directly onto enemy ships (unless special parts remove this "arming time")
- They can be placed in front of another ships path (they are considered “Armed” after you end your turn) for a guaranteed hit at the start of their turn
- There is no limit to how many you can deploy in one turn other than physical space on the table around your ship
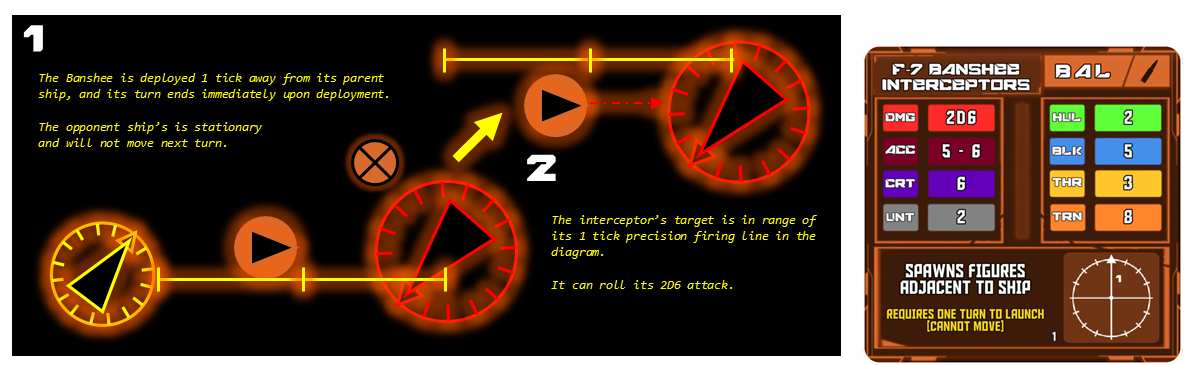
Auxiliary Ships
Auxiliary ships like interceptors, resupply ships, Gunships, ect. deploy the exact same way as special weapons with the exception that you do not want them to collide with the enemy as soon as possible...

Attacking
Standard Weapon Attacks
Attacking with a weapon card is done two separate ways.
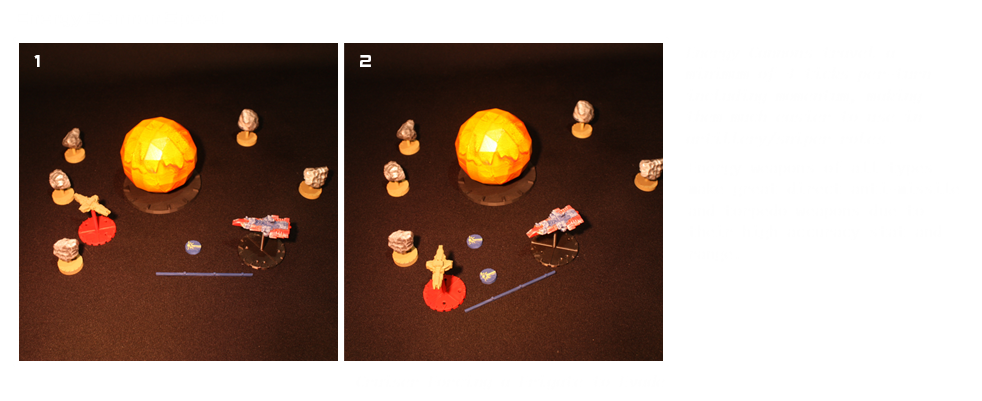
The first way is to make what is called a Direct Attack by attacking a target that is inside “optimal range” defined by the tick range of weapons the targeting diagram. This means you may immediately roll for the attack without placing anything on the board.
The second method is a bit more involved and is an Indirect Attack. Just because a target is out of range doesn’t mean you can't easily hit them. This method requires you to place a projectile token on the table that travels is the range number in ticks every turn so you can land predictive shots and “snipe” targets.
Below we have a theoretical ship equipped with the light railgun card, demonstrating both types of shots.
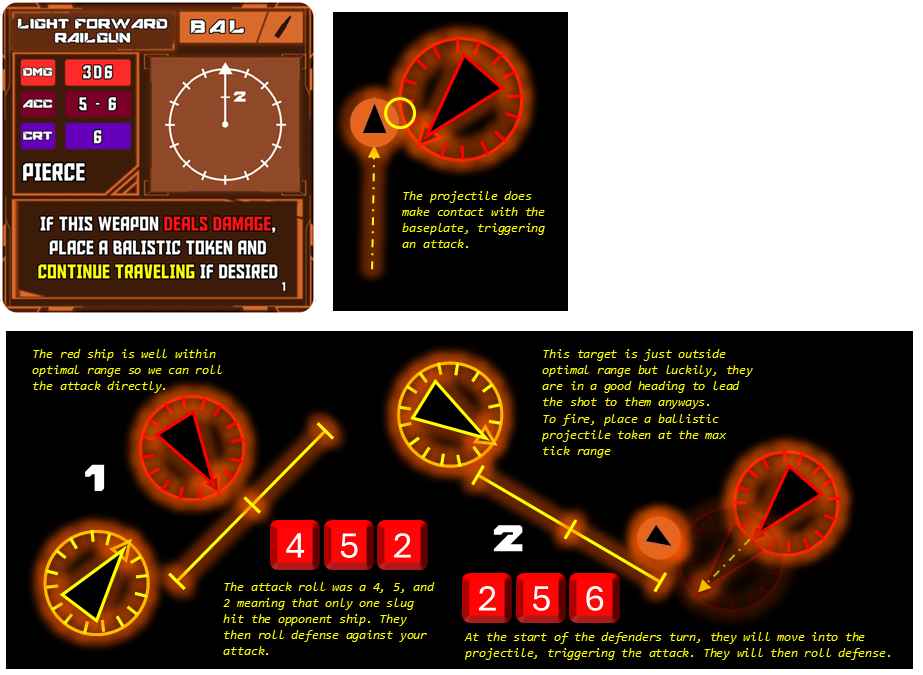
Standard Weapon Attack Summary
|
If you are in range, roll directly. If not, then place a token at max range. |
|
Projectiles travel their max range at the start of each turn, not just 1 tick. |
Energy weapons travel faster therefore have more ticks per turn. |
There is no set limit to the number of tokens that can exist on the board. |
If all players agree that a token will hit nothing, it may be removed. |
Much like long range attacks with standard weapons, missiles must travel physically to their target and collide to trigger the attack with the added bonus that they may course correct on the way. Direct attacks with missiles (placing the missile directly on a targets baseplate) are invalid. Special weapons can be devastating if the defender fails to intercept prior to impact. They are most notable by the following bonuses:
- Only Defensive Cards of the correct type may be used to block special weapons. Ships do NOT get to roll their Base Defense Die without special parts added on.
- Special weapons MAY Pass Through other figures if they have the THRUST to do so (unlike standard projectiles).
- Special Weapons do not suffer Critical Damage (covered later). Critical hits count as one addition HIT to the figure.
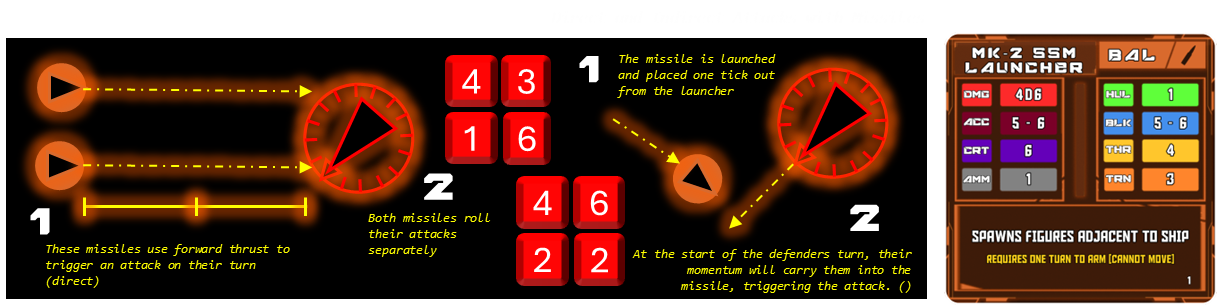
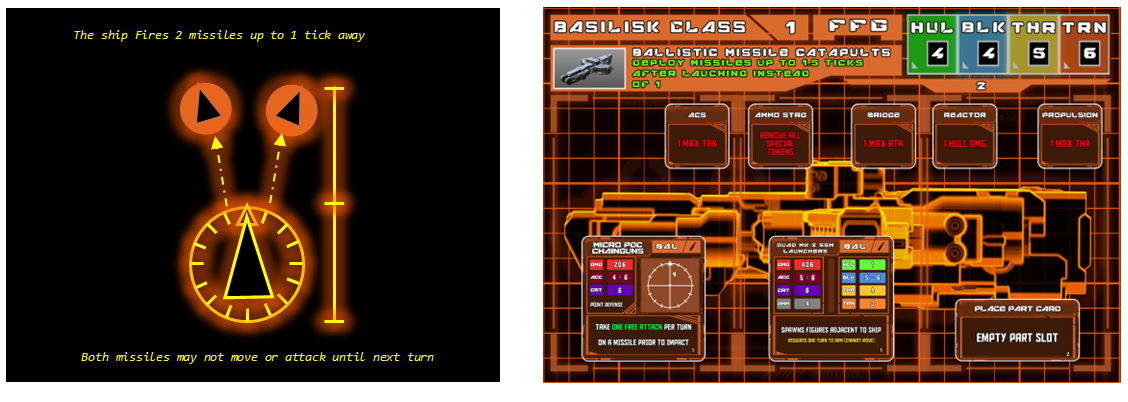
Special Weapon Launching
Missiles, Mines, and Torpedoes can be launched by default up to 1 Tick anywhere around the baseplate of the launching ship. The token for each projectile may be facing any direction. They will not move until their next turn but they do get 1 free momentum move at the start of the next turn in the direction they are facing.
As stated prior, no special weapons may be placed directly on top of enemies, but they CAN be placed directly in the path of enemies to trigger on their momentum move.
Special Weapon Launching
Tactically, missiles have a hard time catching up to targets with larger, more powerful propulsion systems.
The most effect way to directly use special weapons is to place them in the paths of target ships so the attack triggers on their turns momentum phase.

Auxiliary Ships (With Weapons)
Auxiliary ships are deployed from their parent ship in a manner similar to special weapon systems. However, interceptors and other auxiliary ships have their own weapons, making them highly effective at engaging enemy special weapons or keeping larger enemy ships at bay.
Once deployed, auxiliary ships must wait one turn like special weapons do before becoming active on the battlefield. They do also get the free momentum move forward on their next turn like special weapons do as well.
Special Weapon Attack Summary
|
Missiles, mines, and torpedoes cannot be launched directly onto a target. However, you can strategically place them in the path of momentum for easy hits. |
|
Special weapon tokens may be placed anywhere within 1 Tick of the launching ship. |
Any Special Weapon or Auxiliary Ship may face any direction upon deployment with momentum in that direction next turn. |
Special weapons negate an opponents’ base defense die. Defensive cards of the correct damage type may still roll defense. (base defense is covered in the next section) |
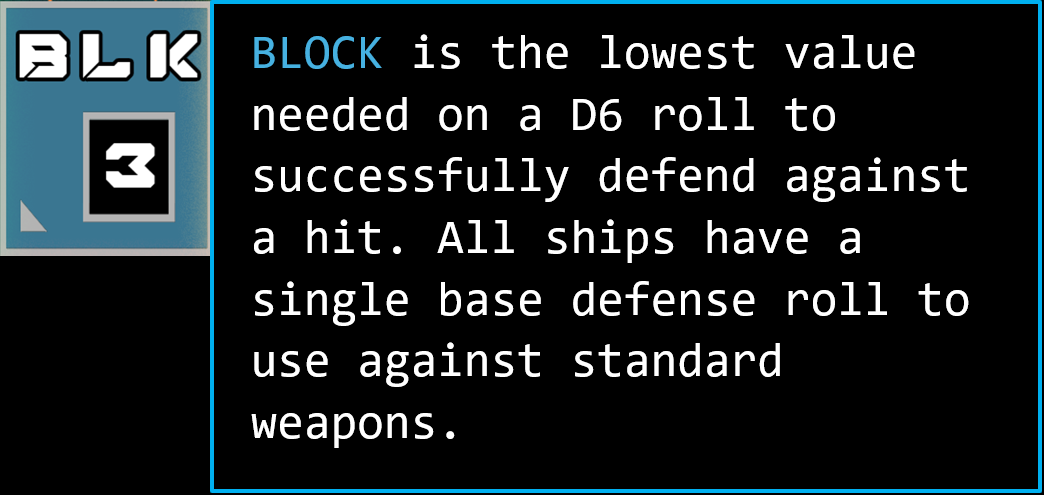
Basic Defense Die
All ships have a single Defense Die to roll even if your ship has no defensive cards like armor or shields. You will still be able to roll 1D6 to defend against standard weapons (but not special weapons, which is still better than nothing).
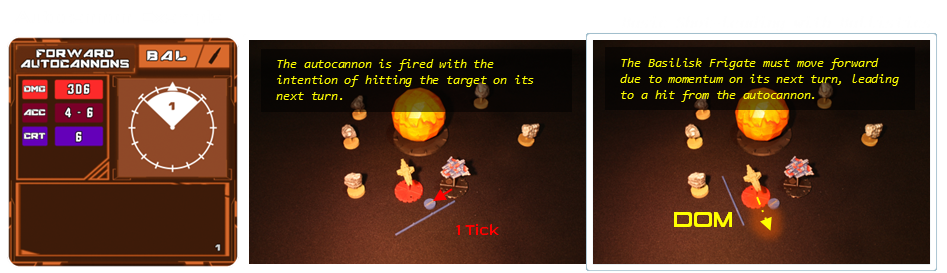
The below image is a good example of this. The Basilisk Frigate has no special armor or shields to help protect it, making it quite vulnerable. Despite not having any defensive parts, it has a Block (BLK) of 4.
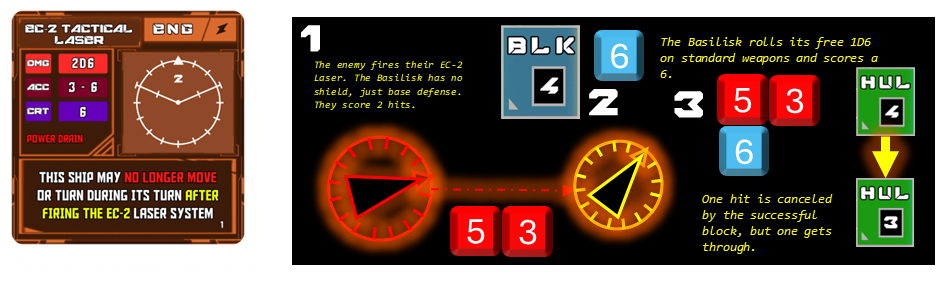
This means that the ship can roll 1D6 on any standard weapons and will block one hit if it rolls a 4 or higher.
Above is an example of a Sol League laser weapon attacking the Basilisk Frigate.
Defensive Parts - Shields and Armor
Having a Base Defense Die to roll is nice but it won’t do anything for you if you get hit by a missile, torpedo, or mine. In these cases, the only way to mitigate damage is with a specialized Shield or Armor card.
Defensive Part cards have the same exact structure as weapon cards with the exception that the names of the thresholds for rolling is different.
Just like weapon cards that use a targeting diagram to indicate where you can fire from, defensive cards use the shaded regions of the diagram to show you where you are protected.
Like weapon cards, defensive cards to sometimes offer full 360-degree coverage but they are usually either expensive or weaker than protection designed for a specific section.
|
All ships have a Base Defense Die for all standard weapon types. |
|
You may not roll Base Def against special weapons (Ammo Weapons) |
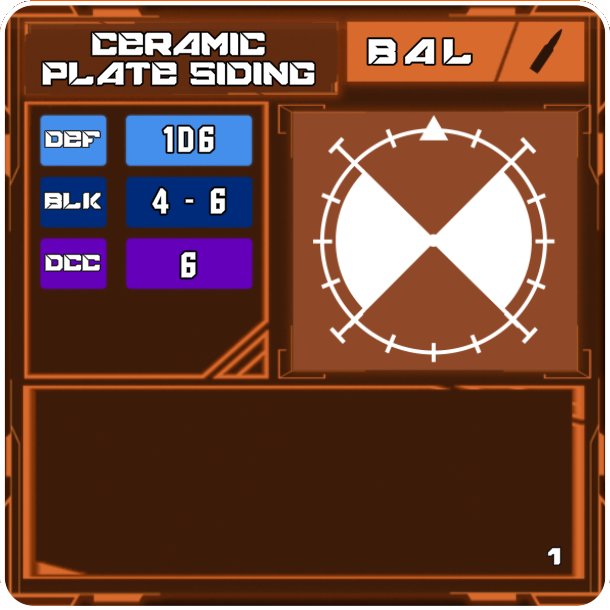
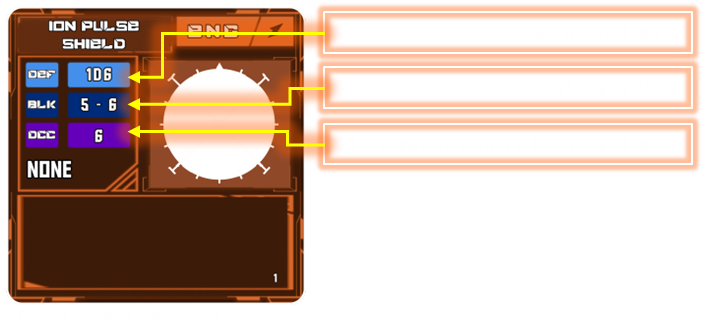
Defensive parts have stats that directly mirror that of Weapon cards.
DEFENSE (DEF) - Defense, like damage, is a maximum threshold. In this case it is the maximum number of hits you can negate.
BLOCK (BLK) - Block is the defensive card equivalent to Accuracy (ACC) and is the value you must roll for a block to succeed.
(5 – 6 is a rather weak shield in the case of the Ion Pulse Shield to the right)
DAMAGE CONTROL CHECK (DCC) - Just like weapons, Defense cards can also roll Criticals. This is the value needed to cancel the critical damage of an enemy’s attack. Even if the DCC value is low, 4 or 5 for example, that will still negate disabling of your ship's vital subsystems.
Note: Rolling a DCC success means you’ll block at least one hit, but you still take damage from any other successful hits, DCC just keeps your systems online.
Defensive Parts - Shields and Armor
While using a shield, you can still utilize your ship’s inherent base defense roll.
In the example below we can see both being used to defend against an energy cannon.
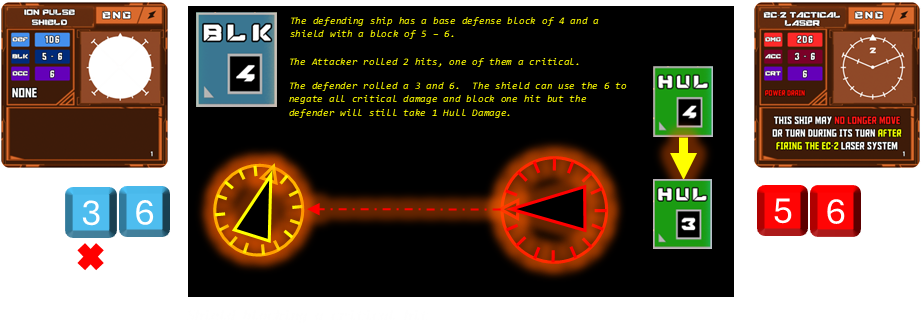
The next section covers the outcome when a defender fails to roll a 6 on their shield, allowing the critical hit to deal its full damage and effects.
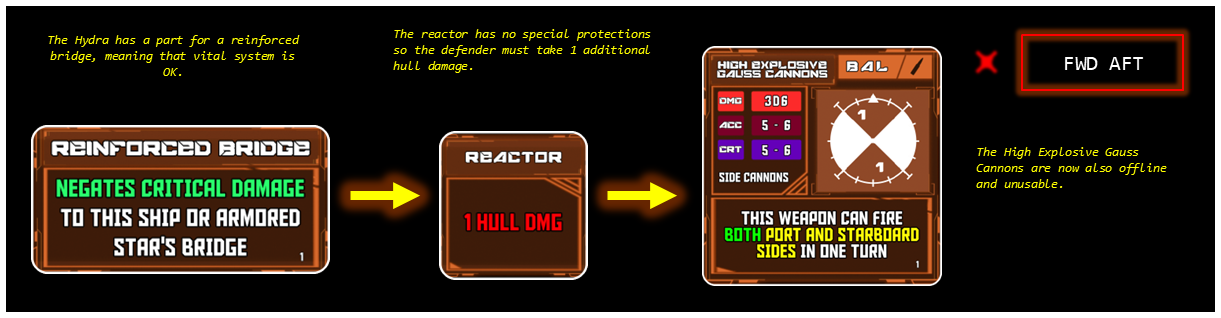
Critical Damage and Loss of Subsystems
All ships are divided into sections. Forward (FWD), Middle, (MID), and AFT. Cruisers, Capitol Ships, and Armored Stars are slightly different in that they have two Middle sections instead of one.
Critical Hits
Upon taking a critical hit, a peg is placed in the critical damage slot of the respective section that was targeted (shown in the Baseplate with Critical Image above). Once the peg is in place, the ship can no longer use any parts located in that section. Critical hits deal +1 hull damage to special weapons / Auxiliaries instead of disabling sections and parts.
If the ship has two middle sections, the attacker picks which one they are targeting prior to making their attack. If we assume that the AFT MID section of the above ship is critically damaged, the following would occur:
SECTION 3 - Ship Blueprints
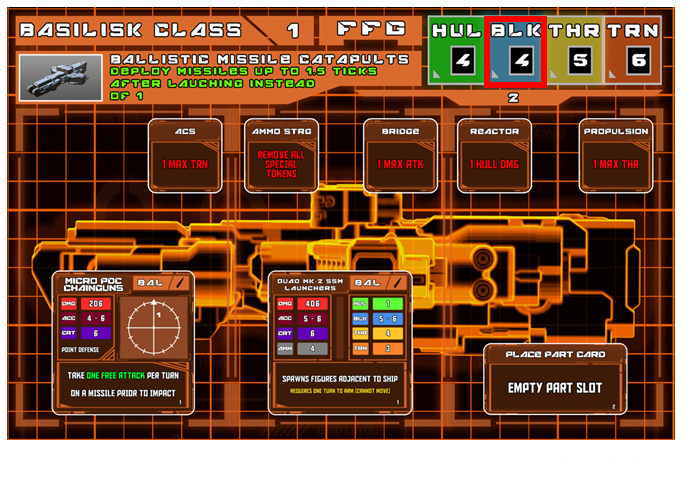
When editing a ship blueprint, keep these three rules in mind:
1. Part Cost Limit
A part’s cost cannot exceed the value shown in that ship’s corresponding part slot. If the slot says “3,” you cannot install a part costing more than 3.
2. Tile Size and Part Type
Utility Parts use the smaller tiles and add special abilities.
Weapons and Defenses use the larger square tiles.
3. Overwriting Parts
Any part can be overwritten by placing a new card directly on top of the existing stock part.
The ship’s cost is updated with whatever is shown on the new card.
This can increase or decrease the ship’s cost, but stock parts usually come at a discount, so overwriting them should be a deliberate choice.
Changing a part on a ship card updates the cost of every copy of that ship in your fleet. For example, upgrading a Valravn to cost 5 Credits each makes fielding multiple Valravns far more expensive than the stock loadout. Sometimes it’s worth the extra cost—just factor in the scaling price when drafting your fleet.
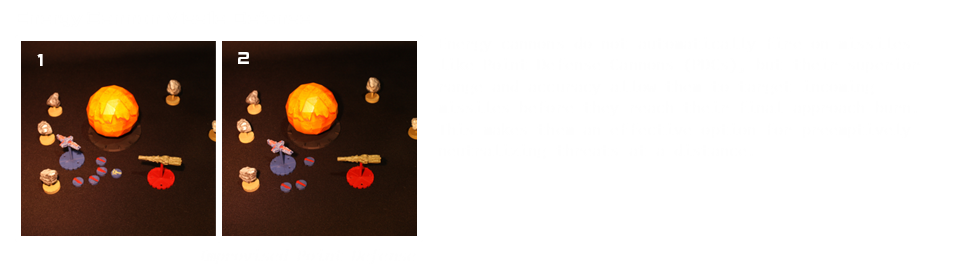
Below is an example of this process: converting a point-defense corvette into a ballistic missile attack corvette.
[IMG]
Ships also include critical subsystem parts (the small red text squares). Some upgrades can interact with or protect these systems, but the subsystem squares themselves cannot be removed, replaced, or covered.
Refer to the game files for printable part sheets and print several copies if you want to use the same part in multiple ship builds. A 3D-printed card frame also helps keep part tiles in place during gameplay and keeps your builds organized.
SECTION 3 - Environment / Map
Skirmish Matches
Skirmish games refer to small, fast-paced battles played on a 3' × 3' play area.
In a standard competitive match, each player selects a corner of the map as their starting position. However, in conquest matches and scenario-based games, the defender may instead begin at the center of the map.
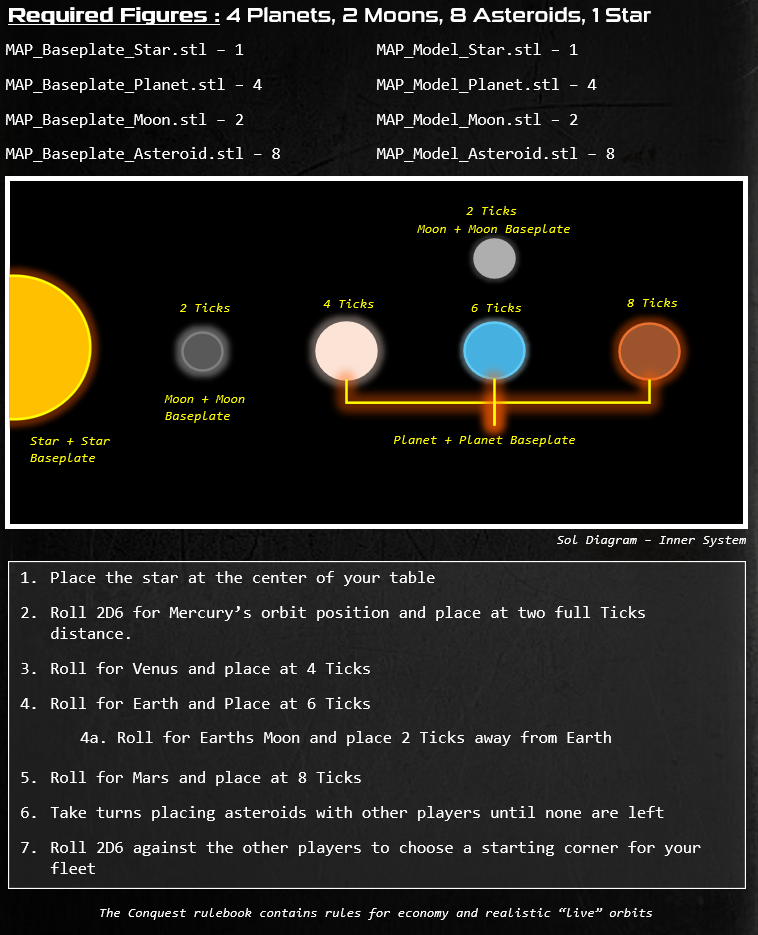
Most matches take place on a Solar System map, featuring a central star and various celestial bodies—such as planets, moons, and asteroids—scattered in orbital positions.
For players seeking a more advanced or realistic experience, optional rules allow for turn-by-turn orbital movement of these celestial bodies. However, in standard skirmish matches, all map elements remain stationary for the duration of the battle.
At the end of this section, you’ll find profiles for each base game star system, which you can follow when creating your maps.
3D Printing Checklist
For your first few games, we recommend starting with the Sol Inner Star System, found in the SYSTEMS section. This system offers a balanced layout and pairs well with the early Scenario Battles.
To build this map, print or acquire the following components:
-
1 Medium Star
- MAP_Star_Mid.stl
- Baseplate: MAP_Baseplate_Mid_Star.stl
-
2 Moons
- MAP_Moon.stl ×2
- Baseplates: MAP_Baseplate_Moon.stl ×2
-
3 Planets
- MAP_Planet.stl ×3
- Baseplates: MAP_Baseplate_Planet.stl ×3
-
8 Asteroids
- MAP_Asteroid_X.stl ×8 (X = version number; multiple asteroid variants available, all functionally identical)
- Baseplates: MAP_Baseplate_Asteroid.stl ×8
Note: Printing all components may take several hours. Investing in higher-quality prints ensures these parts remain compatible with future, more complex star systems.
Each star system in the rulebook includes a breakdown of required components along with STL references. All players must print or obtain these components before play begins.
Determining Placement
Every battle takes place within a unique star system, each with its own blueprint for setup. While the structure remains consistent, the battlefield will differ each time—planetary orbits and asteroid locations vary with each deployment.
Placing Planets and Moons
Planets and moons are placed according to fixed orbital distances listed in their system profiles. These positions cannot be changed unless modified by scenario rules.
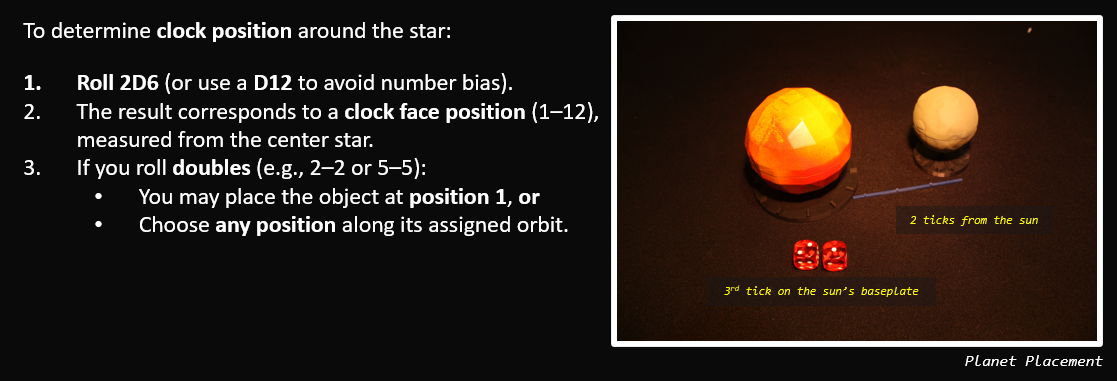
Placing Asteroids
Asteroids are placed alternately by each player, one at a time, until all are deployed. These are not bound by fixed orbits.
Strategic asteroid placement is a key part of early-game decision-making:
- Block enemy lanes of travel
- Create chokepoints
- Break up line-of-sight for ranged units
Tip: Even minor shifts in asteroid layout can dramatically affect tactics and fleet movement—plan your placements carefully.
SECTION 4 - Star Systems